AnyPortrait > Manual > Writing Command Buffer
Writing Command Buffer
1.4.0
Rendering is done automatically by the Unity engine, but you can also extend its functionality by writing scripts.
One of the many ways to do this is to use "Command Buffer".
In a nutshell, Command Buffer is "scheduling a request to render the target mesh to specified conditions".
You can check the detailed explanation in the official Unity manual.
- Extending the Built-in Render Pipeline with CommandBuffers
- Scheduling and executing rendering commands in the Scriptable Render Pipeline
- CommandBuffer API
- CameraEvent API
If you use Unity's "CommandBuffer" class, AnyPortrait's character can be rendered through the command buffer, but it is difficult to implement because there is a lot of data that is difficult for users to access.
The "apCustomCommandBuffer" class added in AnyPortrait v1.4.0 is the version for AnyPortrait of the "CommandBuffer" class.
You can easily implement various techniques using this class.
This page covers how to write scripts using apCustomCommandBuffer and implement some fun techniques.
A detailed description of the functions of the apCustomCommandBuffer class can be found in the Related Page.
Draw a character to another camera with the Command Buffer

Before we get started, let's briefly understand how the command buffer is passed.
When a script creates a command buffer and passes it to Unity's rendering pipeline, additional rendering is executed according to the request of the reserved command buffer when the rendering pipeline is running.
The required elements that need to be passed here are "Mesh to be drawn" and "Camera to draw".
With this in mind, let's implement it.
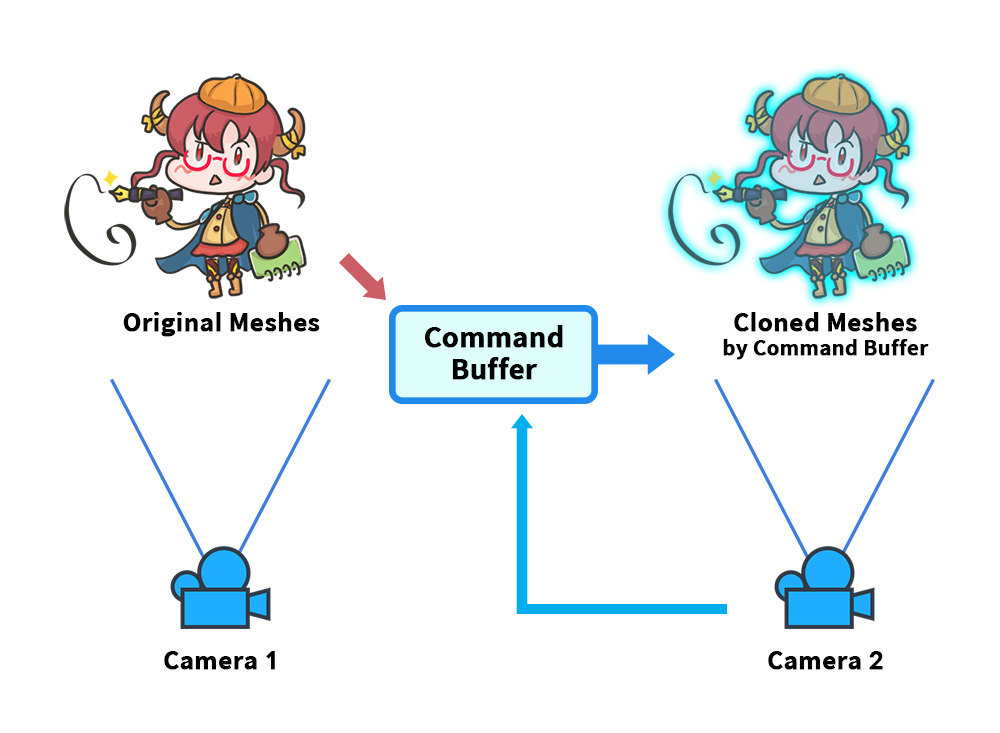
Let's make the simplest example using the command buffer.
Prepares the environment for "the main camera (Camera 1)" to render the character's original meshes.
And let's make "the character (Cloned Meshes)" visible by the command buffer in "another camera (Camera 2)".
Let's remember "Original Meshes" and "Camera 2" as the necessary elements to create the command buffer.
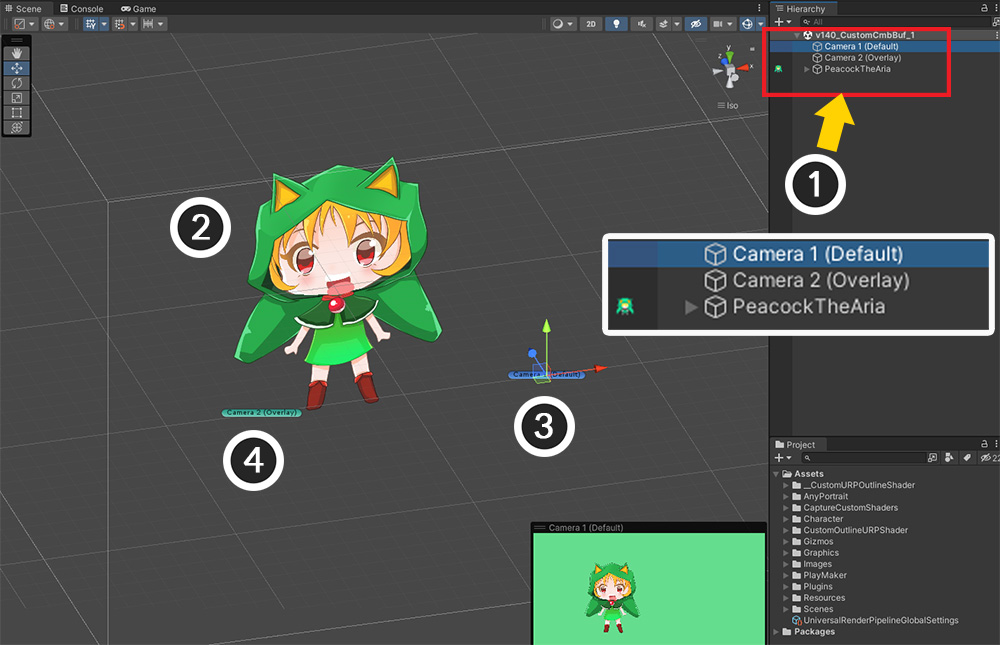
We've set up the Unity scene to fit your description.
(1) You can see that there are 2 cameras and 1 AnyPortrait character.
(2) This is the AnyPortrait character (apPortrait).
(3) This is the main camera for drawing characters. It plays the same role as “Camera 1” in the previous diagram.
(4) This is an overlay camera that renders additionally when the main camera finishes rendering. It acts the same as "Camera 2" in the previous diagram.
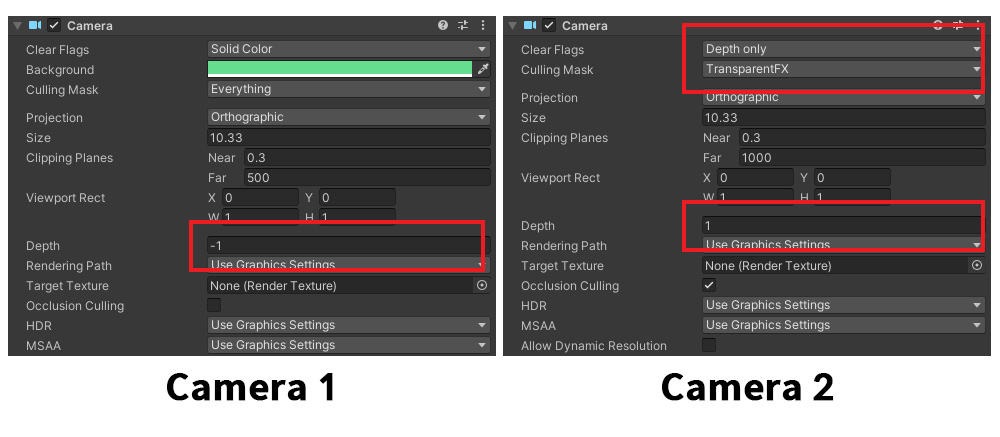
These are the settings for each camera.
Camera 1 is set to render first as the main camera.
Camera 2 is rendered later than Camera 1 by the "Depth" value, and the character is not rendered by the "Culling Mask".
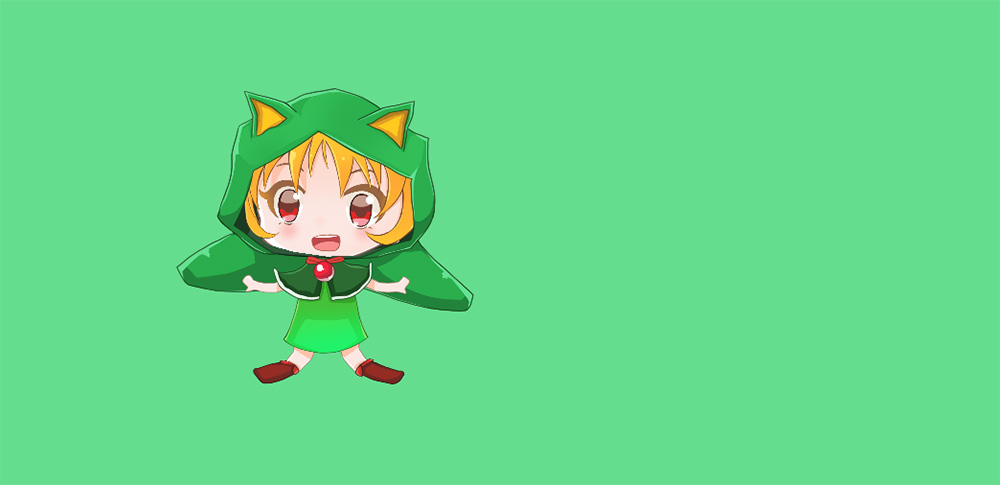
So if you run the game, the character will only be drawn on the main camera.
Now let's write a simple script that creates and updates the command buffer.
The following script does a very simple job of making the "input apPortrait character" draw on the "input camera".
using UnityEngine;
using AnyPortrait;
public class CmdBufferExample : MonoBehaviour
{
// Target objects
public apPortrait portrait;
public Camera targetCamera;
// Command Buffer for apPortrait
private apCustomCommandBuffer _commandBuffer = null;
void Start()
{
// Create a command buffer.
if (_commandBuffer == null)
{
// If apPortrait is not initialized, initialize it directly here.
portrait.Initialize();
// Create a command buffer instance using apPortrait and camera.
_commandBuffer = new apCustomCommandBuffer(targetCamera, portrait, "Custom Command Buffer");
// Register the command buffer in the camera by setting the rendering point. (functions for the built-in render pipeline)
_commandBuffer.AddToCamera(UnityEngine.Rendering.CameraEvent.AfterForwardAlpha);
}
}
void OnDestroy()
{
// Remove the command buffer.
if (_commandBuffer != null)
{
_commandBuffer.Destory();
_commandBuffer = null;
}
}
void LateUpdate()
{
// Each update refreshes the buffer content again.
if (_commandBuffer != null)
{
// Clear the contents of the command buffer and start to rewrite it.
_commandBuffer.ClearCommands();
// Puts the camera's Matrix into the command buffer. (Functions that must be called in Unity 2019 and later)
_commandBuffer.SetViewMatrix();
_commandBuffer.SetProjectionMatrix();
// Request to render meshes of apPortrait.
_commandBuffer.DrawAllMeshes(true, true);
}
}
}
Let's take a look at the key statements of the script one by one.
// (1) Target objects
public apPortrait portrait;
public Camera targetCamera;
// (2) Command Buffer for apPortrait
private apCustomCommandBuffer _commandBuffer = null;
These are member objects.
(1) Make apPortrait and Camera variables, which are essential elements of the command buffer, so that can be connected from the Unity scene.
(2) Create the command buffer variable as apCustomCommandBuffer type.
// (1) If apPortrait is not initialized, initialize it directly here.
portrait.Initialize();
// (2) Create a command buffer instance using apPortrait and camera.
_commandBuffer = new apCustomCommandBuffer(targetCamera, portrait, "Custom Command Buffer");
// (3) Register the command buffer in the camera by setting the rendering point. (functions for the built-in render pipeline)
_commandBuffer.AddToCamera(UnityEngine.Rendering.CameraEvent.AfterForwardAlpha);
This code work for that creates a command buffer and registers it with the render pipeline.
(1) In the example, apPortrait may not be initialized because initialization is written in the Start function, so we wrote initialization code. It is not required code.
(2) When creating a command buffer instance, input the Camera and apPortrait as arguments, and additionally input the command buffer's name.
(3) Register the command buffer in the rendering pipeline using the "AddToCamera" function.
At this time, it sets when the request of the command buffer will be processed during the rendering process.
If the project uses "Scriptable Render Pipeline (SRP)" environment, you should use "AddToCameraSRP" instead.
_commandBuffer.Destory();
If any of the command buffer elements "character", "camera" and "this script that manages the command buffer" do not exist in the scene, the above code must be called to remove the command buffer from the rendering pipeline.
// (1) Clear the contents of the command buffer and start to rewrite it.
_commandBuffer.ClearCommands();
// (2) Puts the camera's Matrix into the command buffer. (Functions that must be called in Unity 2019 and later)
_commandBuffer.SetViewMatrix();
_commandBuffer.SetProjectionMatrix();
// (3) Request to render meshes of apPortrait.
_commandBuffer.DrawAllMeshes(true, true);
If any elements of the command buffer are changed, the contents of the command buffer must be rewritten.
Since AnyPortrait updates the mesh every frame, you need to rewrite the contents of the command buffer in the Update or LateUpdate function.
(1) To write the contents of the command buffer, the contents of the existing buffer must be cleared.
(2) Input the rendering View-Projection Matrix into the command buffer. This function is not supported in versions earlier than Unity 2019.
(3) Input which meshes to render in the command buffer in apPortrait. "DrawAllMeshes" asks to render all currently visible meshes if possible.
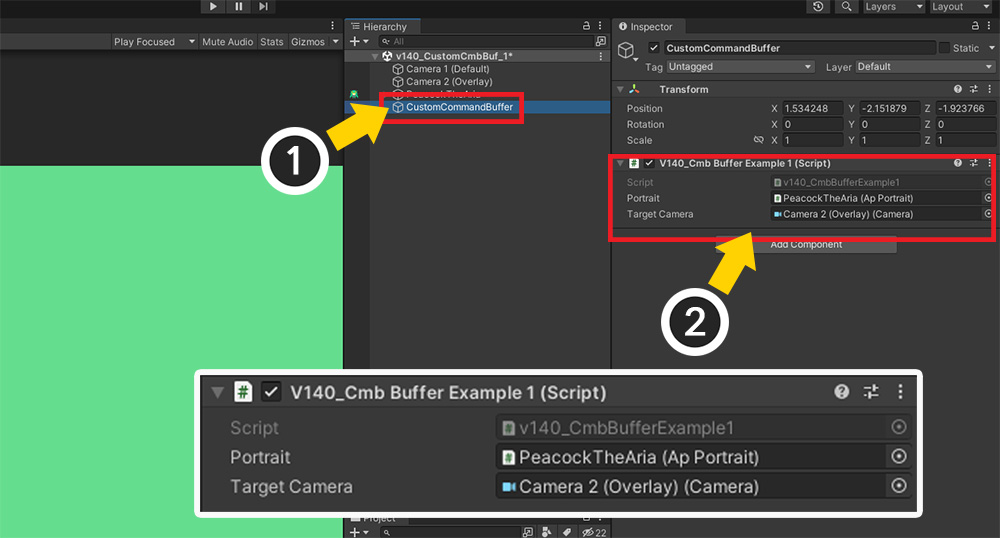
Let's put the script we wrote into our Unity scene.
(1) Create a new GameObject.
(2) Register the created script as a component, and input "apPortrait character" and "Overlay camera (Camera 2)" respectively.
If you run the game again, you should see the character being drawn on the second camera by the command buffer now.
The clipped mesh doesn't render!
AnyPortrait uses a command buffer to create a mask texture when rendering a clipping mesh.
When rendered by a user-created command buffer, there is a high probability that the corresponding mask texture will not be created properly.
Therefore, it is recommended to exclude the clipped mesh from rendering by the command buffer as possible because it is not compatible.
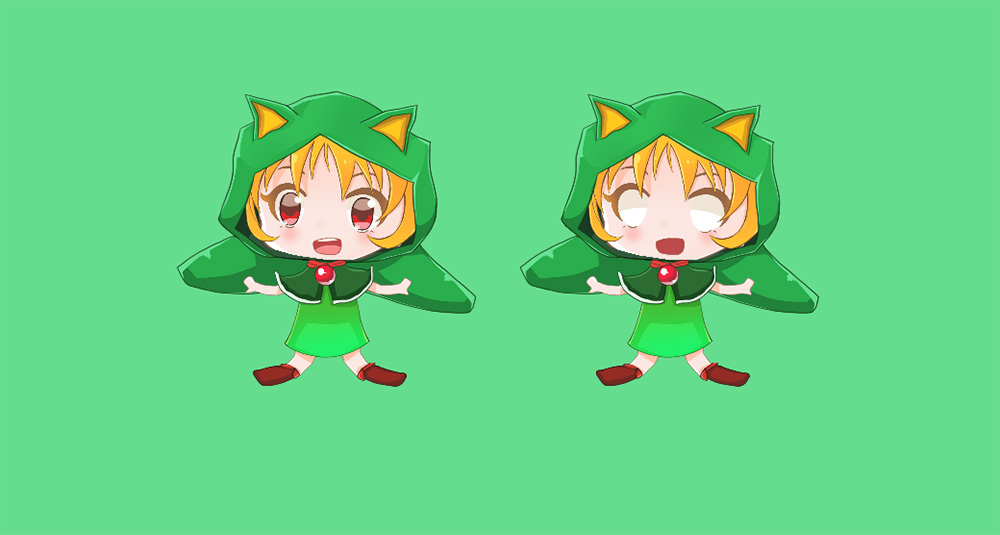
Even small changes to the code that writes the contents of the command buffer can make a huge difference to the rendering result.
As an experiment, let's add a line of code like this:
(Skipped)
void LateUpdate()
{
if (_commandBuffer != null)
{
_commandBuffer.ClearCommands();
// Initializes the color or depth value of the render target.
_commandBuffer.ClearRenderTarget(true, true, Color.magenta);
_commandBuffer.SetViewMatrix();
_commandBuffer.SetProjectionMatrix();
_commandBuffer.DrawAllMeshes(true, true);
}
}
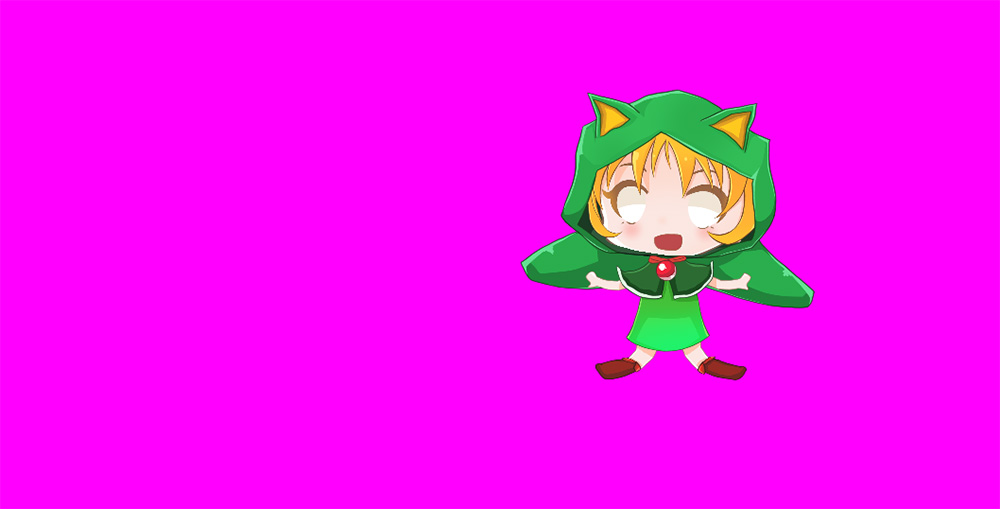
In Overlay Camera (Camera 2), just before the character is rendered by the command buffer, the rendering target, that is, the screen color, was initialized to magenta, so you can see the above result.
Rendering the character in Grayscale
The use of command buffers is primarily for creating special rendering effects.
To create a rendering effect, a separate material must be available in the command buffer.
This time, let's implement the command buffer to render the character in grayscale.
This time, we need to write a Custom Shader that renders the character in a solid color and the Command Buffer Script described above.
First, write the following Custom Shader.
Shader "Custom Command Buffer Example/Grayscale"
{
Properties
{
_MainTex("Main Texture (RGBA)", 2D) = "white" {}
_Color("2X Color (RGBA Mul)", Color) = (0.5, 0.5, 0.5, 1.0)
}
SubShader
{
Tags { "RenderType" = "Transparent" "Queue" = "Transparent" "PreviewType" = "Plane" }
Blend SrcAlpha OneMinusSrcAlpha
ZWrite Off
LOD 200
Pass
{
CGPROGRAM
#pragma vertex vert
#pragma fragment frag
#include "UnityCG.cginc"
struct appdata
{
float4 vertex : POSITION;
float2 uv : TEXCOORD0;
};
struct v2f
{
float2 uv : TEXCOORD0;
float4 vertex : SV_POSITION;
};
sampler2D _MainTex;
float4 _MainTex_ST;
half4 _Color;
v2f vert (appdata v)
{
v2f o;
o.vertex = UnityObjectToClipPos(v.vertex);
o.uv = TRANSFORM_TEX(v.uv, _MainTex);
return o;
}
fixed4 frag (v2f i) : SV_Target
{
fixed4 col = tex2D(_MainTex, i.uv);
col.rgb *= _Color.rgb * 2.0f;
col.a *= _Color.a;
// It uses the average value of RGB colors to make it a single color.
col.rgb = (col.r + col.g + col.b) / 3.0f;
return col;
}
ENDCG
}
}
}
Modify or create a new command buffer script as described above.
This time we need to take the external material and write it to be used for rendering.
using UnityEngine;
using AnyPortrait;
public class CmdBufferExample : MonoBehaviour
{
public apPortrait portrait;
public Camera targetCamera;
// Add a variable so that you can apply a separate material.
public Material alternativeMaterial;
private apCustomCommandBuffer _commandBuffer = null;
void Start()
{
if (_commandBuffer == null)
{
portrait.Initialize();
_commandBuffer = new apCustomCommandBuffer(targetCamera, portrait, "Custom Command Buffer");
_commandBuffer.AddToCamera(UnityEngine.Rendering.CameraEvent.AfterForwardAlpha);
// Calls a function that inputs and copies the material in the command buffer variable so that a separate material is rendered.
_commandBuffer.CreateAlternativeMaterials(alternativeMaterial);
}
}
void OnDestroy()
{
if (_commandBuffer != null)
{
_commandBuffer.Destory();
_commandBuffer = null;
}
}
void LateUpdate()
{
if (_commandBuffer != null)
{
_commandBuffer.ClearCommands();
_commandBuffer.SetViewMatrix();
_commandBuffer.SetProjectionMatrix();
// Request to render meshes using the external material registered during initialization.
_commandBuffer.DrawAllMeshesWithAlternativeMaterials(true, true);
}
}
}
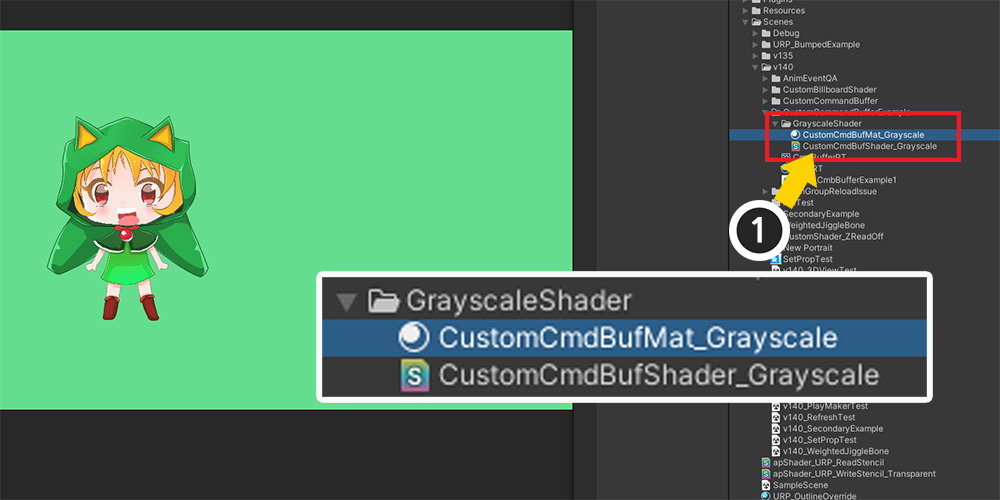
(1) Create a Material asset using the completed Custom Shader.
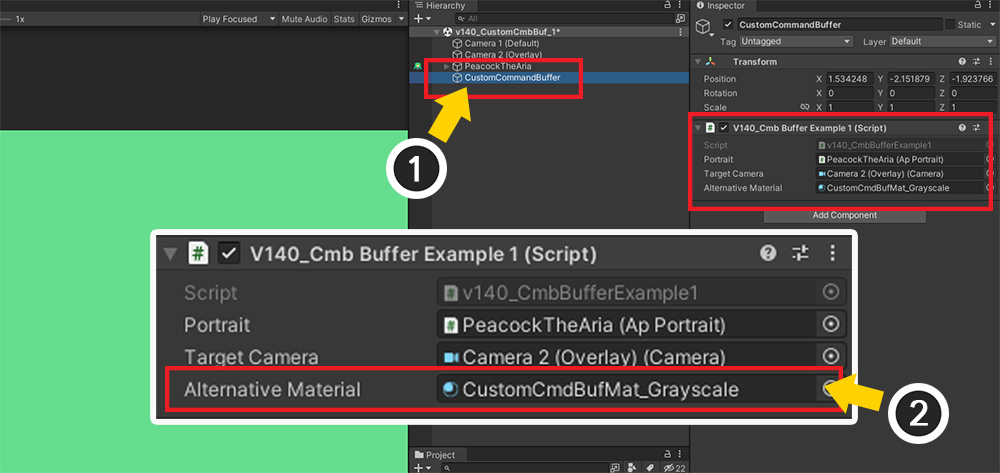
(1) Select the GameObject created earlier.
(2) Assign Material asset using the custom shader to the added variable of the script.
This is the finished result.
When rendering by the command buffer, you can see that the rendering is replaced by a different material.
By applying this method, you will be able to use various rendering techniques.
Rendering the character with the Outline
By utilizing the above explanations a little more, you can make a practical example.
A typical technique is "Outline".
In this example, you can implement it easily by using a simple custom shader that draws an outline using UV.
Additionally, when creating a command buffer, you need to change the rendering point.
Finally, unlike the previous example, this technique will make the command buffer run against the Main Camera.
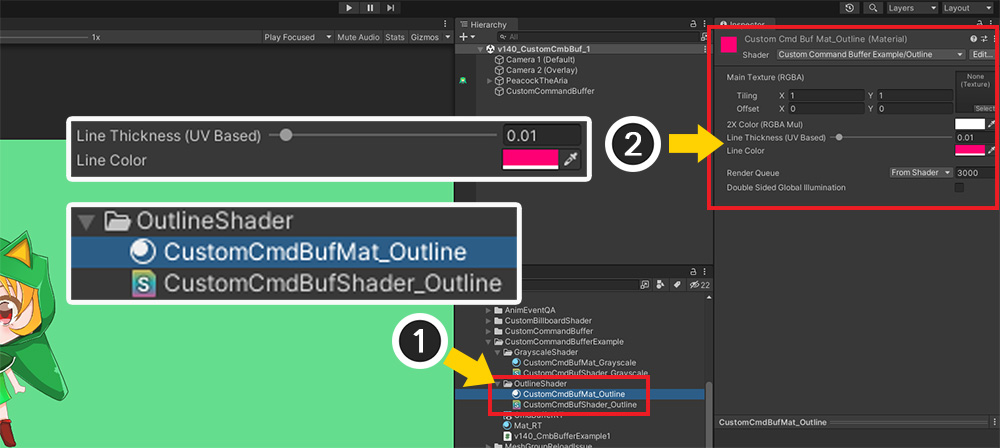
Write a custom shader that draws the outline.
There are various ways to draw the outline, but here we will simply use the method of expanding the color using the Alpha value from the surrounding UV as a reference.
Create a new shader asset and write it like this:
Shader "Custom Command Buffer Example/Outline"
{
Properties
{
_MainTex("Main Texture (RGBA)", 2D) = "white" {}
_Color("2X Color (RGBA Mul)", Color) = (0.5, 0.5, 0.5, 1.0)
// You can set the thickness of the outline using the distance at which the UV is sampled.
_UVThickness("Line Thickness (UV Based)", Range(0, 0.2)) = 0.01
// The color of the outline.
_LineColor("Line Color", Color) = (0, 0, 0, 1)
}
SubShader
{
Tags { "RenderType" = "Transparent" "Queue" = "Transparent" "PreviewType" = "Plane" }
Blend SrcAlpha OneMinusSrcAlpha
ZWrite Off
LOD 200
Pass
{
CGPROGRAM
#pragma vertex vert
#pragma fragment frag
#include "UnityCG.cginc"
struct appdata
{
float4 vertex : POSITION;
float2 uv : TEXCOORD0;
};
struct v2f
{
float2 uv : TEXCOORD0;
float4 vertex : SV_POSITION;
};
sampler2D _MainTex;
float4 _MainTex_ST;
half4 _Color;
float _UVThickness;
half4 _LineColor;
v2f vert(appdata v)
{
v2f o;
o.vertex = UnityObjectToClipPos(v.vertex);
o.uv = TRANSFORM_TEX(v.uv, _MainTex);
return o;
}
fixed4 frag(v2f i) : SV_Target
{
fixed4 col = tex2D(_MainTex, i.uv);
// Accumulate Alpha values by sampling the surroundings.
fixed sumAlpha = col.a;
sumAlpha += tex2D(_MainTex, i.uv + float2(_UVThickness, 0.0f)).a;
sumAlpha += tex2D(_MainTex, i.uv + float2(-_UVThickness, 0.0f)).a;
sumAlpha += tex2D(_MainTex, i.uv + float2(0.0f, _UVThickness)).a;
sumAlpha += tex2D(_MainTex, i.uv + float2(0.0f, -_UVThickness)).a;
sumAlpha += tex2D(_MainTex, i.uv + float2(_UVThickness * 0.7f, _UVThickness * 0.7f)).a;
sumAlpha += tex2D(_MainTex, i.uv + float2(_UVThickness * 0.7f, -_UVThickness * 0.7f)).a;
sumAlpha += tex2D(_MainTex, i.uv + float2(-_UVThickness * 0.7f, _UVThickness * 0.7f)).a;
sumAlpha += tex2D(_MainTex, i.uv + float2(-_UVThickness * 0.7f, -_UVThickness * 0.7f)).a;
// Calculates the transparency and color of the outline and reflects it in the result.
sumAlpha = saturate(sumAlpha);
col.rgb = _LineColor;
col.a = _LineColor.a * _Color.a * sumAlpha;
return col;
}
ENDCG
}
}
}
Next, write the command buffer script.
It can be written almost identically to the code in the previous example, but the rendering point needs to be changed.
The custom shader we wrote has code that extends the character image a bit more and draws it in a solid color, so it needs to be "drawn before the character" for it to act as an outline.
using UnityEngine;
using AnyPortrait;
public class CmdBufferExample : MonoBehaviour
{
public apPortrait portrait;
public Camera targetCamera;
public Material alternativeMaterial;
private apCustomCommandBuffer _commandBuffer = null;
void Start()
{
if (_commandBuffer == null)
{
portrait.Initialize();
_commandBuffer = new apCustomCommandBuffer(targetCamera, portrait, "Custom Command Buffer");
// Change the setting so that it is drawn before "when we render a normal mesh".
_commandBuffer.AddToCamera(UnityEngine.Rendering.CameraEvent.BeforeForwardAlpha);
_commandBuffer.CreateAlternativeMaterials(alternativeMaterial);
}
}
(The following code is the same as the previous one.)
(1) Create a Material asset with the outline shader applied.
(2) Select the Material asset and set the Thickness and Color of the outline.
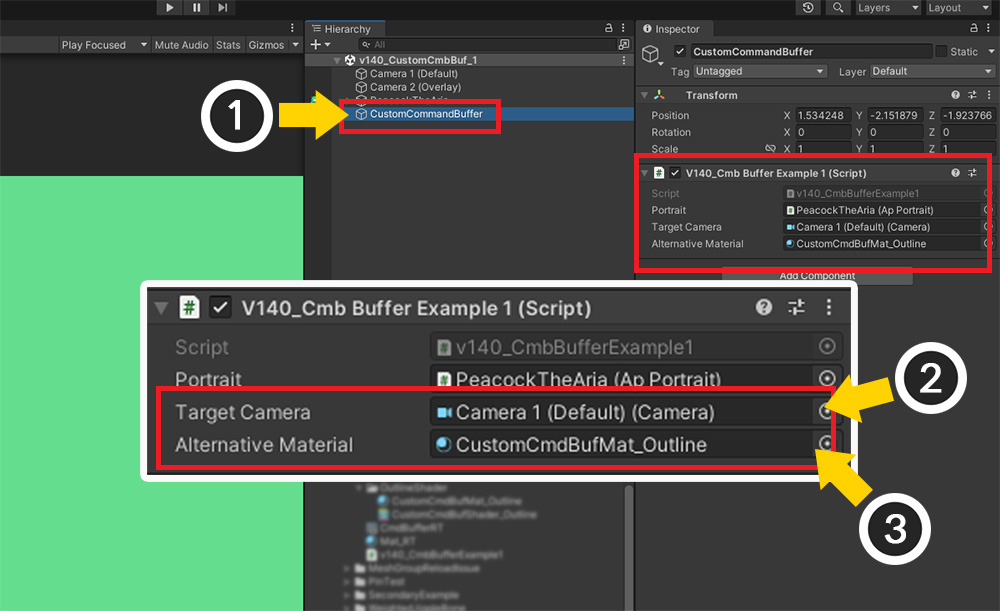
(1) Select the GameObject that controls the command buffer.
(2) For the outline, you need to set the Main Camera that renders the character as the target, not the overlay camera.
(3) Assign the Material asset that draws the outline.
When you run the game, you can see that the outline is drawn with a reasonable quality.
Rendering the character which has two or more images
Through the previous explanation, we learned the process of rendering using a command buffer and an alternative material.
Next, in the case of that there is a character who has two or more images, let's render it assigning external materials.
If you want to render by applying a different "Secondary Texture" depending on the image, you need to modify the materials you need to prepare and the initialization code of the command buffer.
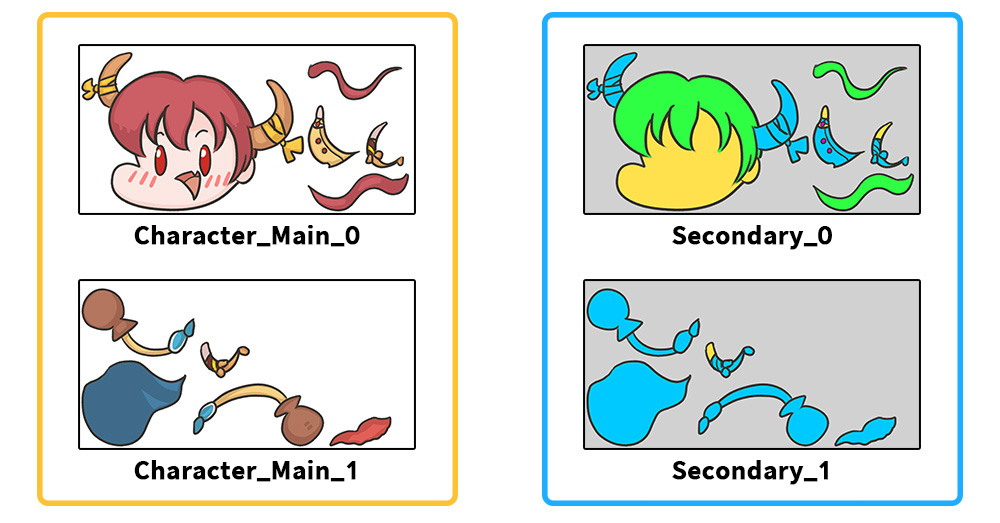
We prepared a character that uses the two textures on the left.
Let's make a material that is multiplied by the color of the secondary texture on the right corresponding to each image and render it through the command buffer.
Let's create a custom shader this time as well.
The "_MainTex" property is managed by AnyPortrait and cannot be used, so you need to create a separate texture property.
Shader "Custom Command Buffer Example/Secondary"
{
Properties
{
_MainTex("Main Texture (RGBA)", 2D) = "white" {}
_Color("2X Color (RGBA Mul)", Color) = (0.5, 0.5, 0.5, 1.0)
// A secondary texture to multiply by color.
_SecondaryTex("Secondary Texture (RGB)", 2D) = "white" {}
}
SubShader
{
Tags { "RenderType" = "Transparent" "Queue" = "Transparent" "PreviewType" = "Plane" }
Blend SrcAlpha OneMinusSrcAlpha
ZWrite Off
LOD 200
Pass
{
CGPROGRAM
#pragma vertex vert
#pragma fragment frag
#include "UnityCG.cginc"
struct appdata
{
float4 vertex : POSITION;
float2 uv : TEXCOORD0;
};
struct v2f
{
float2 uv : TEXCOORD0;
float4 vertex : SV_POSITION;
};
sampler2D _MainTex;
float4 _MainTex_ST;
half4 _Color;
sampler2D _SecondaryTex;
v2f vert(appdata v)
{
v2f o;
o.vertex = UnityObjectToClipPos(v.vertex);
o.uv = TRANSFORM_TEX(v.uv, _MainTex);
return o;
}
fixed4 frag(v2f i) : SV_Target
{
fixed4 col = tex2D(_MainTex, i.uv);
col.rgb *= _Color.rgb * 2.0f;
col.a *= _Color.a;
// Take the color of the secondary texture and multiply it to RGB.
fixed4 secondaryCol = tex2D(_SecondaryTex, i.uv);
col.rgb *= secondaryCol.rgb;
return col;
}
ENDCG
}
}
}
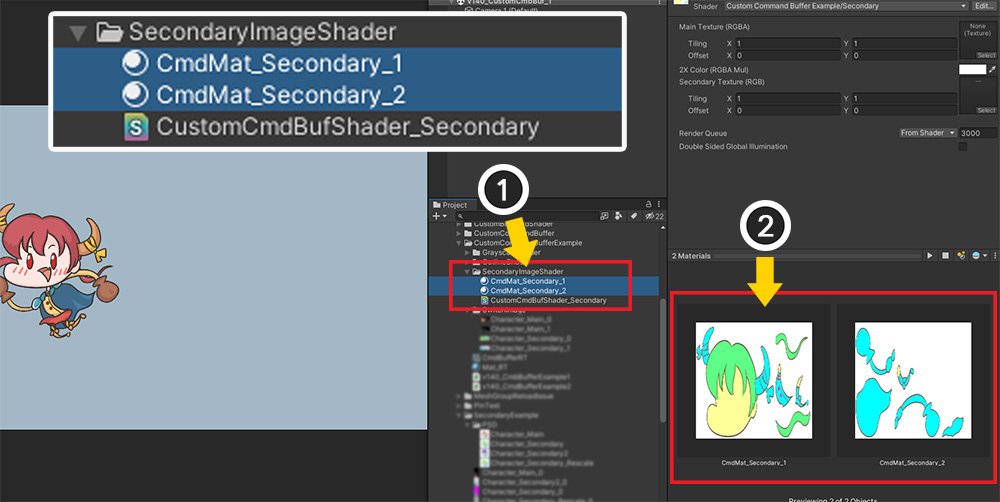
Before writing the script to control the command buffer, let's create a material.
(1) Create Materials according to the number of images.
(2) Assign each Secondary Texture to the "_SecondaryTex" attribute.
Now let's write a script to render by assigning two or more materials to the command buffer.
// This is a package for using Dictionary variables.
using System.Collections.Generic;
using UnityEngine;
using AnyPortrait;
public class CmdBufferExample : MonoBehaviour
{
public apPortrait portrait;
public Camera targetCamera;
// Create a variable in the form of an array to assign an image name and corresponding material to each.
public string[] imageNames;
public Material[] alternativeMaterials;
private apCustomCommandBuffer _commandBuffer = null;
void Start()
{
if (_commandBuffer == null)
{
portrait.Initialize();
_commandBuffer = new apCustomCommandBuffer(targetCamera, portrait, "Custom Command Buffer");
_commandBuffer.AddToCamera(UnityEngine.Rendering.CameraEvent.BeforeForwardAlpha);
// Using an array variable, create a Dictionary variable that connects "image name - alternative material" and pass it to "_commandBuffer".
Dictionary<string, Material> imageNamesToMaterial = new Dictionary<string, Material>();
for (int i = 0; i < imageNames.Length; i++)
{
imageNamesToMaterial.Add(imageNames[i], alternativeMaterials[i]);
}
_commandBuffer.CreateAlternativeMaterials(imageNamesToMaterial, alternativeMaterials[0]);
}
}
void OnDestroy()
{
if (_commandBuffer != null)
{
_commandBuffer.Destory();
_commandBuffer = null;
}
}
void LateUpdate()
{
if (_commandBuffer != null)
{
_commandBuffer.ClearCommands();
_commandBuffer.SetViewMatrix();
_commandBuffer.SetProjectionMatrix();
_commandBuffer.DrawAllMeshesWithAlternativeMaterials(true, true);
}
}
}
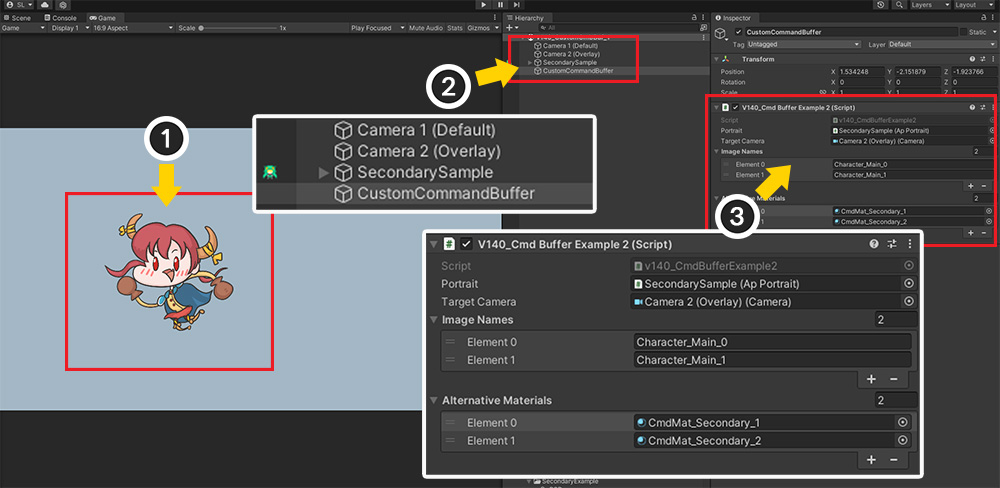
(1) This is a Unity scene featuring a character using two images.
(2) The Unity scene is the same as in the previous description. Select the GameObject with the script added.
(3) Assign the name of the image used by the apPortrait character and the material of the custom shader that matches it, in order.
If you run the game, you will see the above result with the appropriate alternate material corresponding to the image on the mesh applied.
Rendering the Render Texture with a Transparent background
This issue has been requested by several users.
When rendering a character to Render Texture rather than the screen, if the background of the render texture is made transparent, the mesh disappears.
For more information on how to render a character with a render texture, see the Related Page for detailed instructions.
This page describes the script that controls the "Render Target", introducing how to solve the problem of rendering with a render texture with a command buffer.
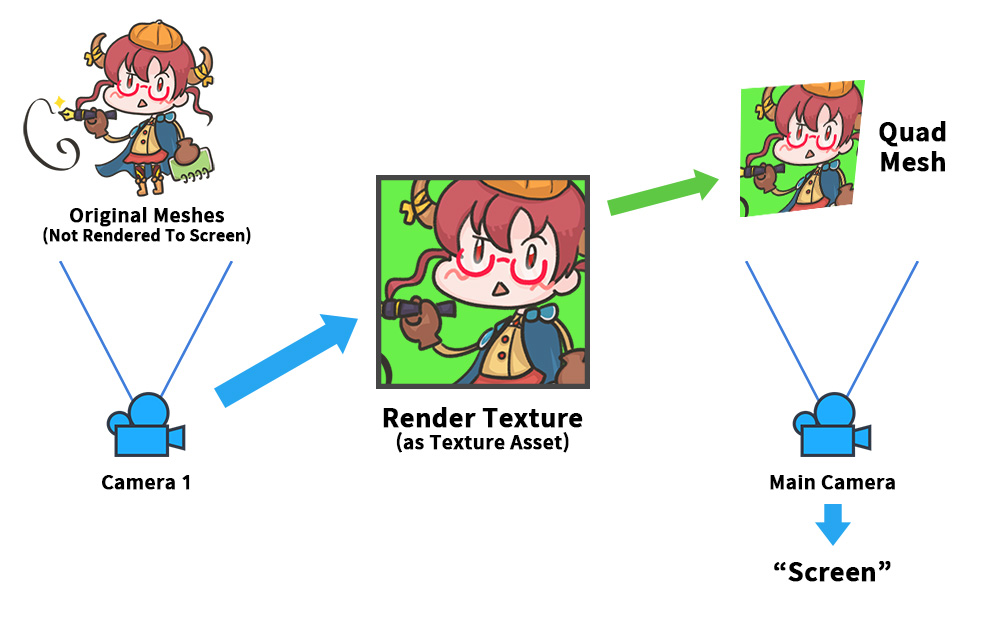
This is a diagram of how to render a character by saving the rendered result in a render texture and then overlaying it on another mesh.
Render textures in which characters are rendered are often used because they can be used in various ways in the game.
The command buffer is not used in this step yet.
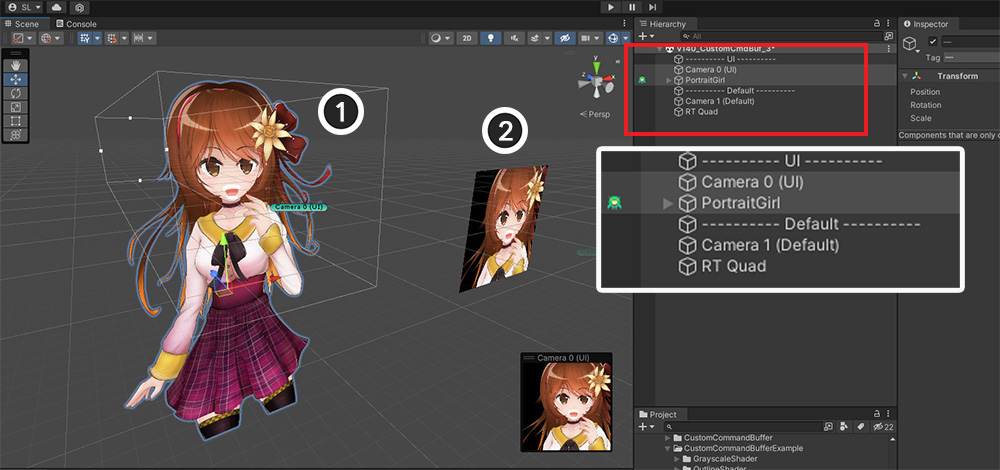
We configured the scene according to the above idea.
It consists of two layers (UI, Default), and AnyPortrait character, 2 Cameras, and a Quad Mesh with render texture are placed in the scene.
(1) Character and the First Camera that renders it. It is not rendered on the Main Camera.
(2) Quad Mesh ("RT Quad") and Main Camera with render texture applied.
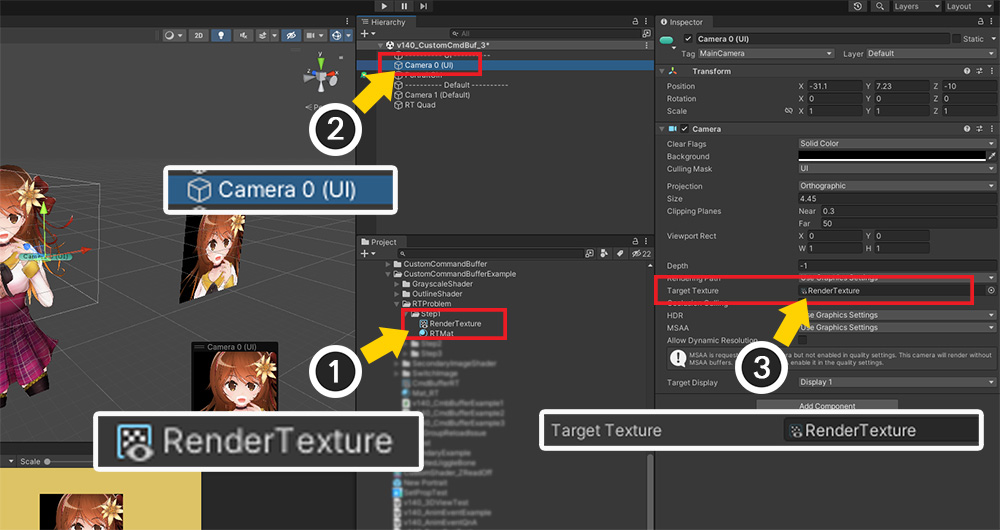
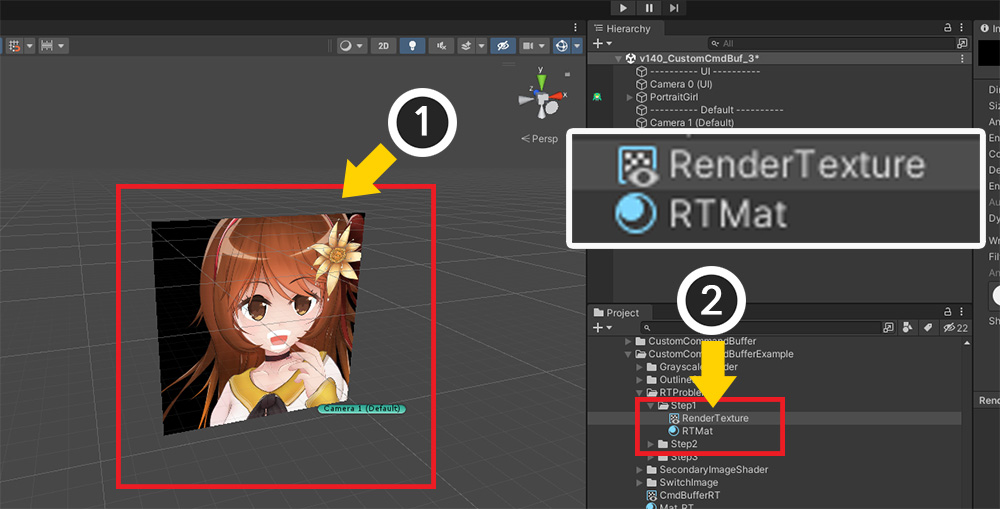
(1) And this is the “Render Texture” asset which is the key of this technique.
(2) This Render Texture is registered as "Target Texture" of the First Camera that renders the character.
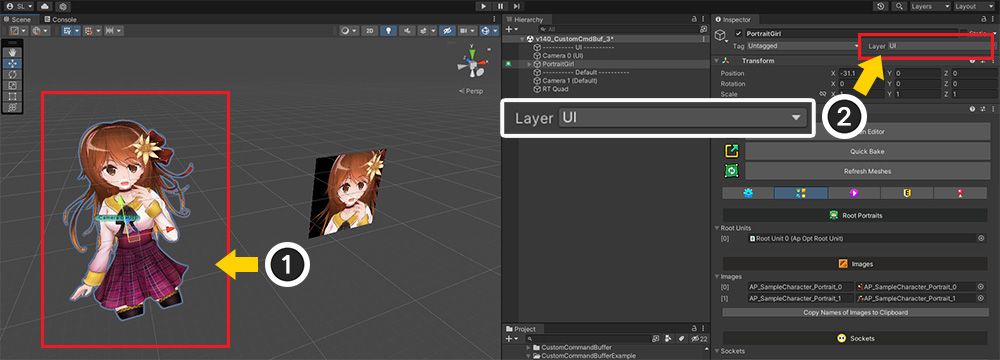
The character is set to a non-Default layer (in this example, set to UI) so that it doesn't render on the Main Camera.
(1) This is the Quad Mesh rendered by the Main Camera.
(2) The texture of this mesh's material is the "Render Texture" asset used by the First Camera.
Because the material of this Quad Mesh and the First Camera share the same Render Texture, the result of rendering with the First Camera will appear in the Quad Mesh.
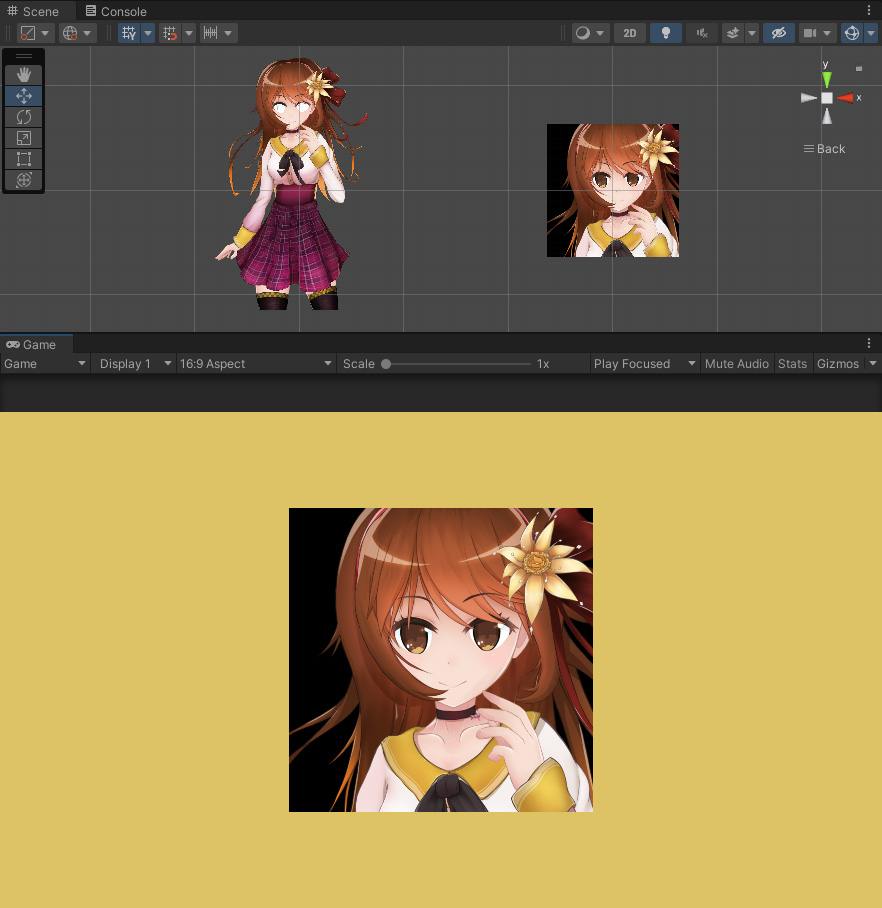
When you run the game, you can see the rendering result of the First Camera on the Quad Mesh, that is, the character is displayed normally.
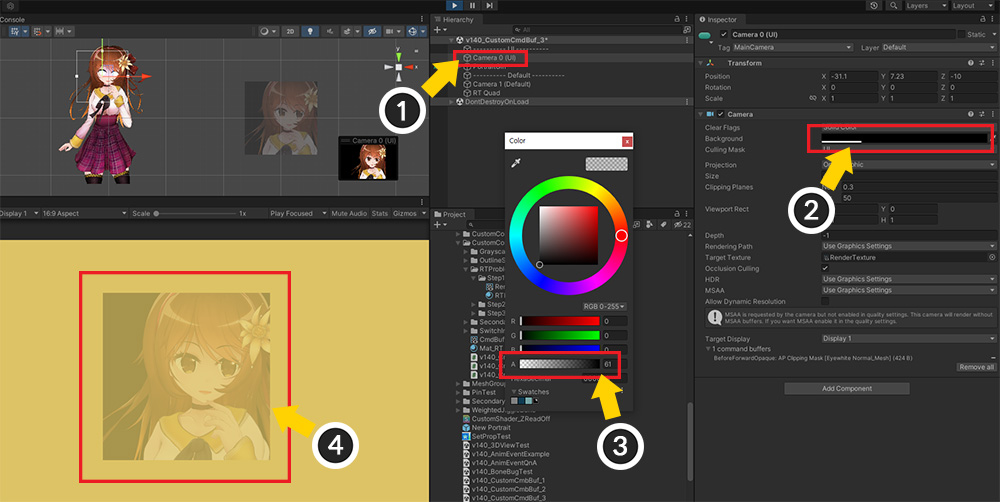
The problem arises when the background color of the render texture is not opaque.
(1) Select the First Camera to render the character.
(2) Select the Background color property. (Clear Flags must be Solid Color.)
(3) Reduce the Alpha value of the background color.
(4) You can see that the entire render texture including the character as well as the background becomes increasingly transparent.
This is the idea how to solve this problem.
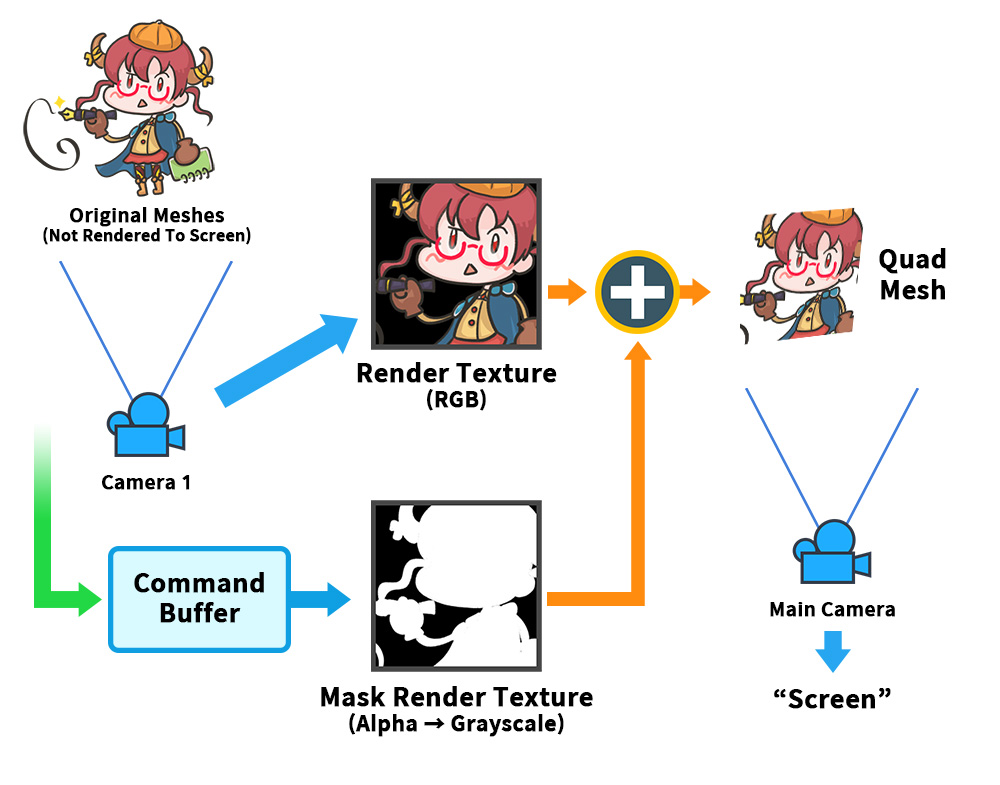
Complete the render texture of the opaque background, and separately create "Mask Texture" using the Command Buffer.
The Mask can be used to separate the "Background" and "Character" areas.
Combine this Mask Texture with the original Render Texture to render the image with only the background transparent.
Note that.
For clarity, the original render texture generated by the camera is called "Color Render Texture", and the render texture that acts as a mask generated by the command buffer is called "Mask Render Texture".
A lot of work is required to implement this technique.
(1) Write a Custom Shader for mask rendering that stores "the Alpha value in Grayscale".
(2) Create an additional "Mask Render Texture".
(3) Write a "Command Buffer Script" to render the mask render texture.
(4) Create a Shader and Material to be applied to the Quad Mesh that merges the two Render Textures.
First, let's write a custom shader to use in the command buffer, that is, a custom shader that stores the Alpha value as a Grayscale.
Shader "Custom Command Buffer Example/White Mask"
{
Properties
{
_MainTex("Main Texture (RGBA)", 2D) = "white" {}
_Color("2X Color (RGBA Mul)", Color) = (0.5, 0.5, 0.5, 1.0)
}
SubShader
{
Tags { "RenderType" = "Opaque" "Queue" = "Transparent" "PreviewType" = "Plane" }
// Because opacity is cumulative, change the blending method to Additive.
Blend One One
ZWrite Off
LOD 200
Pass
{
CGPROGRAM
#pragma vertex vert
#pragma fragment frag
#include "UnityCG.cginc"
struct appdata
{
float4 vertex : POSITION;
float2 uv : TEXCOORD0;
};
struct v2f
{
float2 uv : TEXCOORD0;
float4 vertex : SV_POSITION;
};
sampler2D _MainTex;
float4 _MainTex_ST;
half4 _Color;
v2f vert(appdata v)
{
v2f o;
o.vertex = UnityObjectToClipPos(v.vertex);
o.uv = TRANSFORM_TEX(v.uv, _MainTex);
return o;
}
fixed4 frag(v2f i) : SV_Target
{
fixed4 col = tex2D(_MainTex, i.uv);
// Change the Alpha value to RGB, and set Alpha to 1.
col.rgb = saturate(col.a * _Color.a);
col.a = 1.0f;
return col;
}
ENDCG
}
}
}
Next, write a script to control the Command Buffer.
Most of the code in the previous example is the same, except that it specifies an arbitrary "Render Texture" as "Render Target".
using UnityEngine;
using AnyPortrait;
public class CmdBufferExample : MonoBehaviour
{
public apPortrait portrait;
public Camera targetCamera;
public Material alternativeMaterial;
// A Mask Render Texture which is used as a Render Target.
public RenderTexture maskRenderTexture;
private apCustomCommandBuffer _commandBuffer = null;
void Start()
{
if (_commandBuffer == null)
{
portrait.Initialize();
_commandBuffer = new apCustomCommandBuffer(targetCamera, portrait, "Custom Command Buffer");
_commandBuffer.AddToCamera(UnityEngine.Rendering.CameraEvent.BeforeForwardAlpha);
_commandBuffer.CreateAlternativeMaterials(alternativeMaterial);
}
}
void OnDestroy()
{
if (_commandBuffer != null)
{
_commandBuffer.Destory();
_commandBuffer = null;
}
}
void LateUpdate()
{
if (_commandBuffer != null)
{
_commandBuffer.ClearCommands();
// Set the Render Texture as the Render Target and initialize the background to Black.
_commandBuffer.SetRenderTarget(maskRenderTexture);
_commandBuffer.ClearRenderTarget(true, true, Color.black);
_commandBuffer.SetViewMatrix();
_commandBuffer.SetProjectionMatrix();
_commandBuffer.DrawAllMeshesWithAlternativeMaterials(true, true);
}
}
}
Finally, create a Shader for the material to be applied to the Quad Mesh.
Combining "Color Render Texture" and "Mask Render Texture" serves to make only the background transparent.
Shader "Custom Command Buffer Example/Merge RT and Mask"
{
Properties
{
// Create properties to receive two Render Textures.
_MainTex("Main Texture (RGBA)", 2D) = "white" {}
_MaskTex("Mask Texture (Grayscale)", 2D) = "white" {}
}
SubShader
{
Tags { "RenderType" = "Transparent" "Queue" = "Transparent" "PreviewType" = "Plane" }
Blend SrcAlpha OneMinusSrcAlpha
ZWrite Off
LOD 200
Pass
{
CGPROGRAM
#pragma vertex vert
#pragma fragment frag
#include "UnityCG.cginc"
struct appdata
{
float4 vertex : POSITION;
float2 uv : TEXCOORD0;
};
struct v2f
{
float2 uv : TEXCOORD0;
float4 vertex : SV_POSITION;
};
sampler2D _MainTex;
float4 _MainTex_ST;
sampler2D _MaskTex;
v2f vert(appdata v)
{
v2f o;
o.vertex = UnityObjectToClipPos(v.vertex);
o.uv = TRANSFORM_TEX(v.uv, _MainTex);
return o;
}
fixed4 frag(v2f i) : SV_Target
{
fixed4 col = tex2D(_MainTex, i.uv);
// Use the color stored in the Mask Render Texture as Alpha.
fixed4 mask = tex2D(_MaskTex, i.uv);
col.a = mask.r;
return col;
}
ENDCG
}
}
}
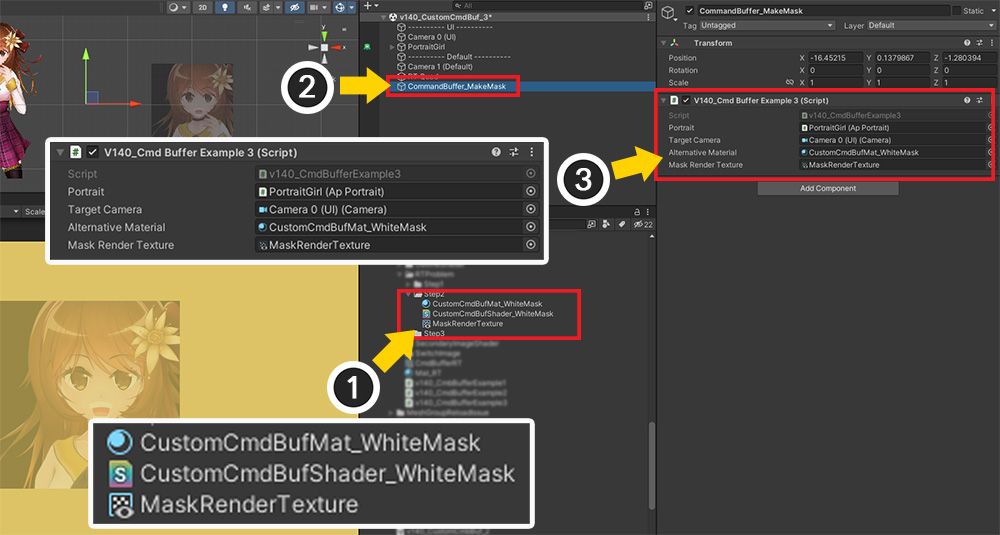
(1) Create "Mask Render Texture" and "Material" to be used in the command buffer. Apply a custom shader to the material that stores the Alpha value as a color.
(2) Create a GameObject to control the command buffer.
(3) Add Script controlling the Command Buffer and assign "apPortrait character" and "First camera", and also assign "Material" and "Mask" Render texture" were created in Step (1).

Since the transparency of the entire image is calculated from the Mask Render Texture, the background of the "Color Render Texture" should be "Opaque" as it is.
(1) Select the First Camera.
(2) Set a background color (3) as it is opaque.
In this case, you can get a cleaner result by setting the color a little darker than the edges of the image.
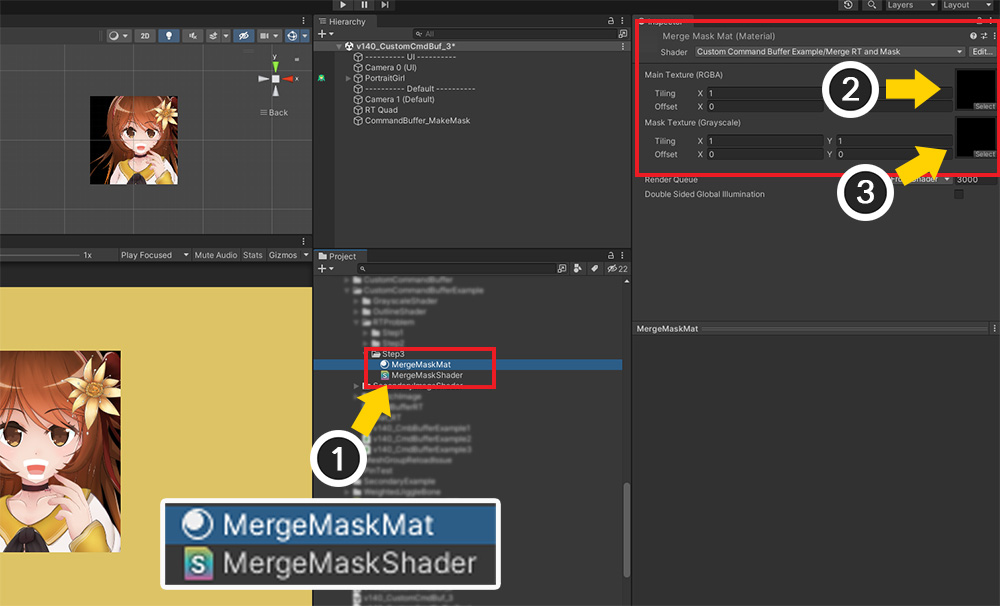
(1) Then, create a Material to be applied to the Quad Mesh and apply a custom shader that combines the two render textures.
(2) Assign "Color Render Texture" to First Property (_MainTex).
(3) Assign "Mask Render Texture" to Second Property (_MaskTex).
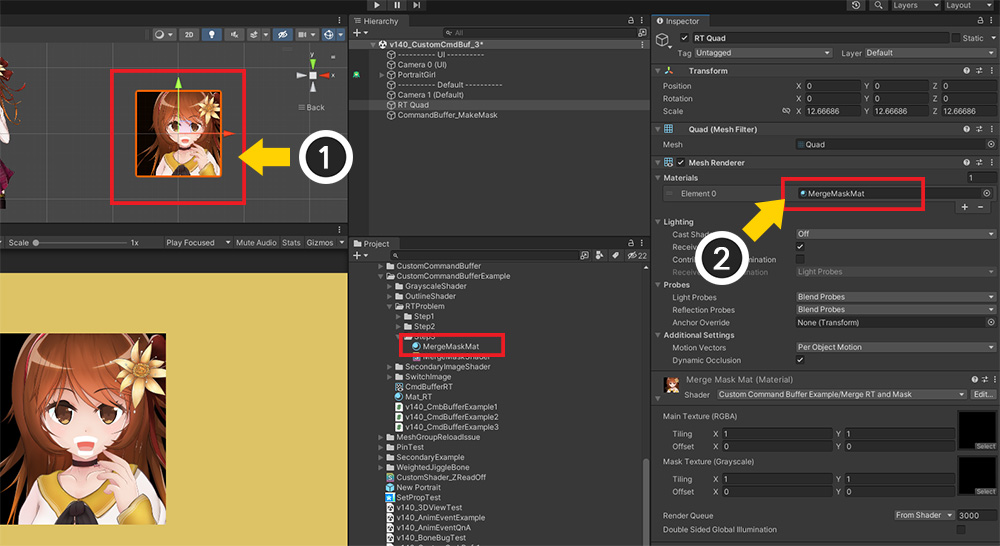
(1) Select Quad Mesh.
(2) Apply the "Material that combines two render textures" created earlier to this mesh.
This is the finished result.
Get great results with only the characters rendered clearly on a transparent background.
You can see that "Color Render Texture" and "Mask Render Texture" are merged to solve the rendering problem.
The command buffer is effectively used to create additional render textures, etc. to solve the rendering problem as above.
Write carefully with performance in mind!
Command buffers do a great job, but the downside is that performance optimization is difficult.
Because the user renders arbitrarily, the draw call optimization function of Unity and AnyPortrait is difficult to operate.
Therefore, it is recommended to implement it while always checking the performance.