AnyPortrait > Manual > Synchronize bones to change costumes
Synchronize bones to change costumes
1.3.4
Users who make games using AnyPortrait have given a lot of feedback on "replacing a character's costume".
Our team has given users the following guide on how to replace costume through two methods.
- Replace a character's costume
- Synchronize with other characters
But in order to make it more efficient, we thought about another way.
Given that many game projects use bones to animate their characters, we think that synchronizing bones can be quite useful.
The method introduced on this page will be very useful in the following cases.
- When the size of the "body" is constant and there are many attached "costumes"
- If you do not want to create a separate animation for "costumes"
- When most of the bones of the "costumes" share the bones of the "body"
- If you do not resize the bones
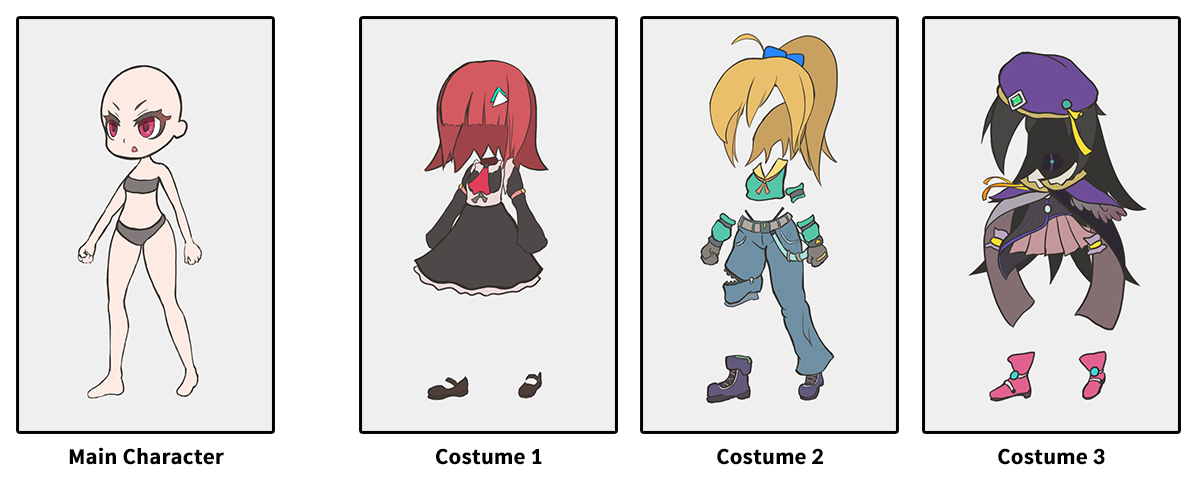
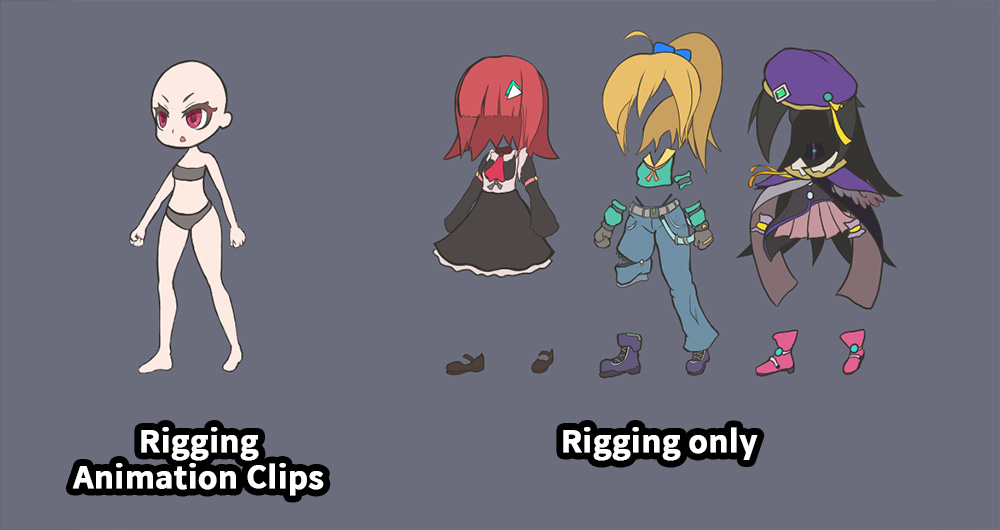
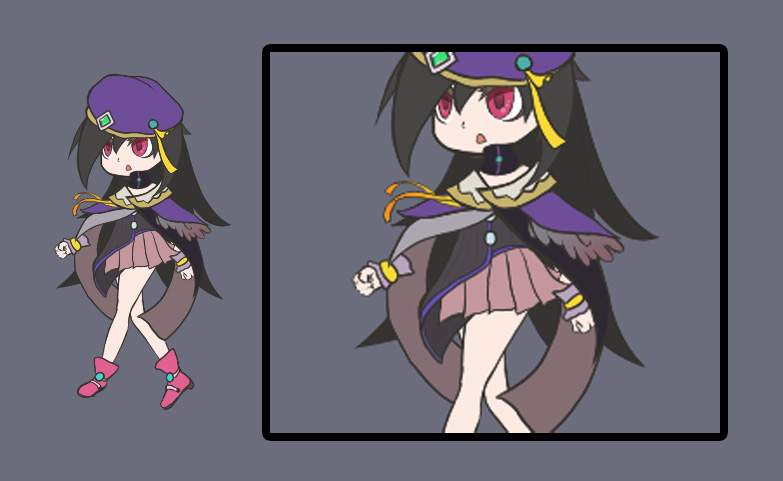
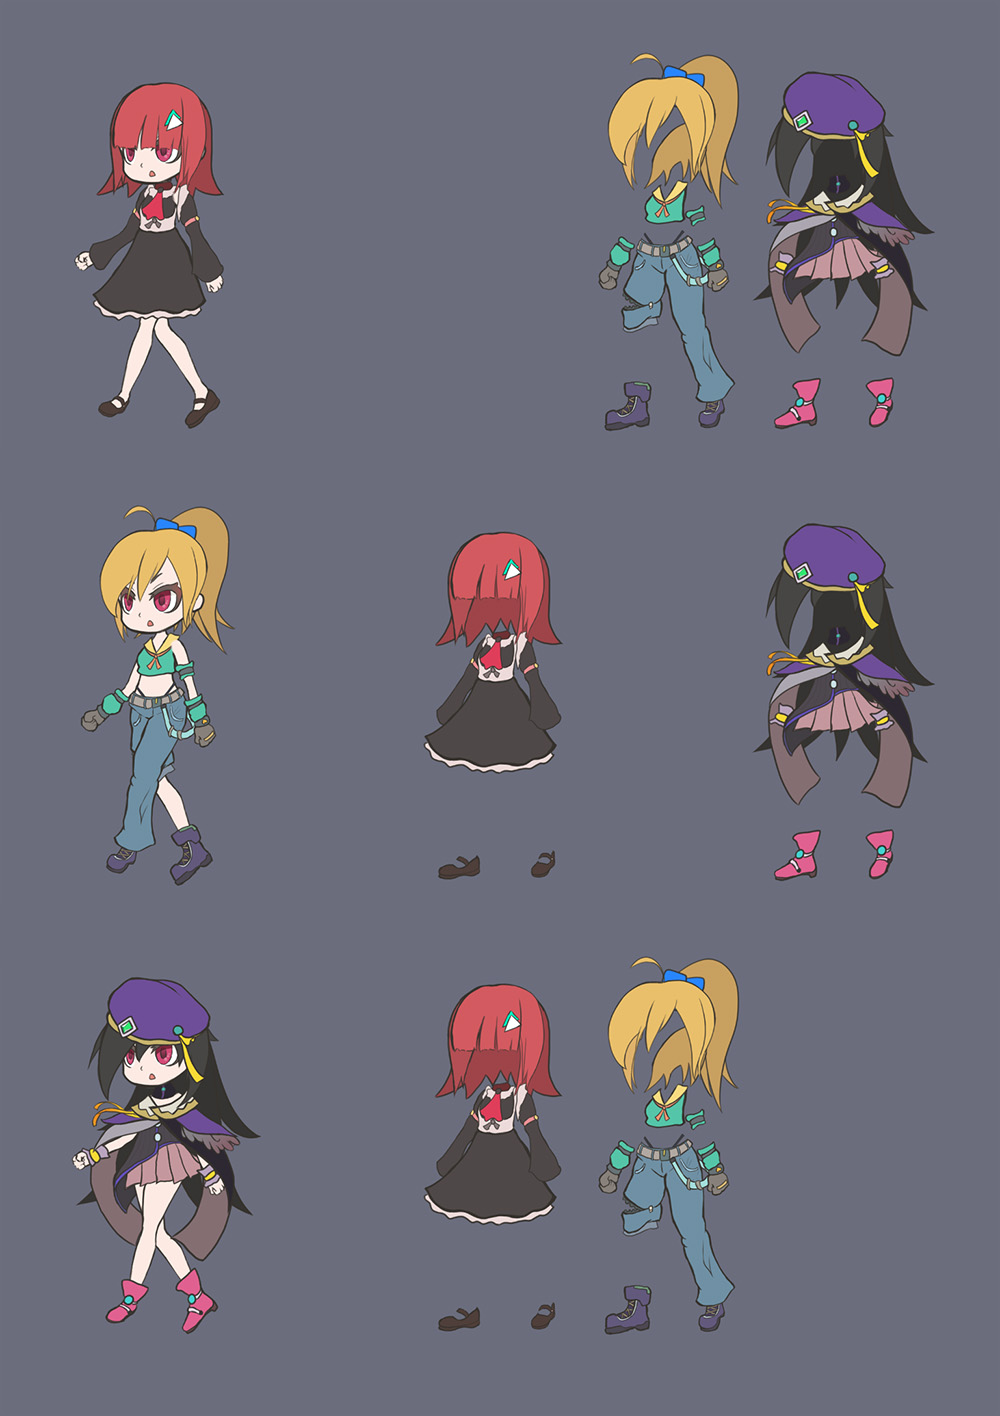
These are the character and costume images we will cover on this page.
All made with PSD files.
This page will show you how to swap costumes with synchronizing each "Costume1, 2, 3" to the "MainCharacter".
Creating a Main Character
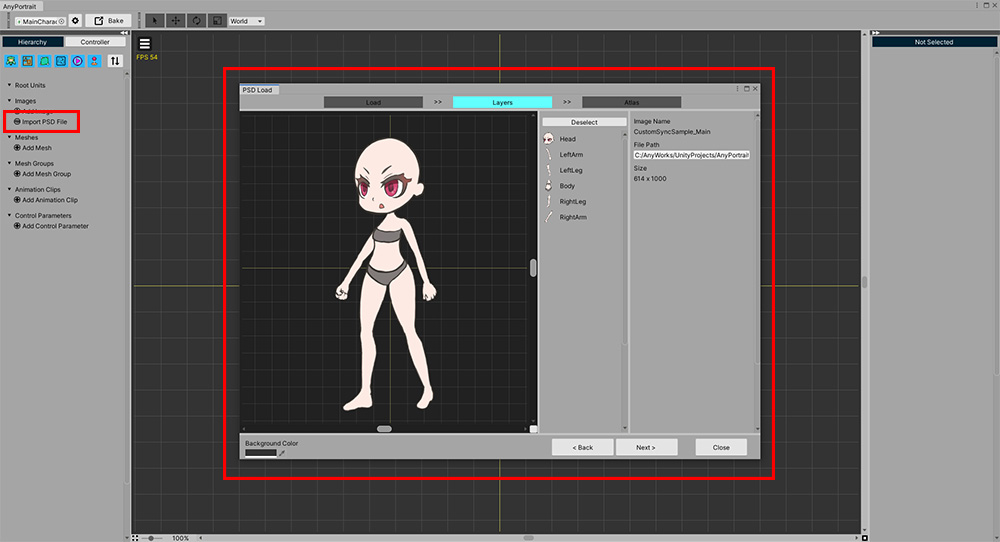
First, let's create a base "MainCharacter".
Import a PSD file and create a character.
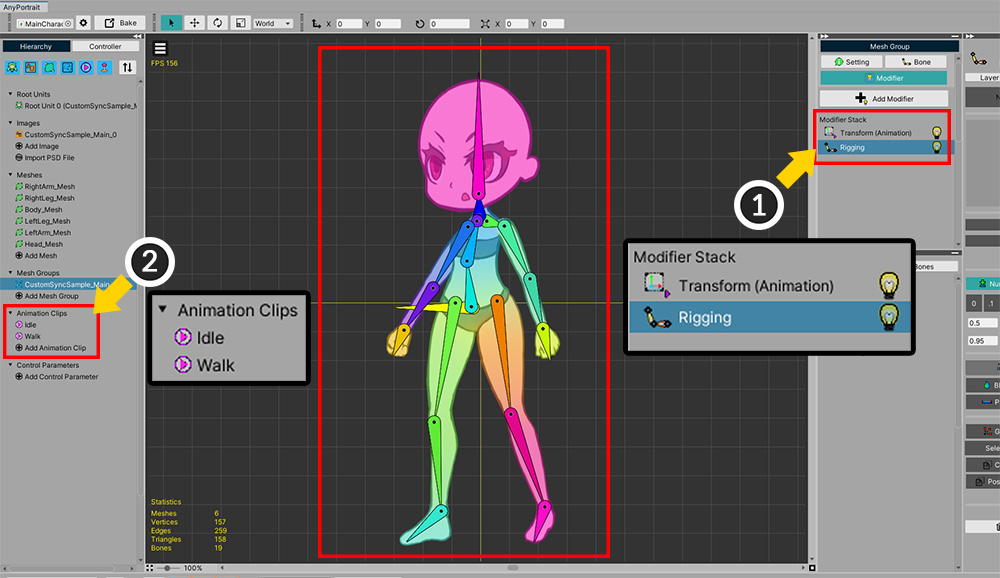
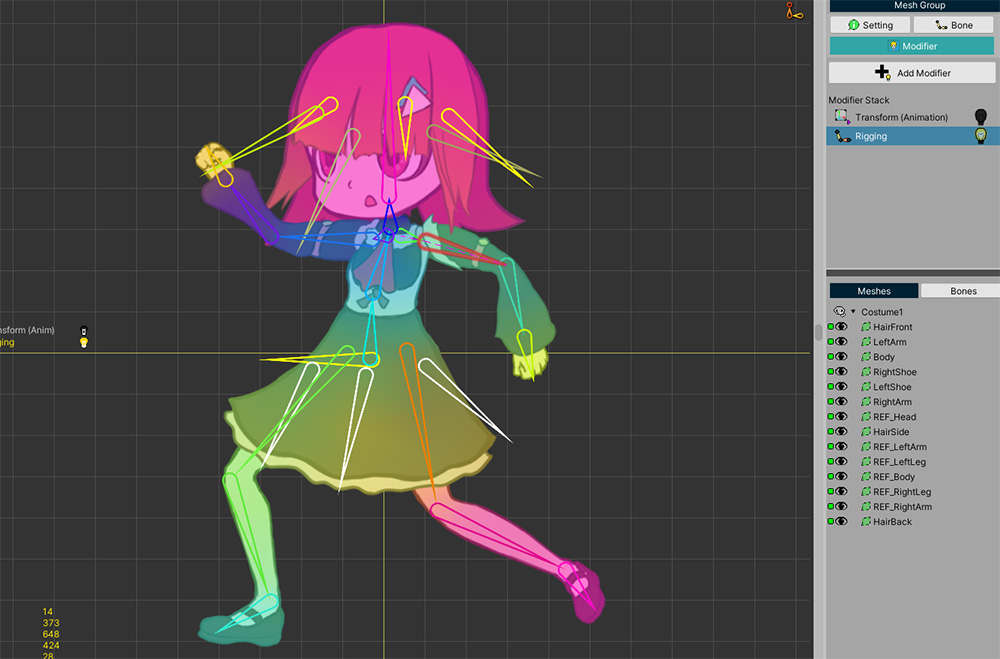
(1) Connect bones and meshes using Rigging modifier and add Transform (Animation) modifier.
(2) Created two animations.
This completes "MainCharacter".
Creating a Costume
There are two main ways to make a costume.
A simple way is to export the main character's bones to a file, import them back into a new apPortrait, and rig them.
Instructions on how to export and import bones to a file can be found on the page below.
- Export / Import Bone settings
However, delicate rigging is required to precisely connect synchronized objects.
So, another method introduced here, Duplicate and Rigged Together will help you.
The important point for this method is to duplicate the main character and create a new finished character with the costume attached.
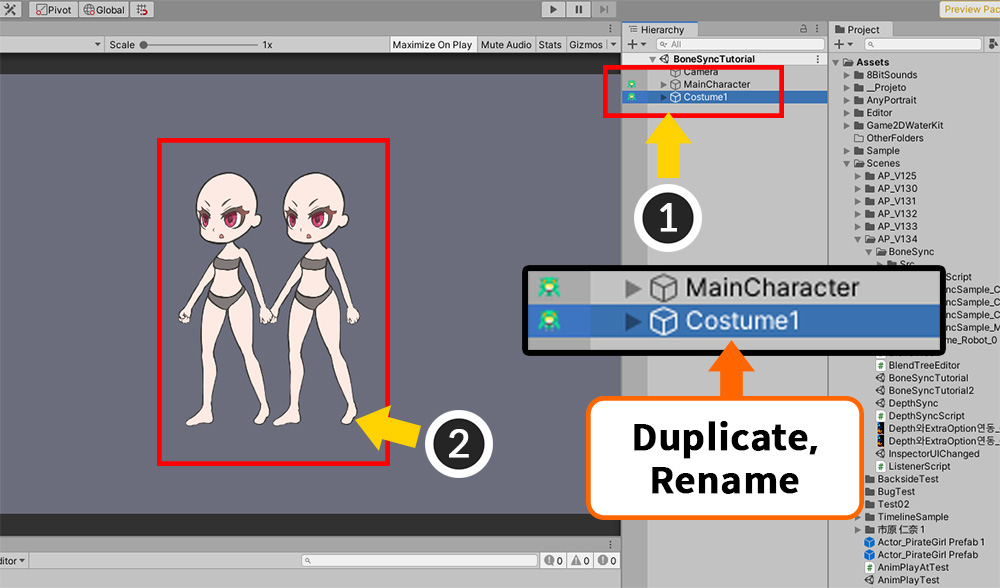
(1) In the Unity scene, duplicate the "MainCharacter" created earlier and rename it to "Costume1".
(2) You will see two identical characters with different names.
From now on, let's select the duplicated "Costume1" character and edit it. (The main character is no longer edited.)
Open "Costume1" character with AnyPortrait editor.
It is in the same state as "MainCharacter" because it has not been modified yet.
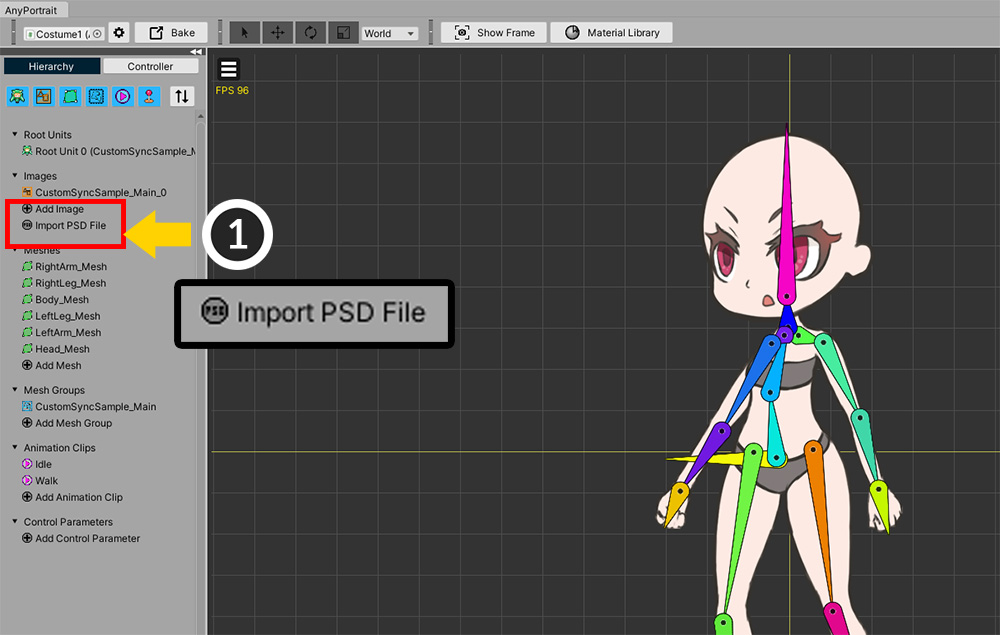
(1) Let's open the costume PSD file.
Import the "Costume" PSD image file.
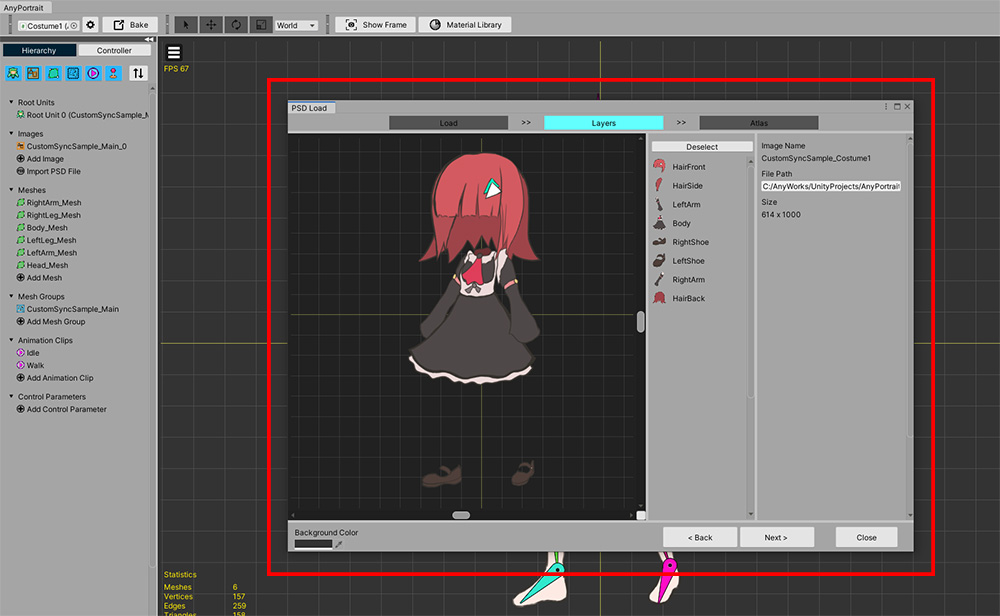
There are a few things to be aware of at this point.
- The size of the PSD image of the main character and the PSD image of the costume must be the same.
- When overlapping the body character and the costume on the PSD image, the position must match.
If you open a costume image file that does not satisfy the above conditions, you must manually adjust the position of the costume meshes.
Bake the costume PSD file into Atlas and import it into the current apPortrait.
The Atlas Bake setup doesn't have to be the same as the main character.

(1) Objects for the costume image are created separately from the original image, mesh, and mesh group.
(2) In particular, check that a new mesh group has been created for the costume.
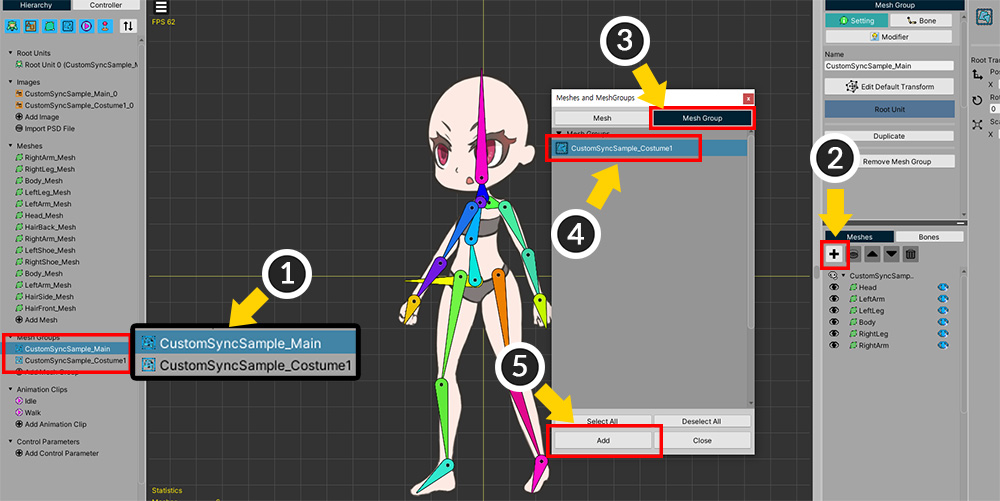
The next task is to overlay the costume meshes on the mesh group for the body.
(1) Again, select the mesh group for the main character.
(2) Press the + button.
(3) Select the Mesh Group tab.
(4) Select the mesh group for the added costume.
(5) Click the Add button.
(1) You can now see the mesh group of the costume joined to the body mesh group.
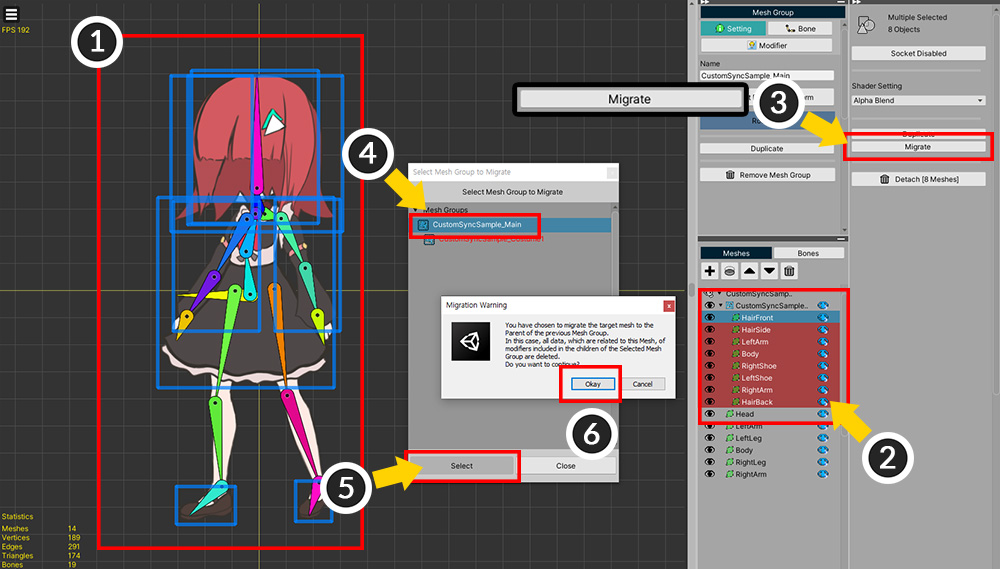
Let's migrate the costume meshes for leaving only one mesh group.
(This process is to reduce unnecessary data and is not mandatory.)
(2) Select all meshes in the costume mesh group. (It is convenient to press Shift to select.)
(3) Press the Migrate button.
(4) Two mesh groups will be shown. Select the mesh group that corresponds to the body that is the root mesh group.
(5) Press the Select button.
(6) When using the Migrate function, you need to be careful as there may be problems in the data migration process. (Related page) Click the Okay button.
Now all meshes within the mesh group for the costume have been moved to the root mesh group.
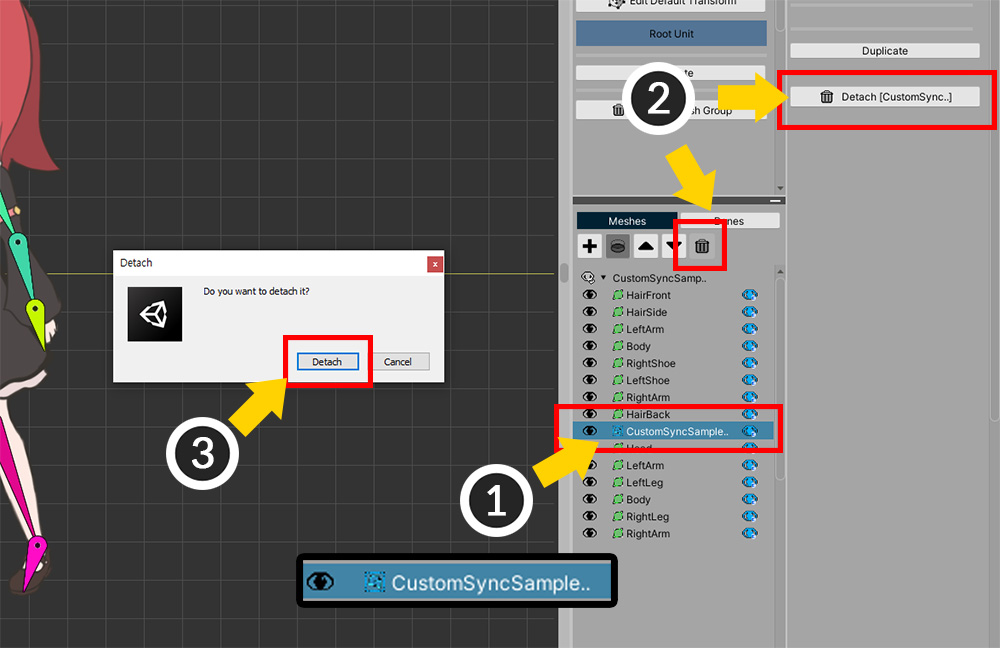
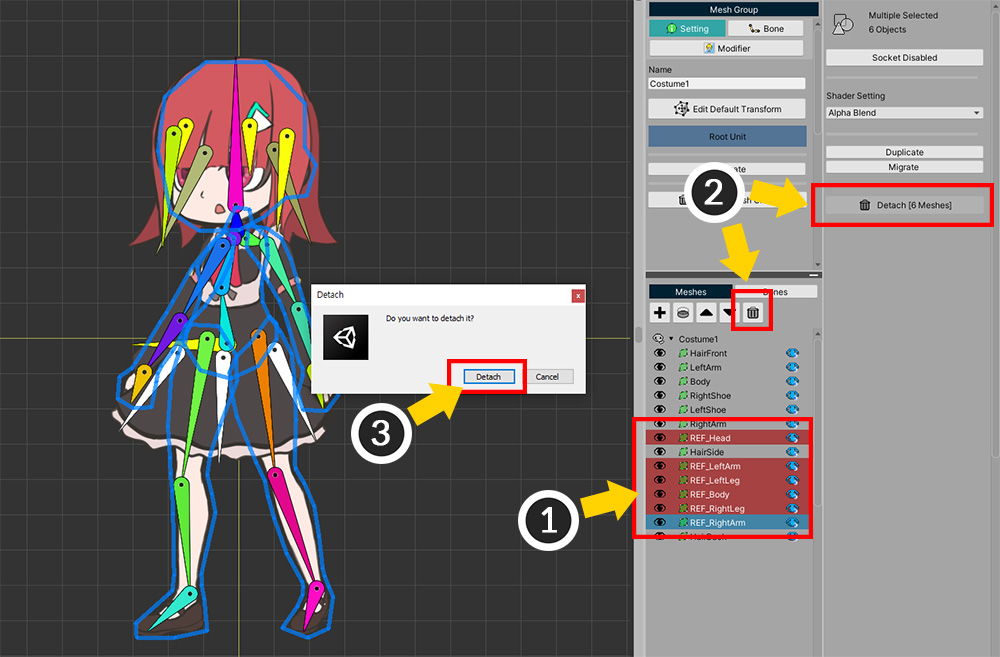
Let's remove the empty mesh group.
(1) Select the costume mesh group, which is empty.
(2) Press the Detach button.
(3) In the message, press the Detach button to separate the mesh group.
The mesh group is now not a child mesh group.
After detach, select the costume mesh group in the left Hierarchy tab and remove it.
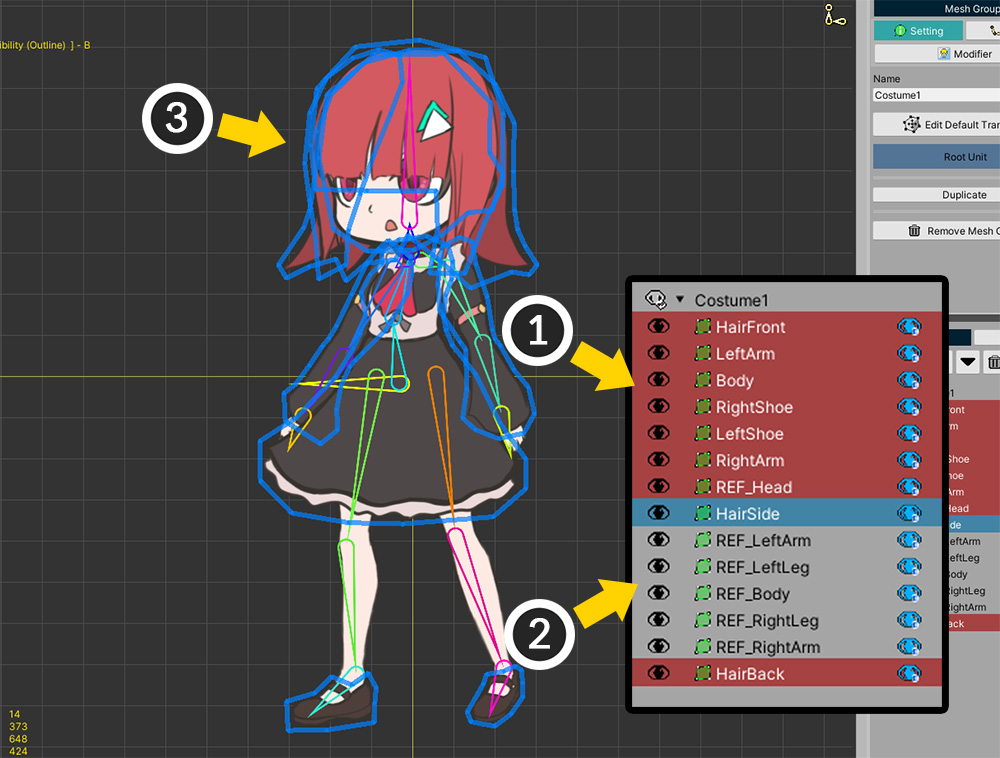
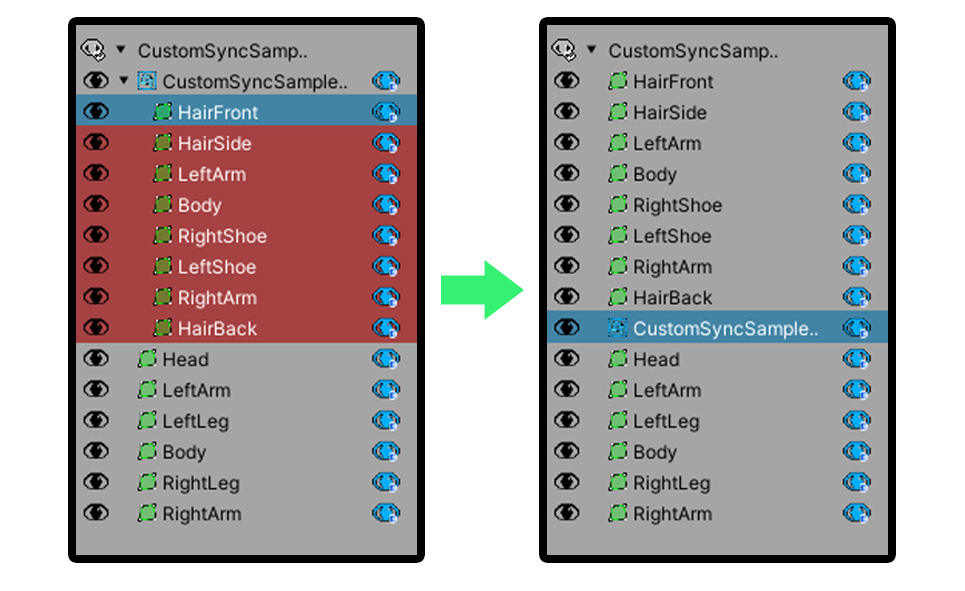
(1) Let's change the rendering order of the costume meshes so that the body and costumes are rendered properly as above.
(2) Let's prefix the body mesh's name with "REF_" to differentiate between the costume meshes and the body meshes.
(3) Edit and complete the costume meshes to prepare them for rigging.
If the precautions when importing the Costume PSD file have not been followed, the position of the body and the costume meshes will not match at this step.
If that, modify the position of the costume meshes appropriately in this step.
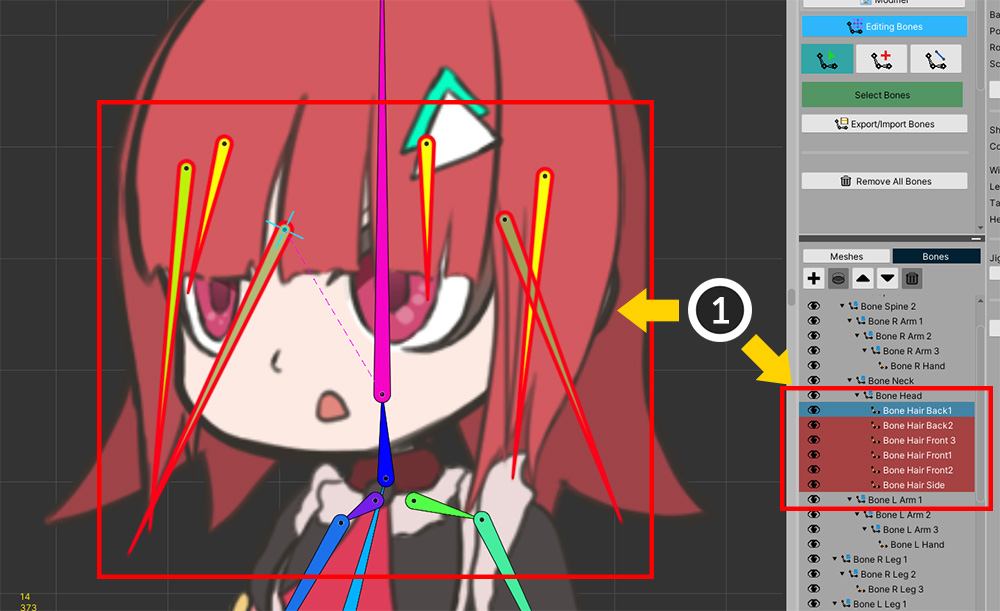
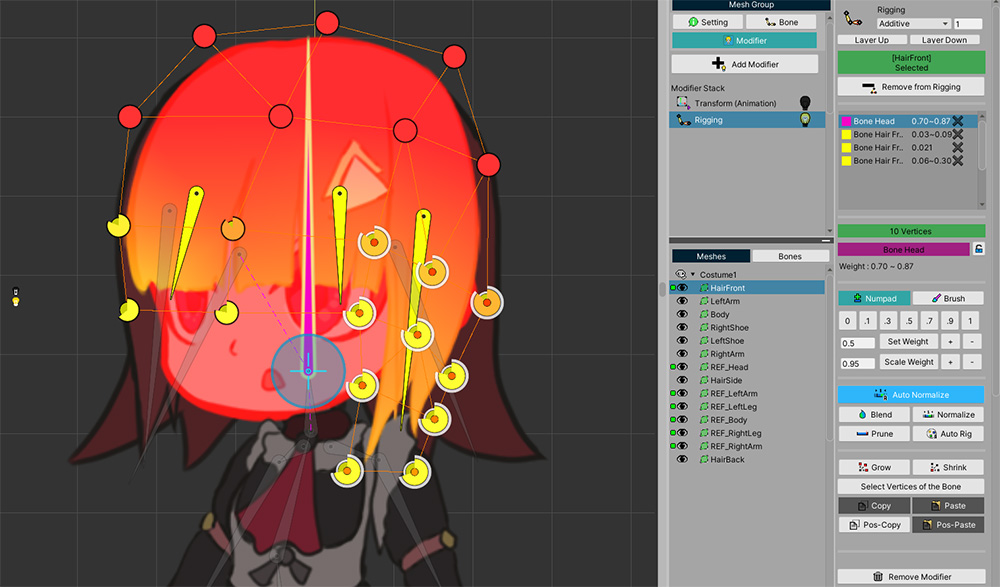
You can add bones before rigging.
(1) Bones are added to express the hair movement.
We connected these bones as children of the "Head bone" of the bones of the body.
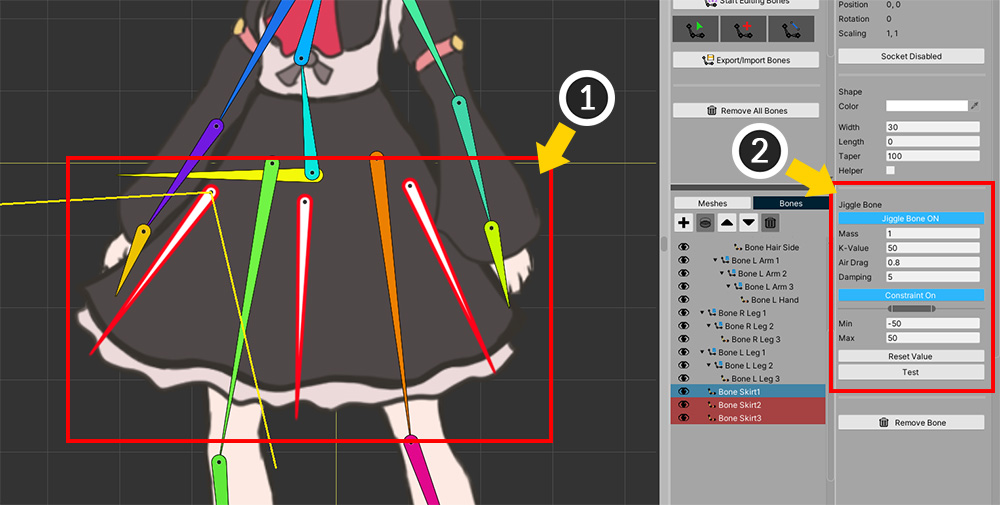
(1) Add bones for the movement of the skirt.
(2) By setting them to Jiggle Bones, they can be made to have physical shaking without additional animation.
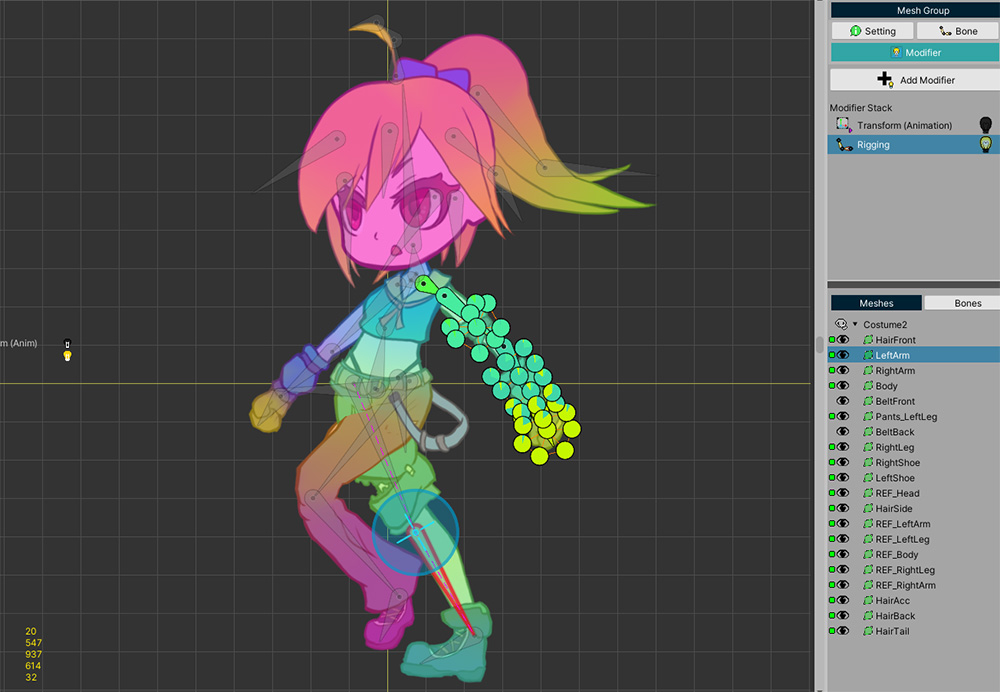
Now let's rig the costume meshes.
Select the Rigging modifier, add meshes and assign weights.
(The Rigging modifier will already exist.)
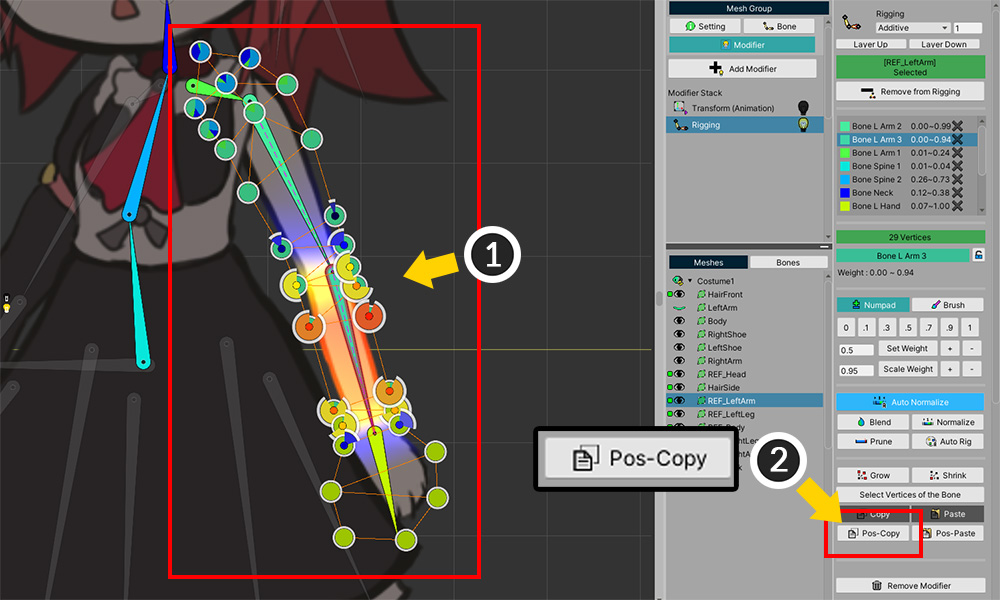
When rigging costumes meshes, the most important thing is how to assign weights in the overlapping part of the body.
If you don't assign weights properly, you might even see your character's hands or feet sticking out of their clothing.
In this case, using the Pos-Copy function will alleviate these concerns. (Related Pages)
(1) Select all the vertices of the mesh of the body overlapping the costume to be rigged.
(2) Press the Pos-Copy button to copy the rigging weights.
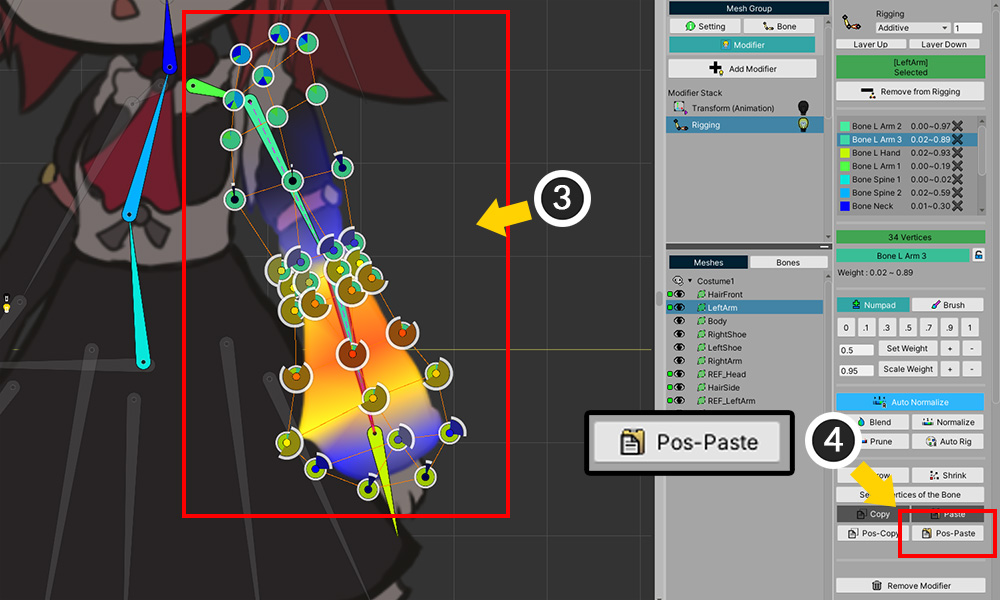
(3) Select the vertices of the costume mesh.
(4) Press the Pos-Paste button to assign the copied weight to the vertices.
Now, when you move the bones, you will see that the costume mesh moves along with the body mesh.
You will need to fine-tune the weights at this step, but this feature will help you a lot.
Once you've rigged all meshes, your character should move naturally as if it wore the costume.
In the same way, let's make other costumes (Costume2, Costume 3).
(Each costume must be a different apPortrait.)
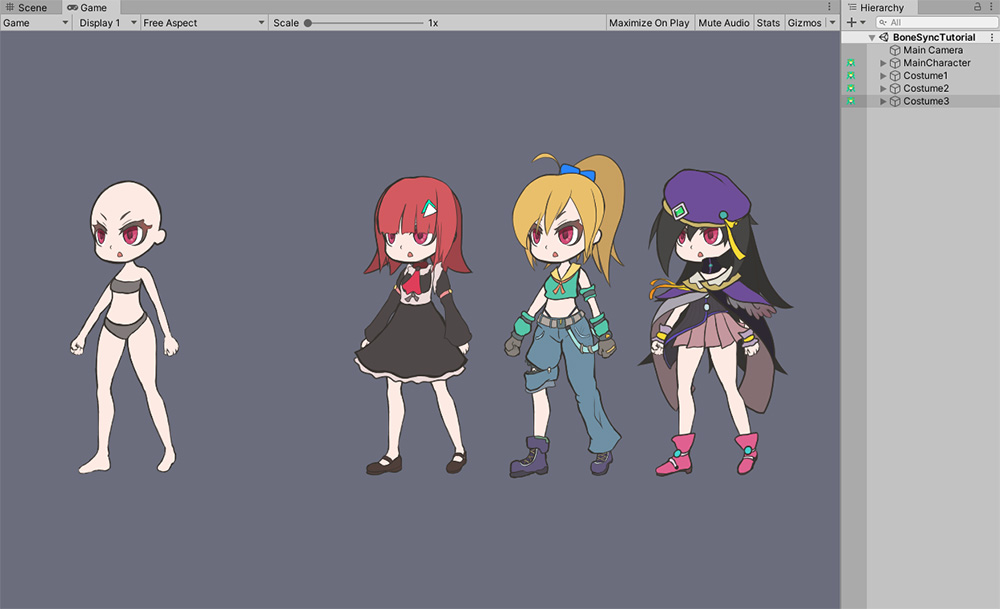
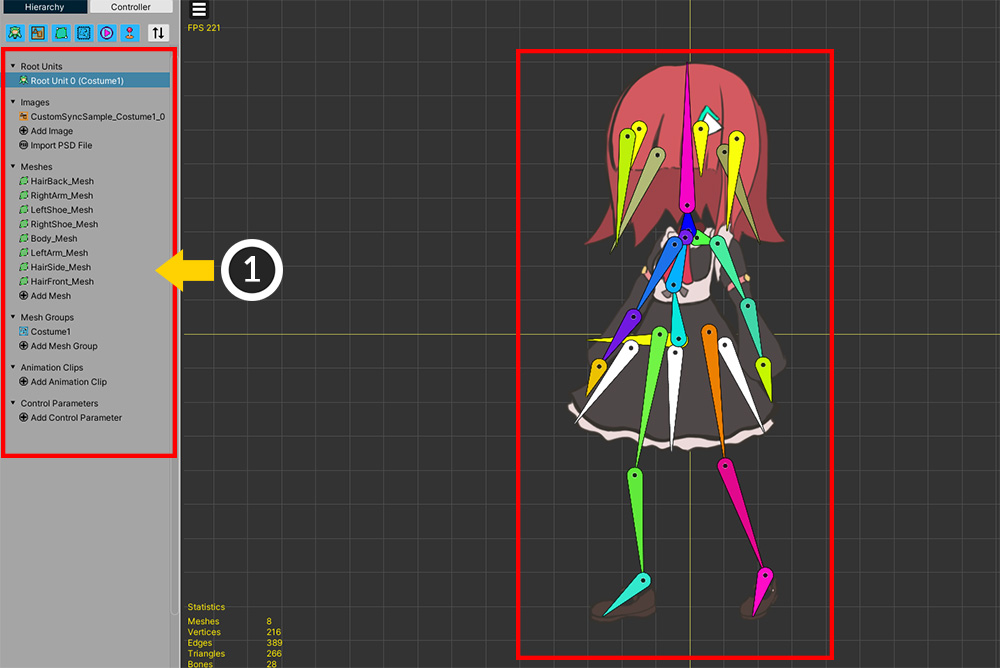
This is the screen that has been completed up to the present stage.
The Main Character and three Costumed Characters (Costume1, 2, 3) were placed in the scene.
Since the costume and the character are still combined, the task of removing the meshes of the main body in Costumes 1, 2, and 3 remains.
Open Costume 1, 2, 3) with AnyPortrait editor and select the mesh group.
(1) Select the meshes of the main body. If you appended "REF_" to the names of the meshes earlier, it will be easier to select them apart.
(2) Press the Detach button.
(3) Press the Detach button in the message.
(1) In addition, all images and meshes of the main character are removed.
Now only the images, meshes, and mesh group for the costume are left, as shown above.
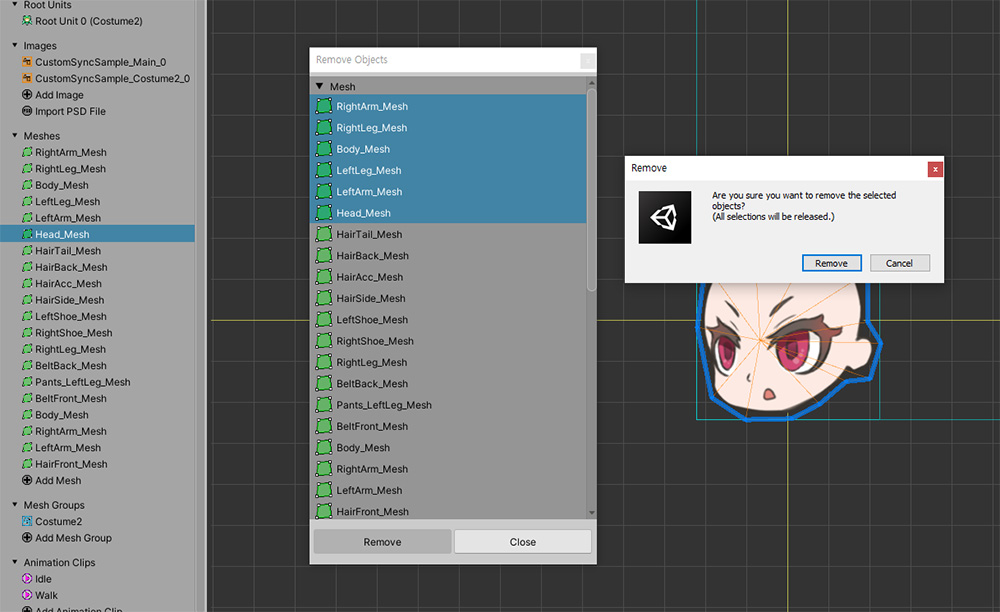
When removing multiple images or meshes, it is very cumbersome to select and remove them one by one.
You can right-click on the Hierarchy and remove multiple items at once as shown above.
For this function, please refer to Related page.
Once you have completed all of these steps, one "Main Character" and three "Costume Characters" will be placed in the Unity Scene as shown above.
- The main character and costumes have almost the same bones, and the Rigging modifier is applied the same.
- Only the main character has Transform (Animation) and Animation.
Synchronize by writing a script
The next step is to write a script to attach the costumes to the main character.
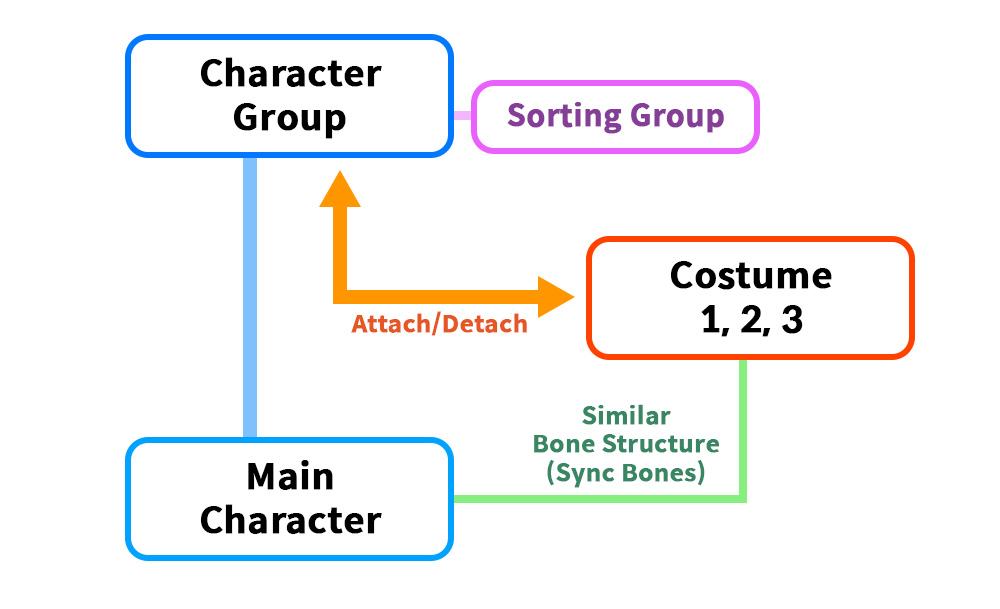
We will write the contents of the above idea into a script.
- Create a GameObject called Character Group and register MainCharacter as a child.
- When Costume is attached, it is registered as a child of Character Group. This is for controlling the Character Group to make the main character and costume move together.
- Add a Sorting Group component to Character Group to solve the rendering problem.
- Synchronize the movement of bones between the costume and the main character.
Let's write a script that contains all of the above.
Let's create a new C# script and write it as follows.
using UnityEngine;
using AnyPortrait;
public class BoneSyncScript : MonoBehaviour
{
public Transform characterGroup;
public apPortrait mainCharacter;
public apPortrait costume1;
public apPortrait costume2;
public apPortrait costume3;
void Start() { }
void Update()
{
//Press the Q or W key to play the main character's animation.
if(Input.GetKeyDown(KeyCode.Q)) { mainCharacter.Play("Idle"); }
if(Input.GetKeyDown(KeyCode.W)) { mainCharacter.Play("Walk"); }
//If you press the number key 1, all costumes will be detached, and costume 1 will be attached.
if(Input.GetKeyDown(KeyCode.Alpha1))
{
DetachCostumes();
AttachCostume1();
}
//If you press the number key 2, all costumes will be detached, and costume 2 will be attached.
if(Input.GetKeyDown(KeyCode.Alpha2))
{
DetachCostumes();
AttachCostume2();
}
//If you press the number key 3, all costumes will be detached, and costume 3 will be attached.
if(Input.GetKeyDown(KeyCode.Alpha3))
{
DetachCostumes();
AttachCostume3();
}
//If you press the number key 4, all costumes will be detached.
if(Input.GetKeyDown(KeyCode.Alpha4))
{
DetachCostumes();
}
}
//Function to detach all costumes
private void DetachCostumes()
{
//Unsynchronize the bones by calling the Unsynchronize function.
costume1.Unsynchronize();
costume2.Unsynchronize();
costume3.Unsynchronize();
//Separates the costumes from the parent GameObject.
//(Positions are assigned to be nicely distributed appropriately.)
costume1.transform.parent = null;
costume1.transform.position = new Vector3(0, 0, 0);
costume2.transform.parent = null;
costume2.transform.position = new Vector3(4, 0, 0);
costume3.transform.parent = null;
costume3.transform.position = new Vector3(8, 0, 0);
}
//Register Costume 1 as a child of the Character Group, and synchronize it with the bone movement of the main character.
private void AttachCostume1()
{
//Register as a child of Character Group and initialize Local location.
costume1.transform.parent = characterGroup;
costume1.transform.localPosition = Vector3.zero;
//Synchronize bone movements.
costume1.Synchronize(mainCharacter, false, false, false, true, SYNC_BONE_OPTION.MatchFromRoot);
}
//Register Costume 2 as a child of the Character Group, and synchronize it with the bone movement of the main character.
private void AttachCostume2()
{
//Register as a child of Character Group and initialize Local location.
costume2.transform.parent = characterGroup;
costume2.transform.localPosition = Vector3.zero;
//Synchronize bone movements.
costume2.Synchronize(mainCharacter, false, false, false, true, SYNC_BONE_OPTION.MatchFromRoot);
}
//Register Costume 3 as a child of the Character Group, and synchronize it with the bone movement of the main character.
private void AttachCostume3()
{
//Register as a child of Character Group and initialize Local location.
costume3.transform.parent = characterGroup;
costume3.transform.localPosition = Vector3.zero;
//Synchronize bone movements.
costume3.Synchronize(mainCharacter, false, false, false, true, SYNC_BONE_OPTION.MatchFromRoot);
}
}
The most important script here is inside the AttachCostume functions.
Please check carefully the part that uses the Synchronize function along with the code to register as a child of characterGroup.
It is also possible to synchronize animations, control parameters or root units if necessary.
A detailed description of the Synchronize function can be found in Related Pages, and you can also see a detailed description of Synchronization of Bones at the bottom of this page.
Now put the script you wrote into the Unity scene to make it work.
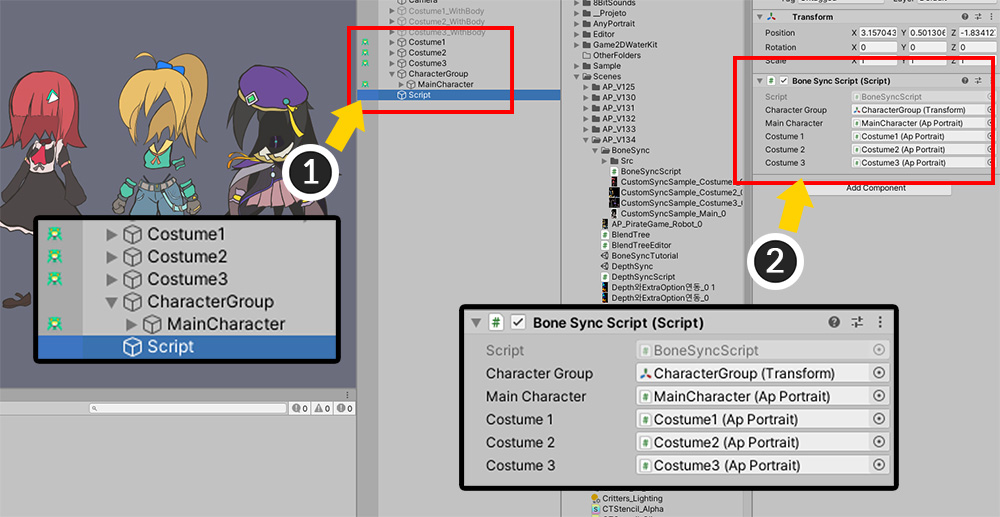
(1) Create a GameObject named CharacterGroup and add the MainCharacter as a child. And, create a new GameObject to place the script into.
(2) Add a script as a component and connect each element.
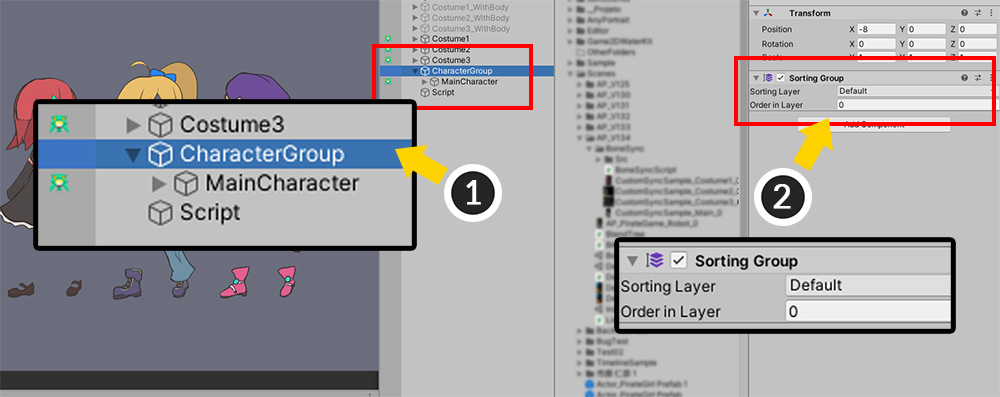
(1) Select CharacterGroup and (2) add the Sorting Group component.
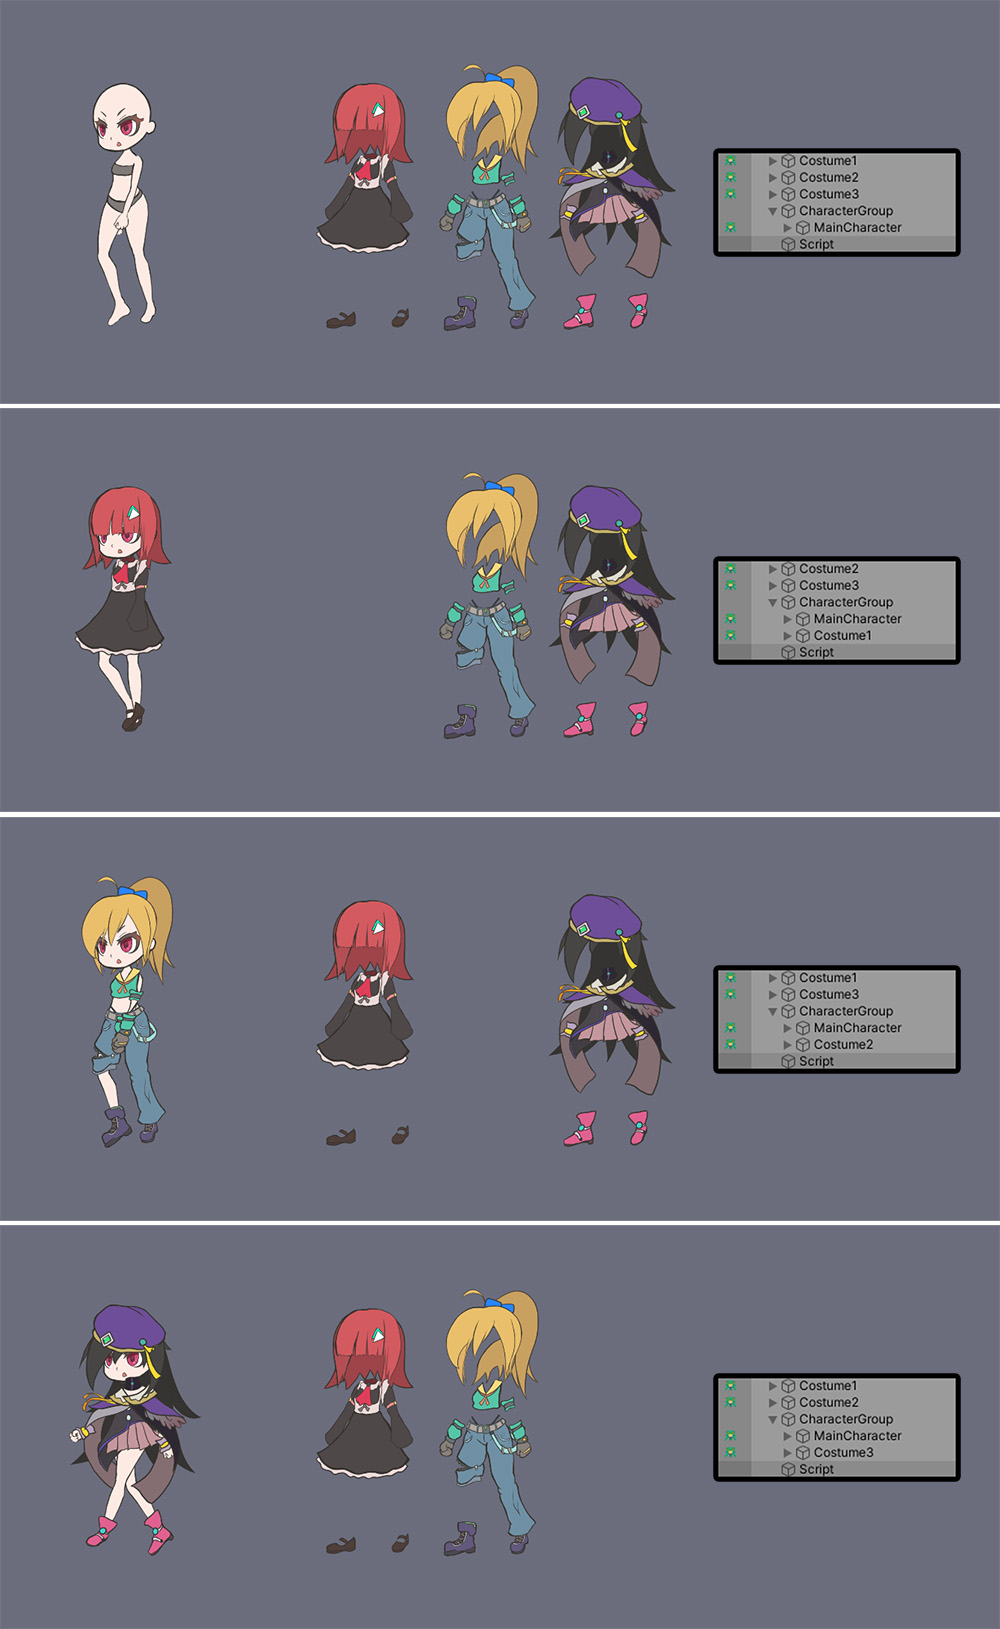
When you run the game, the script runs, and you can make the costumes be worn one by one on your character.
As the bones synchronize, the character and costumes move as if they were one.
Modifying the rendering order of meshes
The basic sync is all done, but there is still work to be done.
If you look closely at the merged character, the rendering order of the overlapping meshes is incorrect.
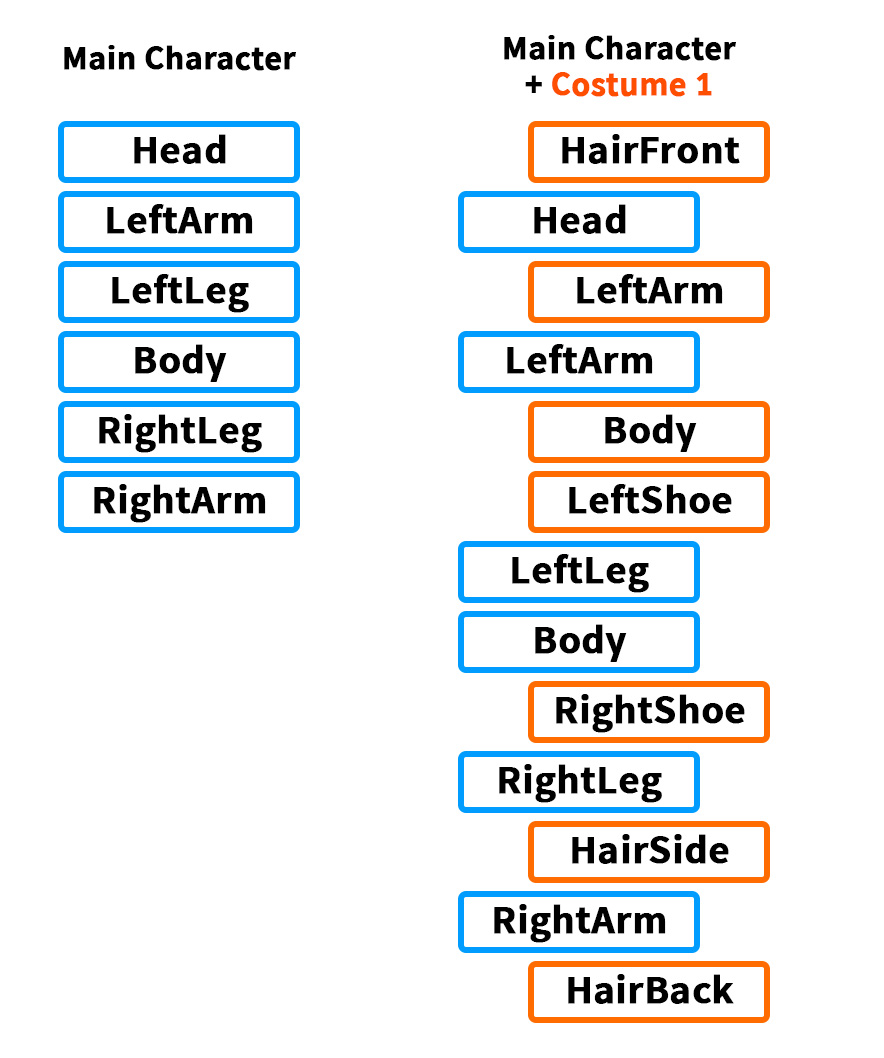
In the case of Costume1, the image layers, that is, the meshes, were drawn as shown above.
Let's modify the script to assign the rendering order of the meshes according to the above order.
(See Related Pages for details on how to set the rendering order for meshes.)
(Code from the previous part omitted)
//Register Costume 1 as a child of the Character Group, and synchronize it with the bone movement of the main character.
private void AttachCostume1()
{
//Register as a child of Character Group and initialize Local location.
costume1.transform.parent = characterGroup;
costume1.transform.localPosition = Vector3.zero;
//Synchronize bone movements.
costume1.Synchronize(mainCharacter, false, false, true, SYNC_BONE_OPTION.MatchFromRoot, false);
//Modify the sorting order of the Costume 1 meshes based on the meshes of the Main Character.
costume1.SetSortingOrder("HairFront", mainCharacter.GetSortingOrder("Head") + 1);
costume1.SetSortingOrder("LeftArm", mainCharacter.GetSortingOrder("LeftArm") + 1);
costume1.SetSortingOrder("Body", mainCharacter.GetSortingOrder("LeftLeg") + 2);
costume1.SetSortingOrder("LeftShoe", mainCharacter.GetSortingOrder("LeftLeg") + 1);
costume1.SetSortingOrder("RightShoe", mainCharacter.GetSortingOrder("RightLeg") + 1);
costume1.SetSortingOrder("HairSide", mainCharacter.GetSortingOrder("RightArm") + 1);
costume1.SetSortingOrder("HairBack", mainCharacter.GetSortingOrder("RightArm") - 10);
}
//Register Costume 2 as a child of the Character Group, and synchronize it with the bone movement of the main character.
private void AttachCostume2()
{
//Register as a child of Character Group and initialize Local location.
costume2.transform.parent = characterGroup;
costume2.transform.localPosition = Vector3.zero;
//Synchronize bone movements.
costume2.Synchronize(mainCharacter, false, false, true, SYNC_BONE_OPTION.MatchFromRoot, false);
//Modify the sorting order of the Costume 2 meshes based on the meshes of the Main Character.
costume2.SetSortingOrder("HairFront", mainCharacter.GetSortingOrder("Head") + 1);
costume2.SetSortingOrder("HairSide", mainCharacter.GetSortingOrder("Head") - 1);
costume2.SetSortingOrder("LeftArm", mainCharacter.GetSortingOrder("LeftArm") + 1);
costume2.SetSortingOrder("Body", mainCharacter.GetSortingOrder("Body") + 1);
costume2.SetSortingOrder("BeltFront", mainCharacter.GetSortingOrder("LeftLeg") + 4);
costume2.SetSortingOrder("Pants_LeftLeg", mainCharacter.GetSortingOrder("LeftLeg") + 3);
costume2.SetSortingOrder("BeltBack", mainCharacter.GetSortingOrder("LeftLeg") + 2);
costume2.SetSortingOrder("LeftShoe", mainCharacter.GetSortingOrder("LeftLeg") + 1);
costume2.SetSortingOrder("RightLeg", mainCharacter.GetSortingOrder("RightLeg") + 2);
costume2.SetSortingOrder("RightShoe", mainCharacter.GetSortingOrder("RightLeg") + 1);
costume2.SetSortingOrder("RightArm", mainCharacter.GetSortingOrder("RightArm") + 1);
costume2.SetSortingOrder("RightArm", mainCharacter.GetSortingOrder("RightArm") + 1);
costume2.SetSortingOrder("HairBack", mainCharacter.GetSortingOrder("RightArm") - 10);
costume2.SetSortingOrder("HairAcc", mainCharacter.GetSortingOrder("RightArm") - 11);
costume2.SetSortingOrder("HairTail", mainCharacter.GetSortingOrder("RightArm") - 12);
}
//Register Costume 3 as a child of the Character Group, and synchronize it with the bone movement of the main character.
private void AttachCostume3()
{
//Register as a child of Character Group and initialize Local location.
costume3.transform.parent = characterGroup;
costume3.transform.localPosition = Vector3.zero;
//Synchronize bone movements.
costume3.Synchronize(mainCharacter, false, false, true, SYNC_BONE_OPTION.MatchFromRoot, false);
//Modify the sorting order of the Costume 3 meshes based on the meshes of the Main Character.
costume3.SetSortingOrder("Hat", mainCharacter.GetSortingOrder("Head") + 2);
costume3.SetSortingOrder("HairFront", mainCharacter.GetSortingOrder("Head") + 1);
costume3.SetSortingOrder("LeftArmFront", mainCharacter.GetSortingOrder("LeftArm") + 4);
costume3.SetSortingOrder("LeftHand", mainCharacter.GetSortingOrder("LeftArm") + 3);
costume3.SetSortingOrder("RightArmFront", mainCharacter.GetSortingOrder("LeftArm") + 2);
costume3.SetSortingOrder("Neck", mainCharacter.GetSortingOrder("LeftArm") + 1);
costume3.SetSortingOrder("LeftArmBack", mainCharacter.GetSortingOrder("LeftArm") - 1);
costume3.SetSortingOrder("BodyFront", mainCharacter.GetSortingOrder("LeftLeg") + 3);
costume3.SetSortingOrder("Skirt", mainCharacter.GetSortingOrder("LeftLeg") + 2);
costume3.SetSortingOrder("LeftShoe", mainCharacter.GetSortingOrder("LeftLeg") + 1);
costume3.SetSortingOrder("RightShoe", mainCharacter.GetSortingOrder("RightLeg") + 1);
costume3.SetSortingOrder("BodyBack", mainCharacter.GetSortingOrder("RightLeg") - 1);
costume3.SetSortingOrder("RightHand", mainCharacter.GetSortingOrder("RightArm") + 1);
costume3.SetSortingOrder("RightArmBack", mainCharacter.GetSortingOrder("RightArm") - 1);
costume3.SetSortingOrder("HairBack", mainCharacter.GetSortingOrder("RightArm") - 10);
}
}
Since meshes are configured differently depending on the costumes, the code for specifying the mesh's Sorting Order is different for each.
The above script was written rough for explanation, but it would be possible to write a more sophisticated script, such as making a nice rule.
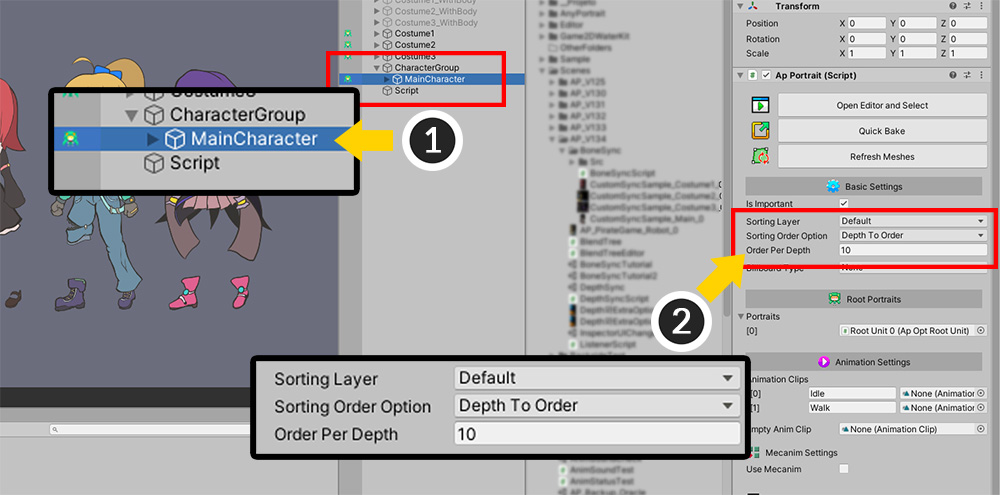
Now go back to the Unity scene and set the Sorting Order option.
(1) Select MainCharacter.
(2) Set Sorting Order Option to Depth To Order, and specify a moderately large value for Order Per Depth. Here we have specified 10.
An example of replacing a character's costumes using this synchronization is complete!
Bone synchronization conditions and options
The characteristics of bone synchronization are as follows:
- The conditions for synchronizing bones are largely Name and Structure.
- In order to synchronize, the names of the bones to be synchronized must be the same.
- The parent-child structure from the root bone must be the same if the name is the same. However, this is slightly different depending on the options.
- The position, shape, and size of the bone are not considered in the synchronization condition.
- Bone with the same name can accidentally be synchronized unintentionally, so be sure to name them well.
- Basically, it should have the same structure from the root bone.
- Consider the order of the root units. Attempts to synchronize with bones contained in the root unit of the same number.
- It is okay if there are some out-of-sync bones.
However, the synchronization result is slightly different depending on the synchronization option.
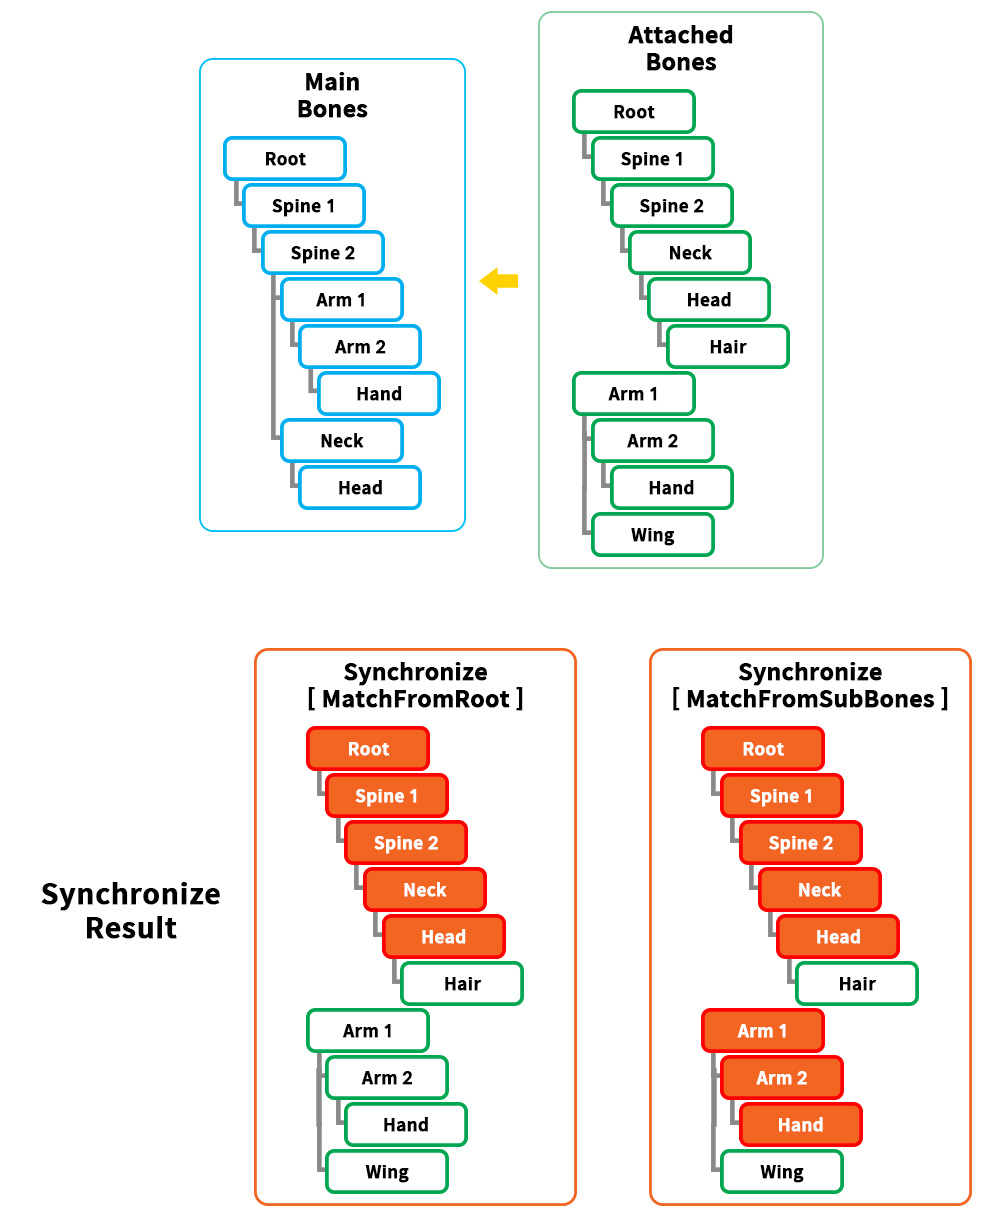
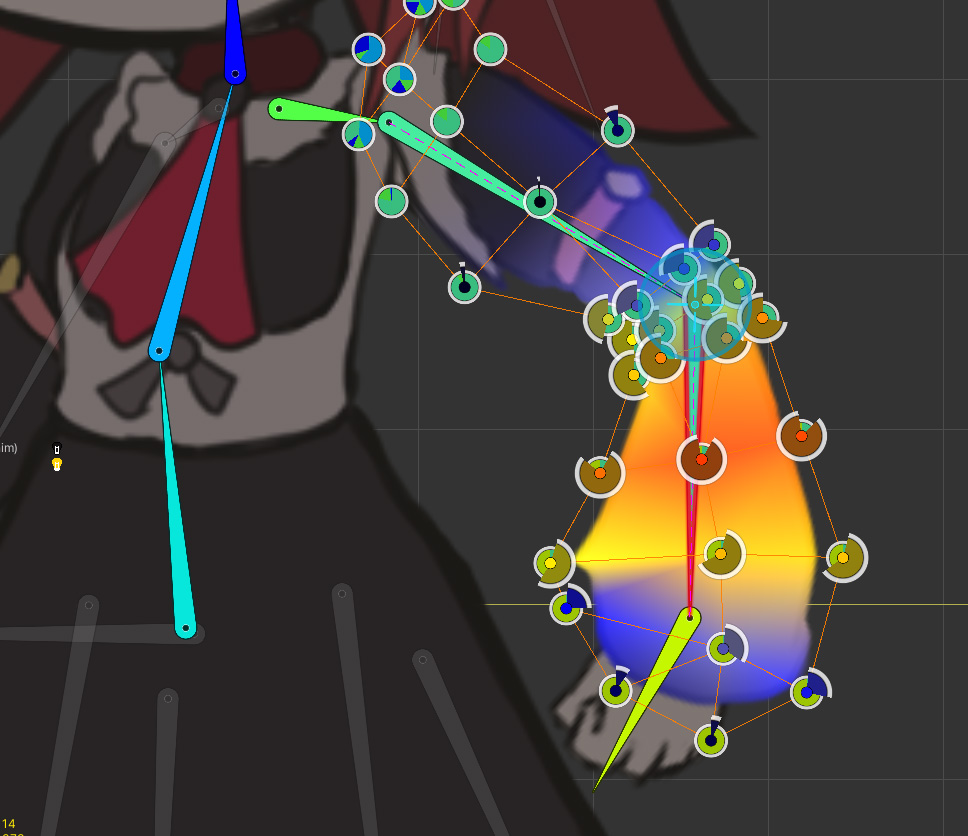
This is a schematic of the difference in synchronization results depending on the synchronization options.
The synchronization result changes according to the SYNC_BONE_OPTION value, which is an argument of the Synchronize function.
- MatchFromRoot : Synchronization requires the same structure from the root bone.
- MatchFromSubBones : Among the synchronized bones, even if the root bone is not the root bone of the target character, it will be synchronized. In the above case, Arm1 > Arm2 > Hand is the that case. (In the opposite cases, however, they are not synchronized.)
1.3.5
Draw Call can increase significantly when using multiple texture atlas.
A method using a common texture or a separate optimization technique is required.
Our team is also considering solving this issue.
Try using the Merging Material function. (Go to the page)