AnyPortrait > Manual > Sorting Order in attaching meshes
Sorting Order in attaching meshes
1.3.4
When making a game, different characters are combined and rendered, or external meshes are created that are equipped as costumes or weapons.
In this case, it is very important to properly modify the rendering order of the attached meshes.
We introduced how to set the rendering order using Sorting Order in another manual.
In addition to this, this page also covers cases where the rendering order of meshes is changed in real time by "Extra Option".
It will be helpful to look at the manuals below related to this page together.
- Script : Initialization, Basic Settings
- Script : Mesh, Mesh Group Transform
- Sorting Layer/Order Setting
- Switching Rendering Order and Images
- Attach Equipments
- Synchronize with other characters
- Synchronize bones to change costumes
Specifically, this example uses the "Synchronize Bones" function.
For more information on this synchronization, please check the related page.
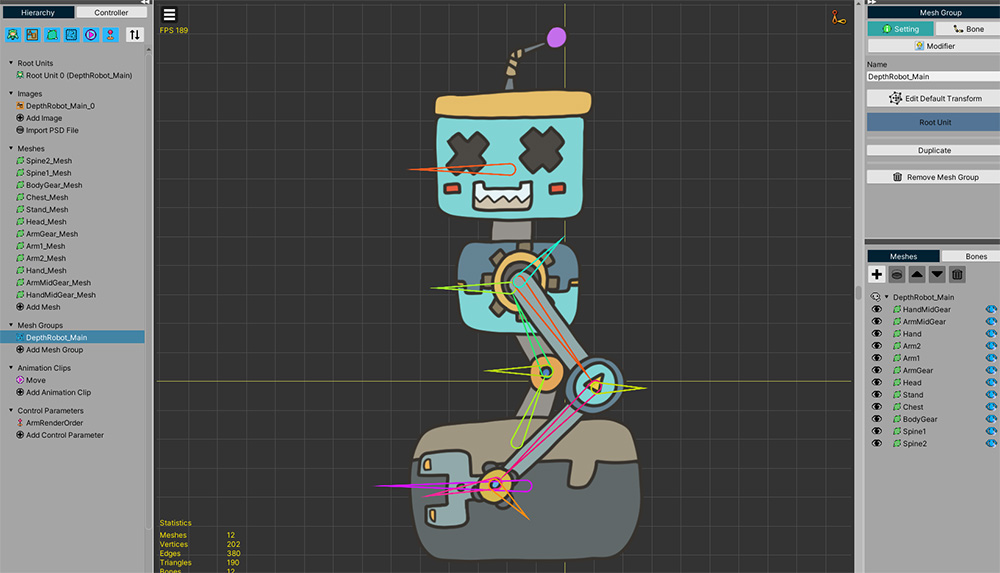
This is a robot character.
We will made that an arm of this robot moves around its body.
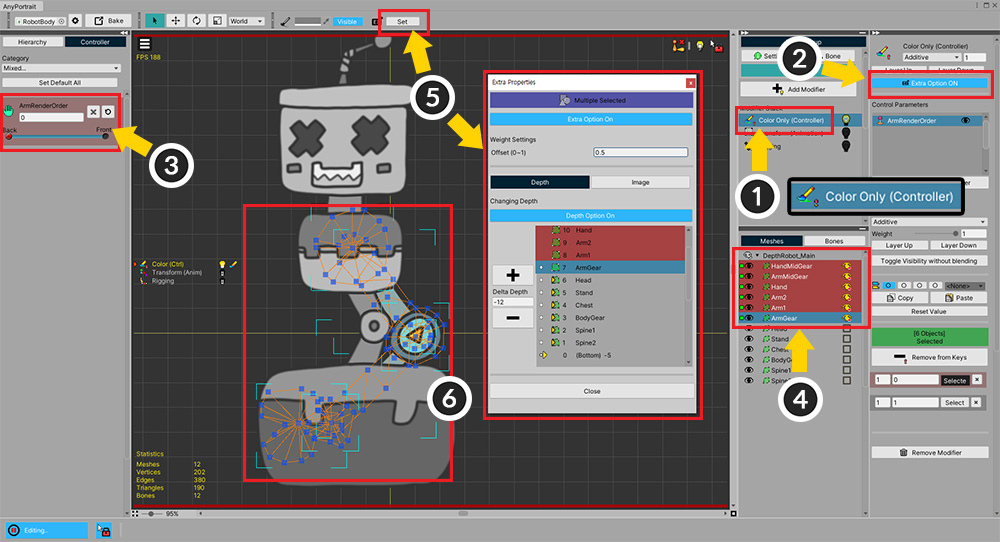
Use "Extra Option" (Related page) to make the arm move forward and backward of the body.
(1) Add the "Color Only (Controller)" modifier.
(2) Activate "Extra Option".
(3) Add keys while creating control parameters to control the rendering position of the arm.
(4) Select the arm meshes.
(5) Press the "Set" button to open the "Extra Option" dialog.
(6) Make the Detph of the meshes move forward and backward of the body.
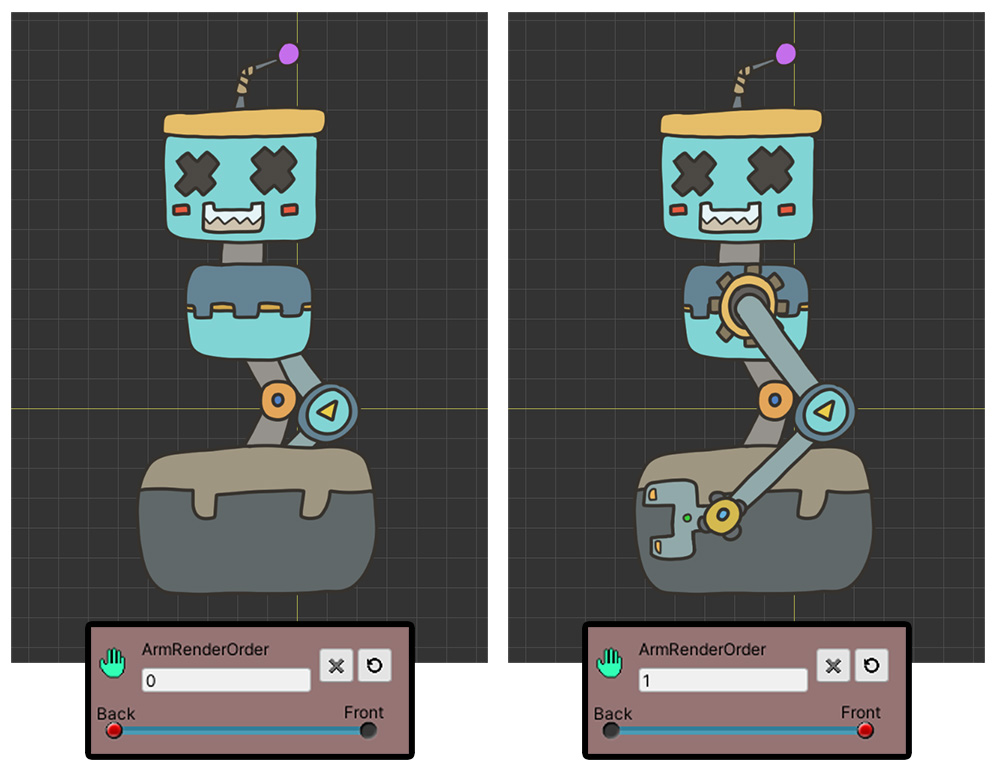
We made the arms render in front or behind the body depending on the control parameters.
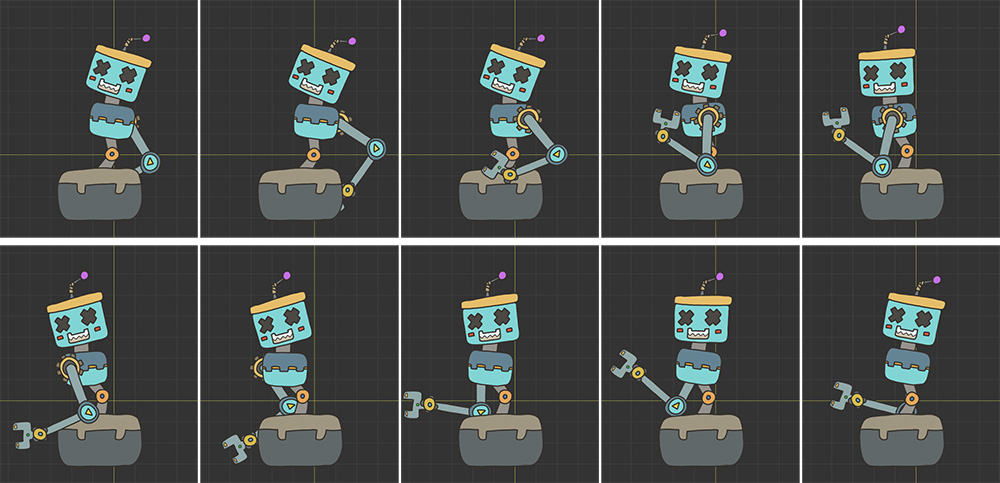
The animation was completed by adding the movement of the bones.
You can see the arm moving around the body.
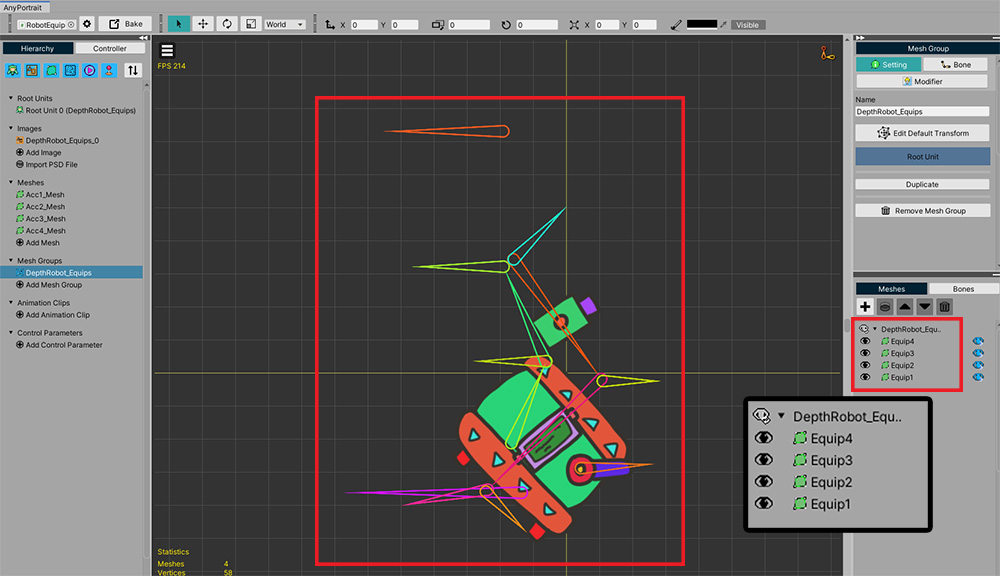
Create a new character.
This character is "equipment mounted on a robotic arm".
It has 4 meshes named "Equip1-4".
This character was created to take advantage of "bone sync".
You can learn more about how to make it and the description of the script below at the related page.
Now let's write a script to make the equipment attach to the robot arm.
using UnityEngine;
using AnyPortrait;
public class RobotDepthSyncScript : MonoBehaviour
{
public Transform robotGroup; // The robot's parent GameObject.
public apPortrait mainCharacter; // Robot character.
public apPortrait equipment; // Equipment character to be attached to the robot.
void Start()
{
}
void Update()
{
// Press the A key to attach the equipment.
if(Input.GetKeyDown(KeyCode.A))
{
Attach();
}
// Press the S key to release the attachment.
if(Input.GetKeyDown(KeyCode.S))
{
Detach();
}
}
private void Attach()
{
// Registers the equipment as a child of the robot's parent GameObject.
equipment.transform.parent = robotGroup;
equipment.transform.localPosition = Vector3.zero;
// Synchronize the bones.
equipment.Synchronize(mainCharacter, false, false, false, true, SYNC_BONE_OPTION.MatchFromRoot);
}
private void Detach()
{
// Detach the equipment from the robot's parent GameObject.
equipment.transform.parent = null;
equipment.transform.position = new Vector3(-5, 0, 0);
// Disable synchronization.
equipment.Unsynchronize();
}
}
With a simple script like the one above, you can make two characters with the same bone synchronize.
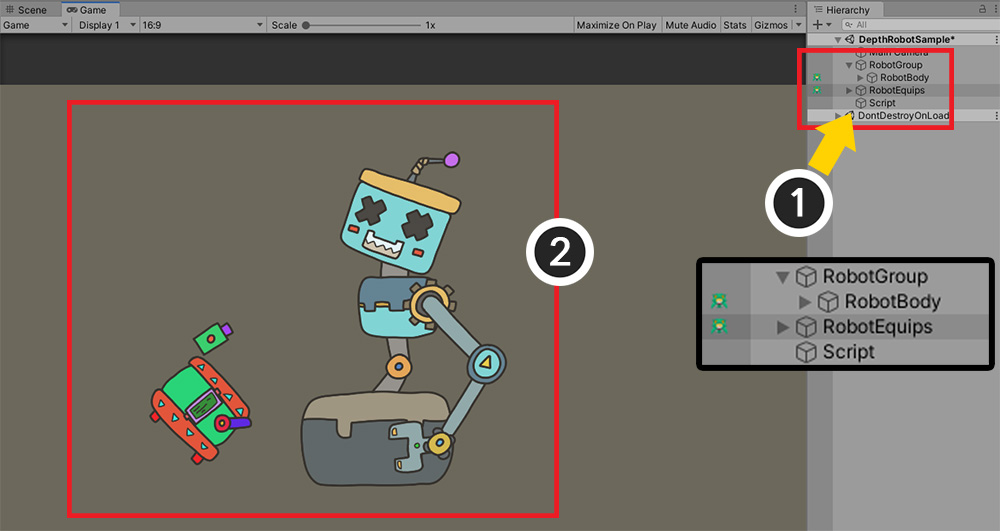
Let's apply the script we wrote in Unity.
(1) Create a new GameObject named "RobotGroup" and register the robot character as a child. Also create a GameObject to add the script to.
(2) This is a Unity scene composed by allocating script members.
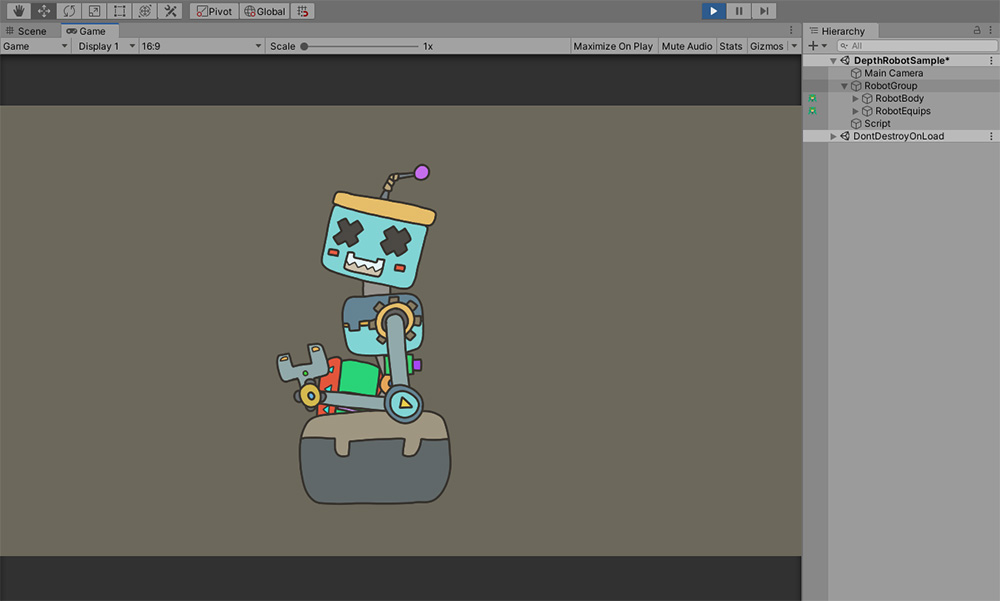
If you run the game and press the A key, you can see the equipment sticking to the robot and moving.
However, the order in which the meshes of the equipment are rendered looks very strange.
Let's modify the script to specify the rendering order.
using UnityEngine;
using AnyPortrait;
public class RobotDepthSyncScript : MonoBehaviour
{
public Transform robotGroup; // The robot's parent GameObject.
public apPortrait mainCharacter; // Robot character.
public apPortrait equipment; // Equipment character to be attached to the robot.
// Store one of the meshes of the robot arm to reference the Sorting Order value.
private apOptTransform targetMesh;
void Start()
{
// Among the arm meshes of the robot, "the mesh rendered in the most front" is stored to a variable.
targetMesh = mainCharacter.GetOptTransform("HandMidGear");
}
void Update()
{
// Press the A key to attach the equipment.
if(Input.GetKeyDown(KeyCode.A))
{
Attach();
}
// Press the S key to release the attachment.
if(Input.GetKeyDown(KeyCode.S))
{
Detach();
}
}
private void Attach()
{
// Registers the equipment as a child of the robot's parent GameObject.
equipment.transform.parent = robotGroup;
equipment.transform.localPosition = Vector3.zero;
// Synchronize the bones.
equipment.Synchronize(mainCharacter, false, false, false, true, SYNC_BONE_OPTION.MatchFromRoot);
// When equipment is attached to the robot arm, it refreshes the rendering order of the equipment meshes.
RefreshMeshDepth();
}
private void Detach()
{
// Detach the equipment from the robot's parent GameObject.
equipment.transform.parent = null;
equipment.transform.position = new Vector3(-5, 0, 0);
// Disable synchronization.
equipment.Unsynchronize();
}
// Refresh the Sorting Order of the equipment meshes.
private void RefreshMeshDepth()
{
// Gets the Sorting Order of the robot character's arm mesh.
int baseSortingOrder = targetMesh.GetSortingOrder();
// Set the Sorting Order one by one to render in front of the robot character's arm mesh.
equipment.SetSortingOrder("Equip4", baseSortingOrder + 1);
equipment.SetSortingOrder("Equip1", baseSortingOrder + 2);
equipment.SetSortingOrder("Equip2", baseSortingOrder + 3);
equipment.SetSortingOrder("Equip3", baseSortingOrder + 4);
}
}
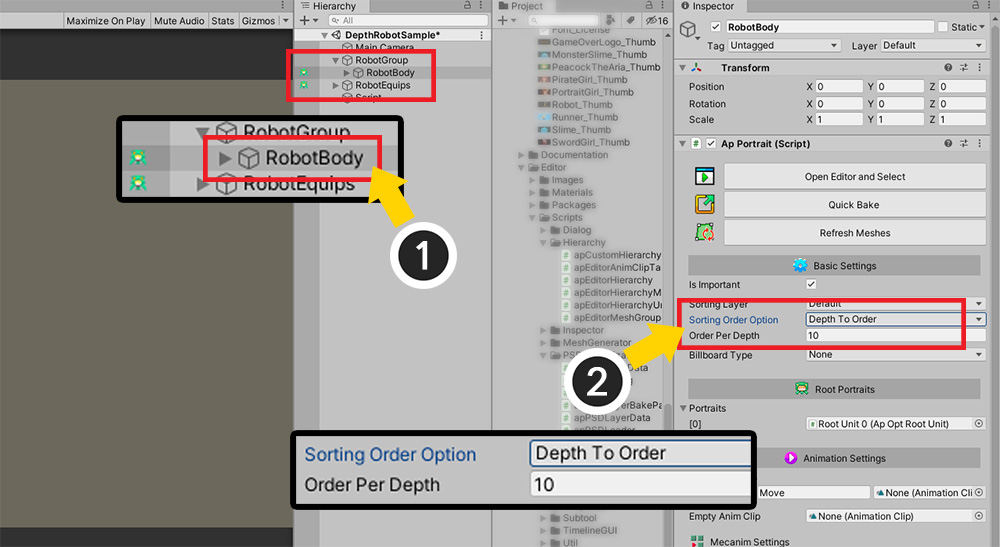
Let's change the settings so that the rendering order changes according to the modified script.
(1) Select the robot character, which is the main character. (It is not an equipment character.)
(2) Change the Sorting Order Option to Detph To Order, and set Order Per Depth to a moderately large 10.
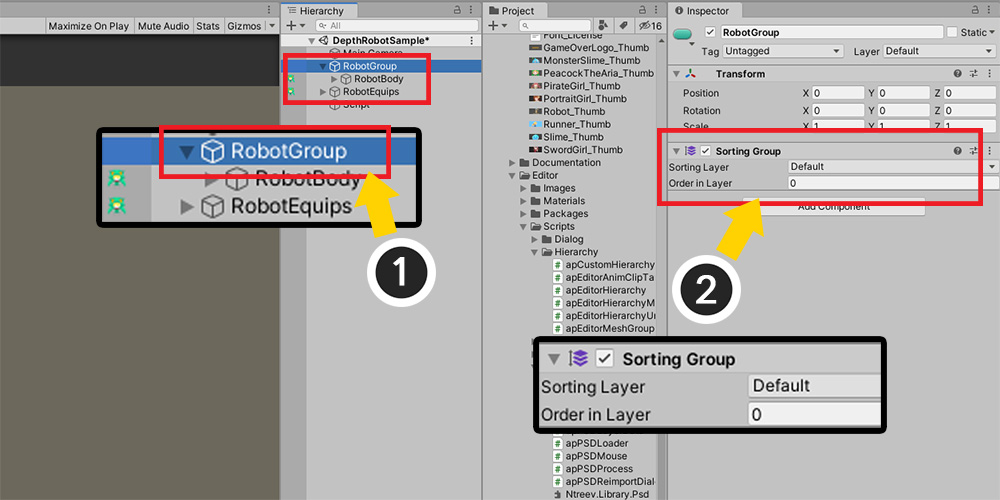
(1) Select the parent GameObject.
(2) Add the Sorting Group component.
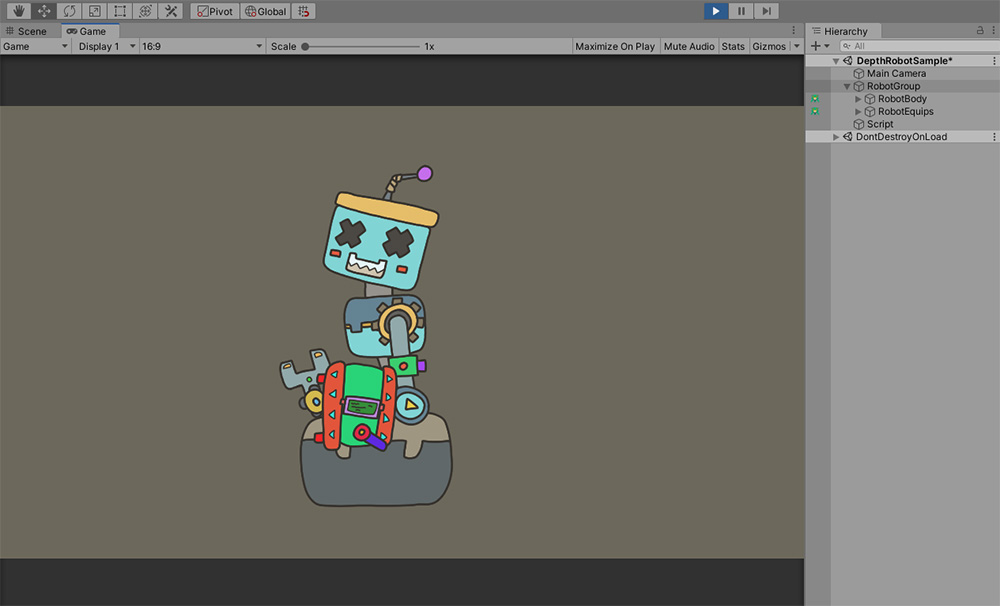
If you run the game and mount the equipment to the robot, you can see the meshes render normally.
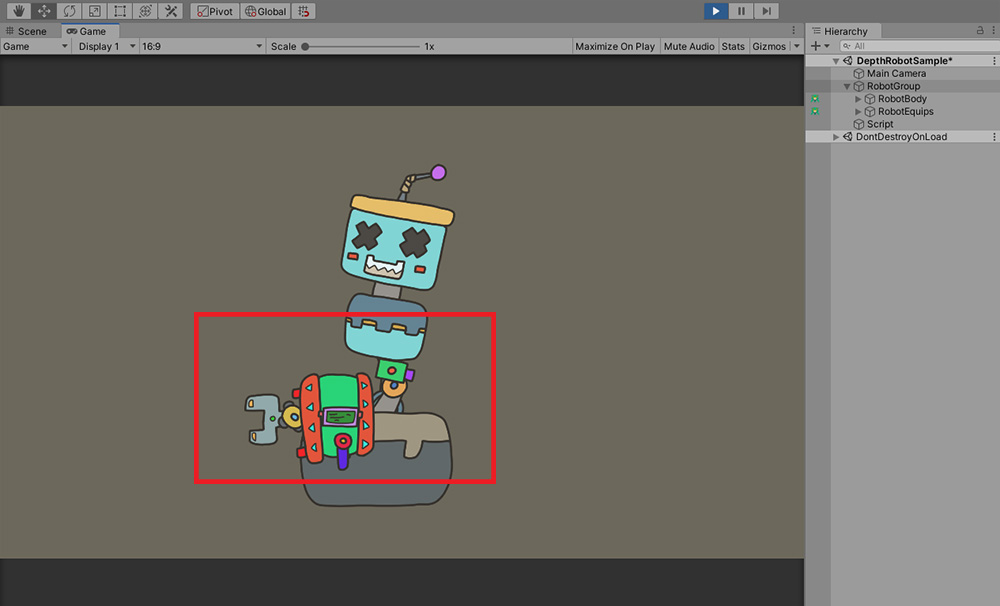
However, it does not completely solve the problem.
This is because the robot's arm meshes are also rendered from the back of the body by "Extra Option".
Even when the robot arm is rendered from behind, you can see the equipment meshes being rendered in front of the body.
(It may be the other way around depending on when the equipment is attached.)
Previously "specify the mesh's Sorting Order when attaching", but to fix this problem, you need to "refresh the mesh's Sorting Order continuously".
Let's modify the script further.
using UnityEngine;
using AnyPortrait;
public class RobotDepthSyncScript : MonoBehaviour
{
public Transform robotGroup; // The robot's parent GameObject.
public apPortrait mainCharacter; // Robot character.
public apPortrait equipment; // Equipment character to be attached to the robot.
// Store one of the meshes of the robot arm to reference the Sorting Order value.
private apOptTransform targetMesh;
// Variables to check if the rendering order of the arm mesh is updated.
private bool isAttached = false; // Whether the equipment is in an attached state.
private int prevSortingOrder = -1; // The value of the SortingOrder of the targetMesh in the previous frame.
void Start()
{
// Among the arm meshes of the robot, "the mesh rendered in the most front" is stored to a variable.
targetMesh = mainCharacter.GetOptTransform("HandMidGear");
}
void Update()
{
// Press the A key to attach the equipment.
if(Input.GetKeyDown(KeyCode.A))
{
Attach();
}
// Press the S key to release the attachment.
if(Input.GetKeyDown(KeyCode.S))
{
Detach();
}
}
// LateUpdate() is used to refer to the Sorting Order value after AnyPortrait character update is processed.
private void LateUpdate()
{
// Checks if the rendering order of the robot arm mesh is changed when the equipment is attached.
if (isAttached)
{
if (targetMesh.GetSortingOrder() != prevSortingOrder)
{
// If the arm mesh's Sorting Order is different from the previous frame, refresh the attached equipment meshes' Sorting Order.
RefreshMeshDepth();
// After processing is completed, it is updated with the Sorting Order value of the current frame.
prevSortingOrder = targetMesh.GetSortingOrder();
}
}
}
private void Attach()
{
// Registers the equipment as a child of the robot's parent GameObject.
equipment.transform.parent = robotGroup;
equipment.transform.localPosition = Vector3.zero;
// Synchronize the bones.
equipment.Synchronize(mainCharacter, false, false, false, true, SYNC_BONE_OPTION.MatchFromRoot);
// When equipment is attached to the robot arm, it refreshes the rendering order of the equipment meshes.
RefreshMeshDepth();
// Store the Sorting Order of the arm mesh immediately after attaching, and store that it is attached in the isAttached variable.
prevSortingOrder = targetMesh.GetSortingOrder();
isAttached = true;
}
private void Detach()
{
// Detach the equipment from the robot's parent GameObject.
equipment.transform.parent = null;
equipment.transform.position = new Vector3(-5, 0, 0);
// Disable synchronization.
equipment.Unsynchronize();
// Since the attachment has been released, enter false so that LateUpdate() does not keep checking the rendering order of the arm mesh.
isAttached = false;
}
// Refresh the Sorting Order of the equipment meshes.
private void RefreshMeshDepth()
{
// Gets the Sorting Order of the robot character's arm mesh.
int baseSortingOrder = targetMesh.GetSortingOrder();
// Set the Sorting Order one by one to render in front of the robot character's arm mesh.
equipment.SetSortingOrder("Equip4", baseSortingOrder + 1);
equipment.SetSortingOrder("Equip1", baseSortingOrder + 2);
equipment.SetSortingOrder("Equip2", baseSortingOrder + 3);
equipment.SetSortingOrder("Equip3", baseSortingOrder + 4);
}
}
The key to the modified script is to keep checking "whether the Sorting Order value of the base arm mesh has changed".
AnyPortrait characters are updated in "LateUpdate()", so you need to check Sorting Order in "LateUpdate()" here as well.
In particular, pay attention to the syntax for comparing the Sorting Order of the previous frame by storing it in a separate variable (prevSortingOrder)!
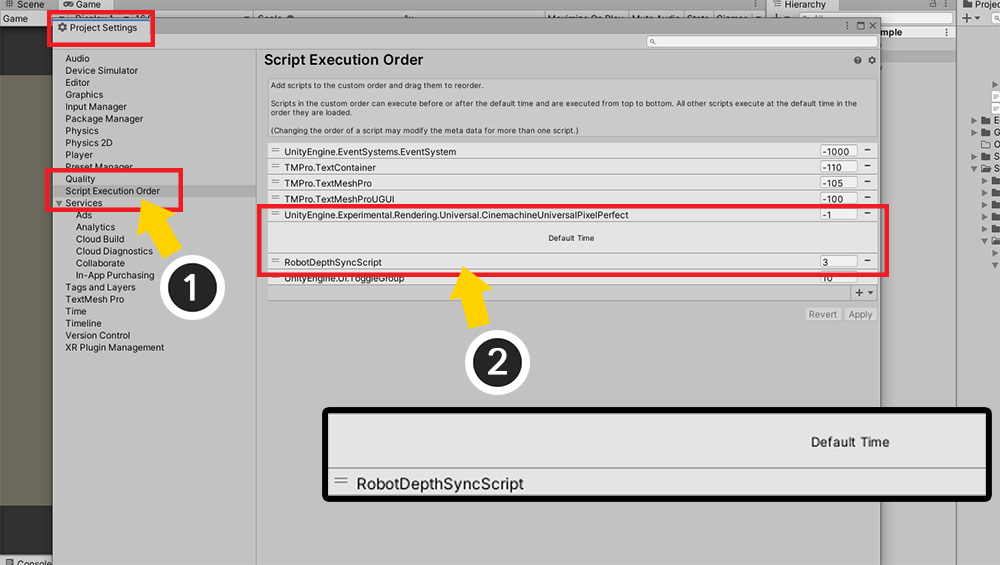
Above we use "LateUpdate()" to check the Sorting Order value, but that code can still be called before AnyPortrait character's update.
In this case, it is difficult to check the "Current Sorting Order" normally.
You need to make this script run later than AnyPortrait.
(Similar issues are also addressed in the related page.)
(1) Open "Project Settings" in Unity and select "Script Execution Order".
(2) Drag the created script and add it to the script list and place it below "Default Time".
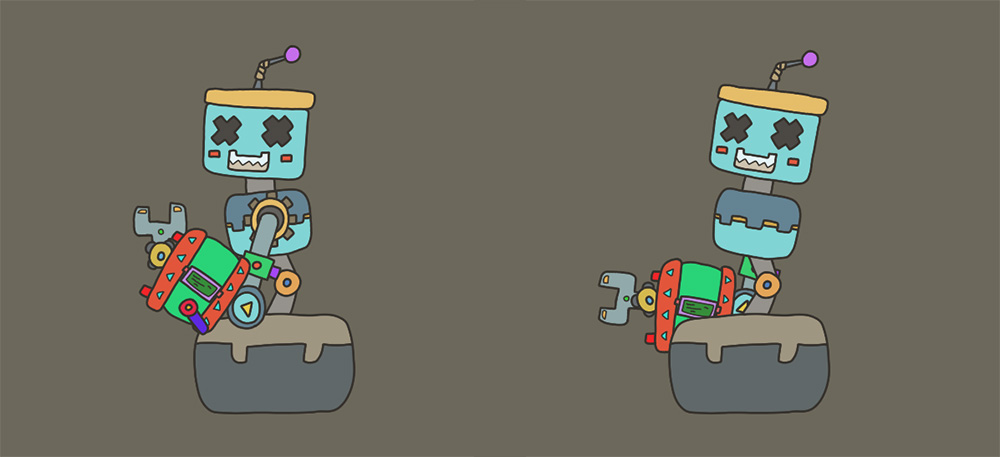
When you run the game, you can see the equipment moving and rendering according to the robot's arm movement and rendering order.
How to detect a change in Sorting Order
In this page, after storing a specific mesh as a variable, we checked the change of Sorting Order.
In addition, it is also possible to use "the value of the control parameter that determines the Extra Option" or use the "Animation event".
Assigning Sorting Order to Attached Meshes
The order of the meshes will be determined by the illustration you create.
So, it is up to you to decide on which mesh the attached mesh will be placed before or after.
It's a quick and easy way to specify the name and order of the meshes directly in the script, as is the case on this page.
However, if you want to attach various objects, it would be better to write a script with separate data or rules.
About the issue of Draw call
Draw calls increase significantly when meshes with different images or materials are rendered staggered.
To solve this, you need to share an image or create a special material.
Our team is considering features that can minimize the increase in draw calls in this case.
If you give us your opinion on this, we will actively reflect it in development.