AnyPortrait > Manual > Bake Dialog
Bake Dialog
1.6.0
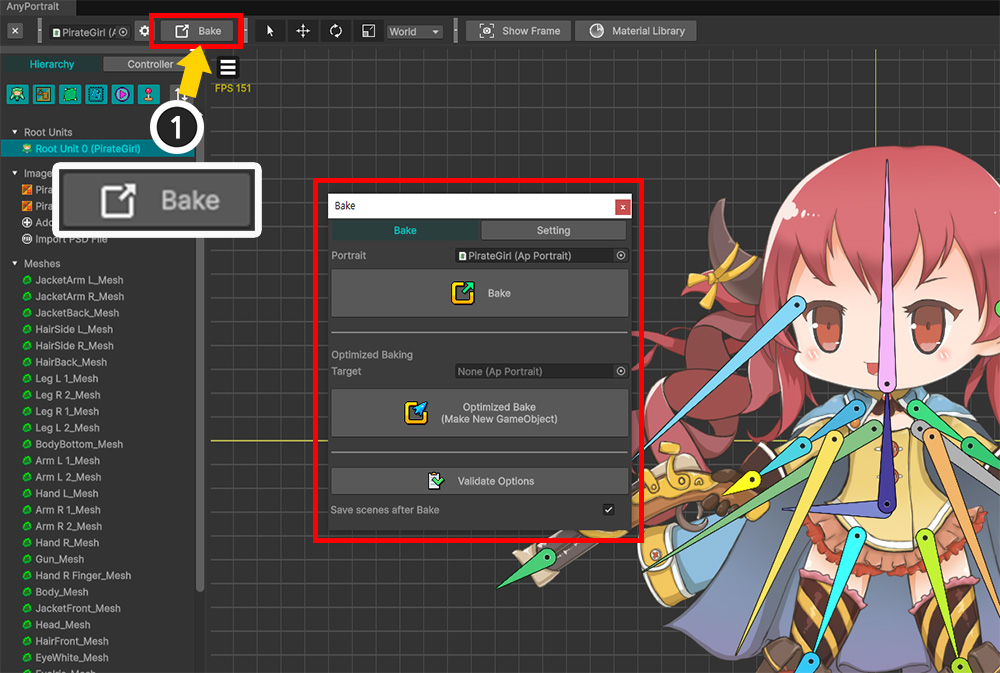
As of v1.1.0, the UI of the Bake dialog has been partially changed.
When you press the Bake button at the top of the screen, the Bake dialog box appears.
At the top of the dialog are the Bake tab and the Setting tab.
The Settings tab contains settings for apPortrait for Bake.
[ Bake Tab ]
1. Portrait : The apPortrait currently being edited.
2. Bake : Bake to Unity scene.
3. Optimized Baking Target
4. Optimized Bake : Optimized Bake to Unity scene.
5. Validate Options : Opens a dialog that checks whether the Bake options are valid for the current project's settings. (Related page)
6. Save scenes after Bake : Save the current scene when baking to ensure that your work is safely saved.
[ Setting Tab ]
7. Project Category
: The following settings are changed and saved per project.
8. Color Space
: Bake according to Color space. (Gamma / Linear) (Related page)
9. Render Pipeline
: This option can be set according to the project's Render Pipeline (Default / Scriptable Render Pipeline).
(This option is supported since Unity 2019.)
This option causes the clipping mesh to render properly.
See the following pages for a description of the render pipeline and materials.
(Material Library / Universal Render Pipeline)
10. Set Ambient Light to Black color
: This makes the Unity scene's Ambient color black to prevent characters from rendering too bright.
11. Portrait Category
: The following settings are saved per portrait.
12. Bake Scale : Since the coordinate system of AnyPortrait is different from the coordinate system of Unity, it is the ratio of size to fit this.
13. Z Per Depth : The Z interval of each mesh. Too small may cause Z-Fighting problems.
14. Sorting Layer / Order
: This is an option for how to determine the rendering order of meshes. (Related page)
- Sorting Layer : Layers specified in project settings that determine rendering order.
- Sorting Order Option : This is an option for how to assign Sorting Order to meshes. You can enter the same value or specify different values depending on the order.
- Sorting Order : The Sorting Order value is assigned to meshes as this value.
- Order Per Depth : Determine how differently the Sorting Order will be assigned depending on the depth difference between the meshes.
15. Mecanim
: This is an option to use Mecanim. (LINK
- Is Mecanim Animation : Whether to use Mecanim or not.
- Animation Clip Export Path : This is the path where Animation Clip assets included in Animator are created.
16. Update Options
: These are options for how updates are handled when playing the game.
- Main Logic Event : Set which event the main logic will be called. (Related page)
- Is Important : For unimportant objects or NPCs, you can turn off Important and limit updates for optimization. (Related page)
- Mesh Update Frequency : Animations can play at low FPS. (Related page)
- Invisible Mesh Update : Set whether to update invisible meshes by modifiers or scripts. In some cases, such as applying Physics modifiers, invisible meshes can be made to update continuously.
- Clipping Process : If you are experiencing clipping rendering issues due to script execution order issues, you can change when the clipped mesh is processed. (Related page)
17. Billboard
: It is possible to use perspective cameras to place characters in a 3D scene. (Related page)
- Billboard : Decide whether and how to apply the Billboard feature.
- Set Sort Mode to Orthographic : This option forces the Sort Mode of the current project to be Orthographic, resulting in better billboard rendering.
- Parent's Rotation : Whether the parent object's rotation will be applied to the billboard.
18. Shadow / Probe
: You can specify properties related to the shadow and Probe of the created Mesh Renderers at once.
(In the default Shader, shadows are not applied even if Receive Shadows is turned on.)
19. VR / Multi-Camera
: It is the rendering option when using VR or using multiple cameras.
This option makes the clipping mesh and billboard calculations work for your environment.
Refer to the following page for the description of VR.
(Build to VR / Rendering with Multiple Cameras)
- VR / Multi-Camera : Determine how to render in VR or multi-camera.
- Mask Texture Size : You can adjust the resolution of the render texture on the clipping mask in VR.
- Check Cameras : This is a way to check the number of cameras in-game.
20. Flipped Mesh
: This is an option about making meshes to render normally when their scale is inverted.
Depending on the option, the rigged mesh will also be included in this processing.
(Related page)
21. Scale of Root Bone
: This is an option for calculating the scale of the child mesh group and the root bone of that mesh group.
(Related page)
22. Unspecified value in animation transition
: This is an option that determine whether specified values are restored to default or retained as last in the next animation that transitions.
- Control Parameter : This is an option when control parameters are not specified.
23. Teleport Calibration
: This is an option that temporarily reduces the physical effect when the character “Teleports” by moving beyond the distance set for 1 frame.
- Teleport Calibration : Whether to temporarily reduce physical effects when teleportation occurs.
- Position / Rotation / Scaling : If each property changes more than the set value during one frame, a “teleportation” is considered to have occurred.
24. Root Motion Options
: The movement of an animation can be applied to the parent GameObject. (Related page)
- Root Motion Method : This is the root motion method.
- Options Per Axis : You can specify a different method for root motion for each axis.
- Parent Transform Type : The type of parent object to which the root motion is applied.
25. IK Method
: You can decide which algorithm the IK controller operates by. (Related page)
26. Save Settings as Default
: Save the current Bake settings as "defaults" so you can quickly apply them to other portraits.

Change Ambient Light setting
1.1.2
If you create a character in AnyPortrait and then bake it, you may have experienced the character's appearance too bright.
This is because the character of AnyPortrait receives the Ambient Light of the scene.
You need to change the Ambient Light to black for proper application, and you can do this quickly in the Bake dialog.
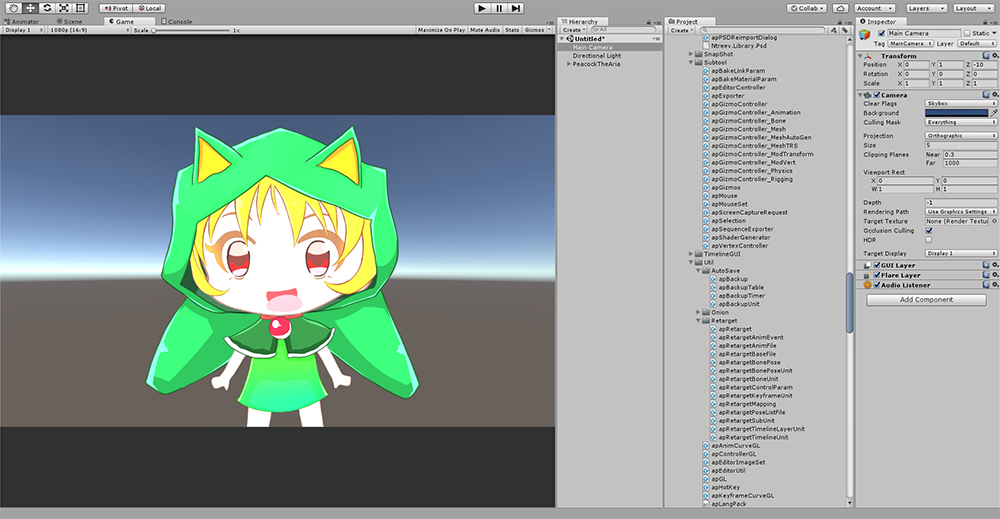
This is the render screen in the scene right after Bake.
You can see that it is being rendered too bright, unlike the original color.
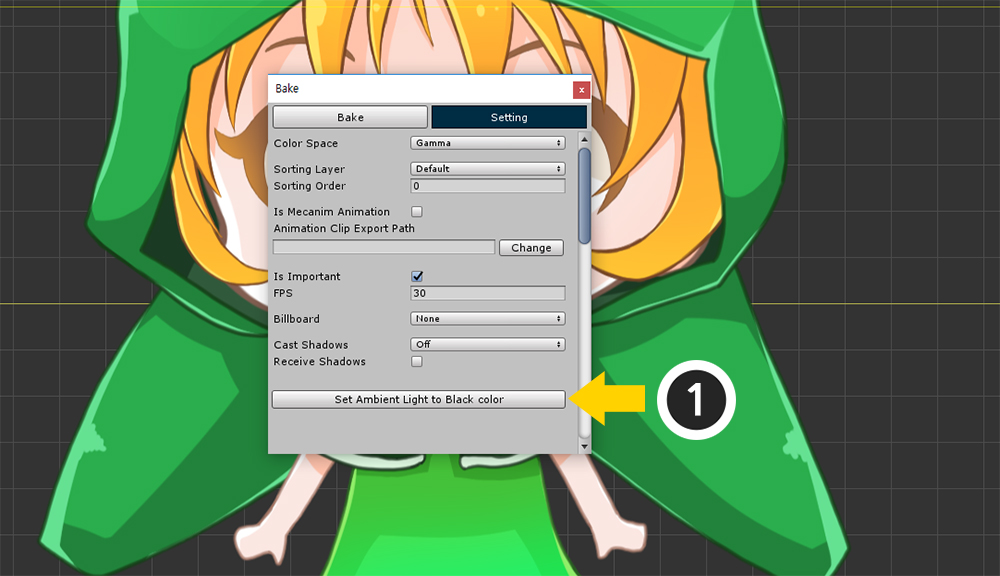
On the Setting tab of the Bake dialog, click the "Set Ambient Light to Black Color" button.
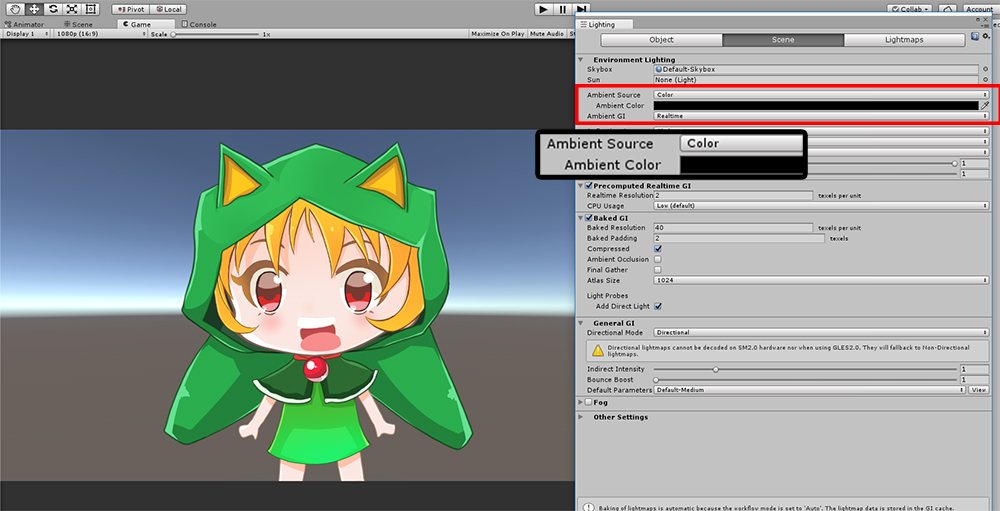
You can see that the Ambient settings change and render to normal brightness.
Change Render Pipeline Option Automatically
1.3.5
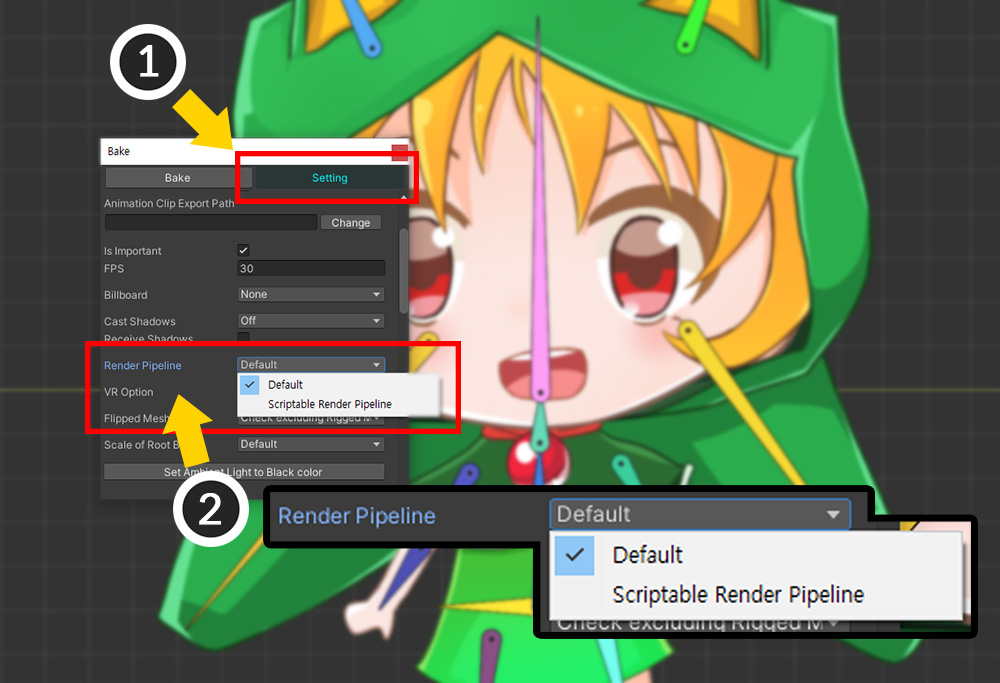
If the project's render pipeline is set to URP, etc. other than the default, you need to change the Render Pipeline option in Bake's settings to Scriptable Render Pipeline as above.
In particular, it is essential to make the clipping mesh behave normally.
In AnyPortrait v1.3.5, if the project's render pipeline and Bake settings do not match, it is checked and automatically changed.
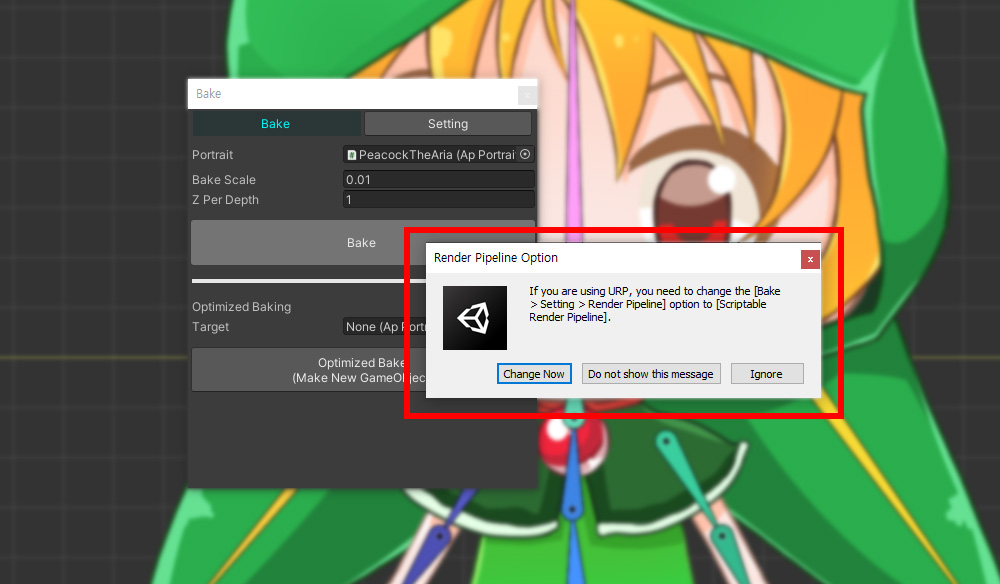
When running Bake, if the Render Pipeline option is not suitable for using URP or vice versa, the above message will appear.
Let's click the Change Now button.
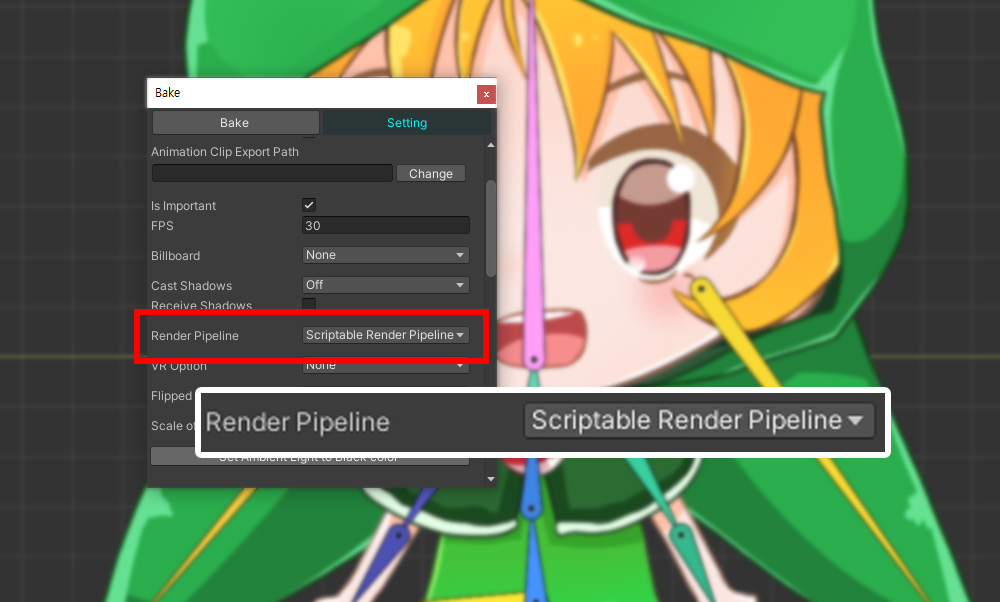
It is automatically changed according to the render pipeline settings of the current project.
If you click the Do not show this message button in the message, the message will no longer appear.
If you want to make the message appear again, enable the option in Settings Dialog. (Related Page)
Note
- This message only appears in Unity 2020 or newer versions.
- Scriptable Render Pipeline other than URP is not recognized.
Quickly Apply Bake Settings to Other Characters
1.4.2
Setting Bake settings for each character every time is cumbersome.
Here's how to avoid cumbersome work by setting the set values as default values.
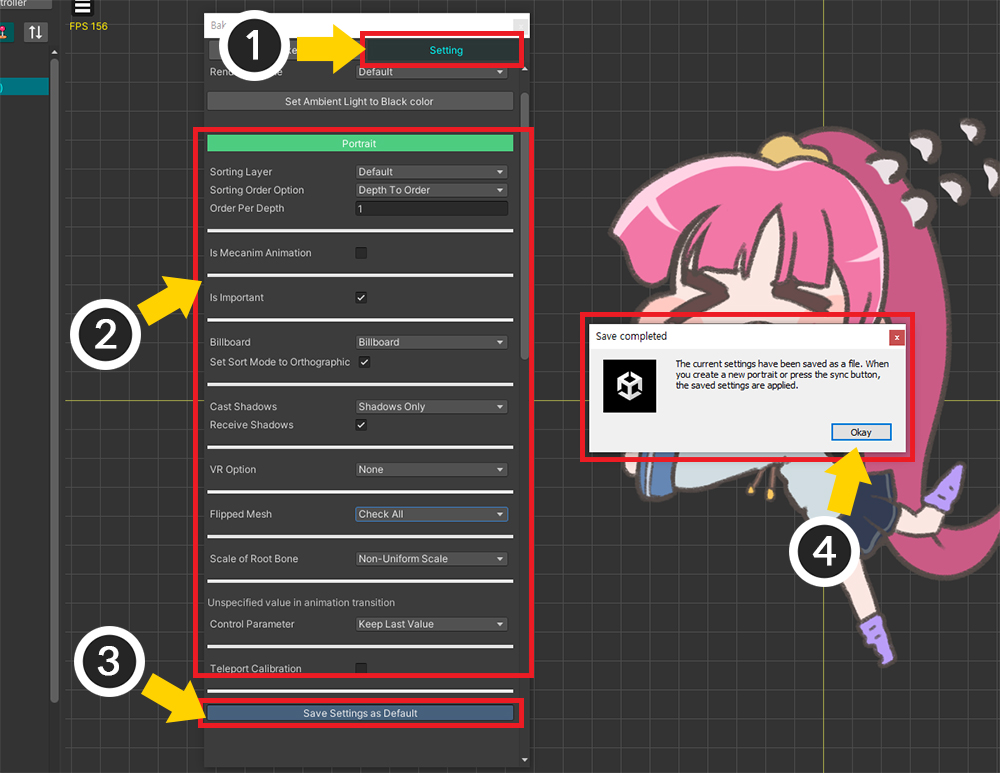
(1) Select the Setting tab.
(2) Check the options that will be applied when baking and set them appropriately.
(3) Click the Save Settings as Default button.
(4) Check the information message and press the Okay button.
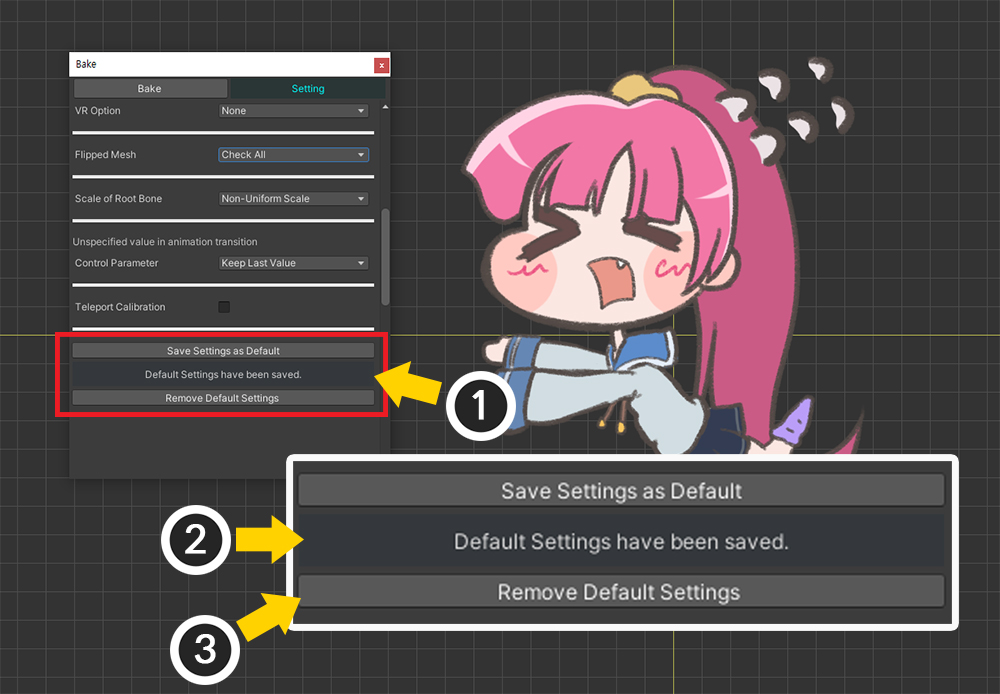
(1) If the Bake settings are saved, the UI will change as above.
(2) A message indicating that the default settings have been saved is displayed.
(3) If you want to delete the saved values, press the Remove Default Settings button.
Note
The settings are saved as a text file named "AnyPortrait_ProjectSettings.txt" in the project folder.
This file is compatible with version control tools, so it's good to use it in sync with other development environments.
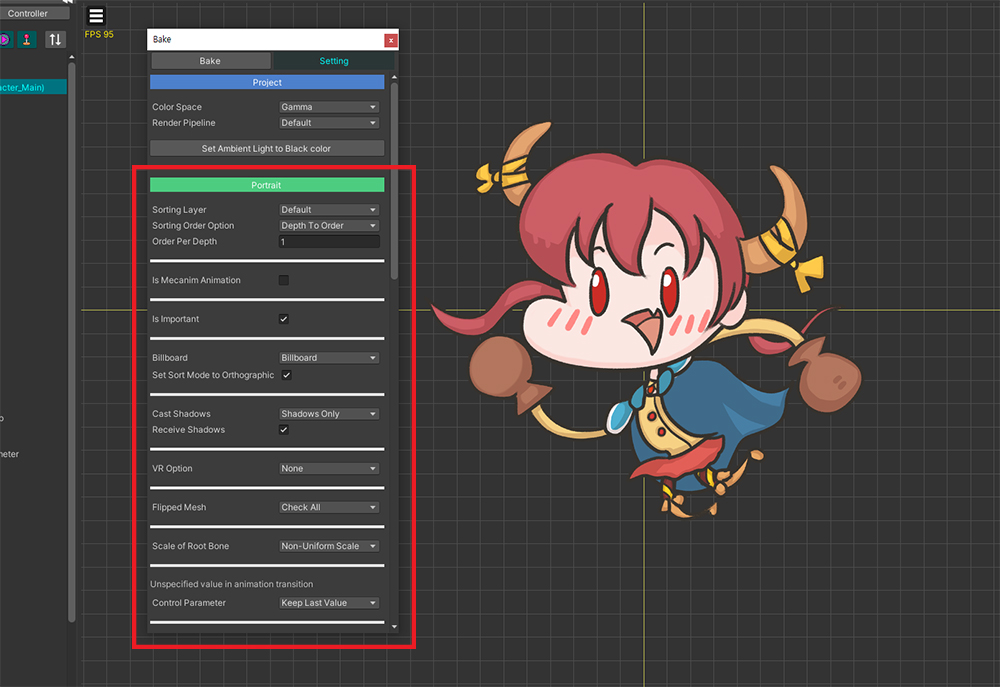
Let's create a new character and open the Bake dialog.
You can see that it is set the same as it was saved as default.
(However, the settings of the character created before saving as default will not be changed.)
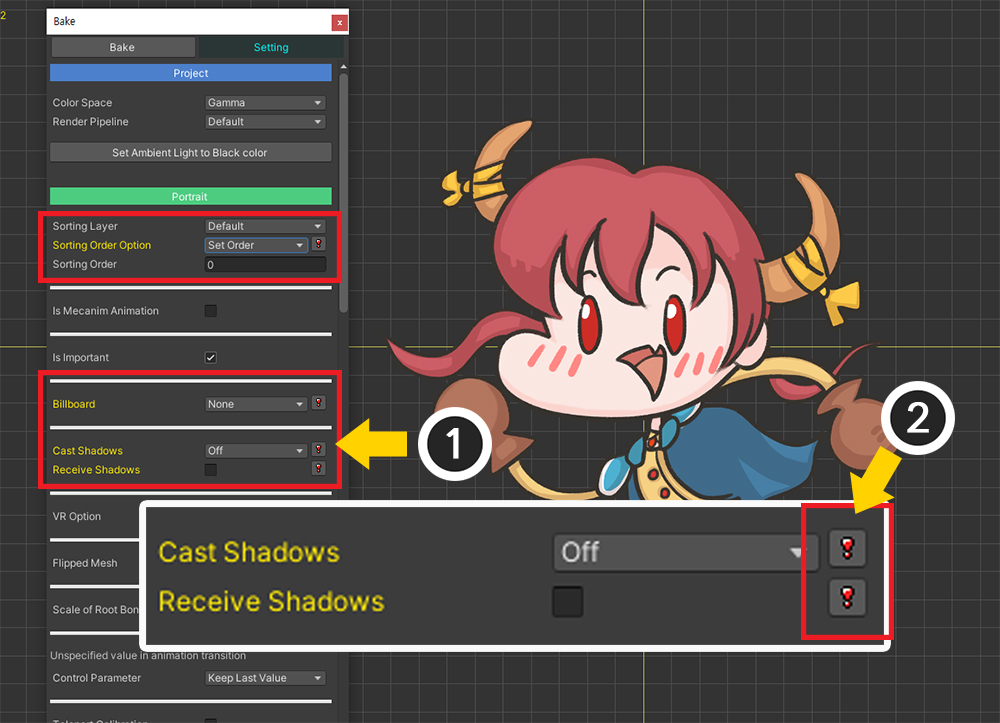
(1) If you select an option different from the saved default, the UI will change as above.
(2) A "!" button will appear, pressing this button will restore the option to its saved default.
About how Bake settings are stored
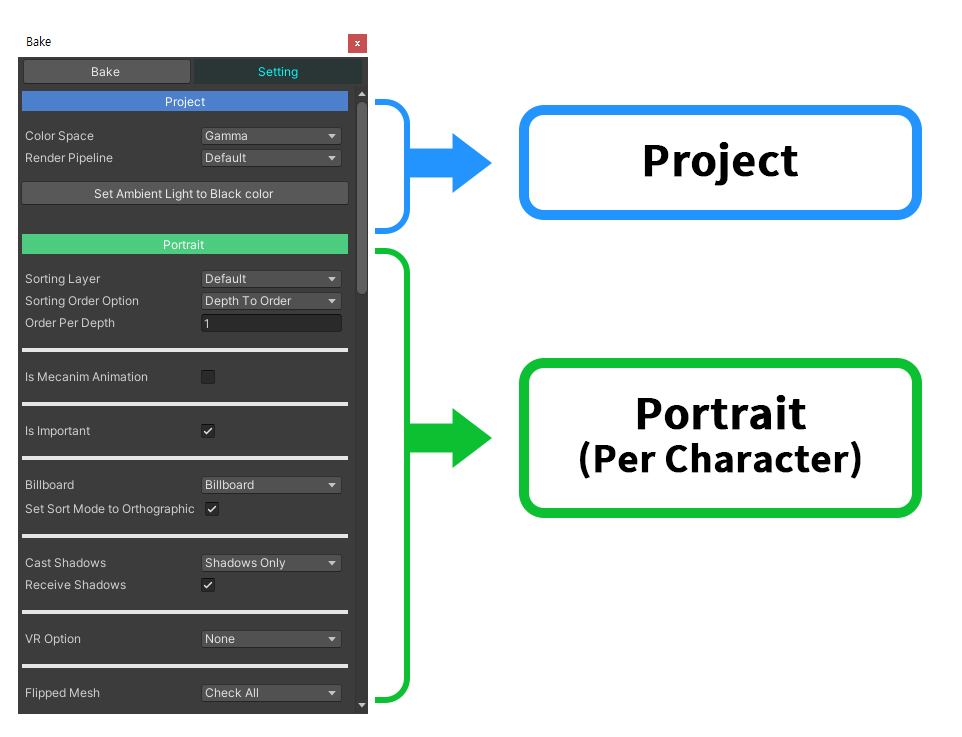
Some of Bake's settings are saved per project, some per character.
If you change an option in the "Project" category, it will be applied to other characters as well.
Conversely, changing the options in the "Portrait" category will not affect other characters.