AnyPortrait > Manual > Setting Dialog
Setting Dialog
1.4.2
You can change the settings of the AnyPortrait editor or character using the "Setting Dialog".
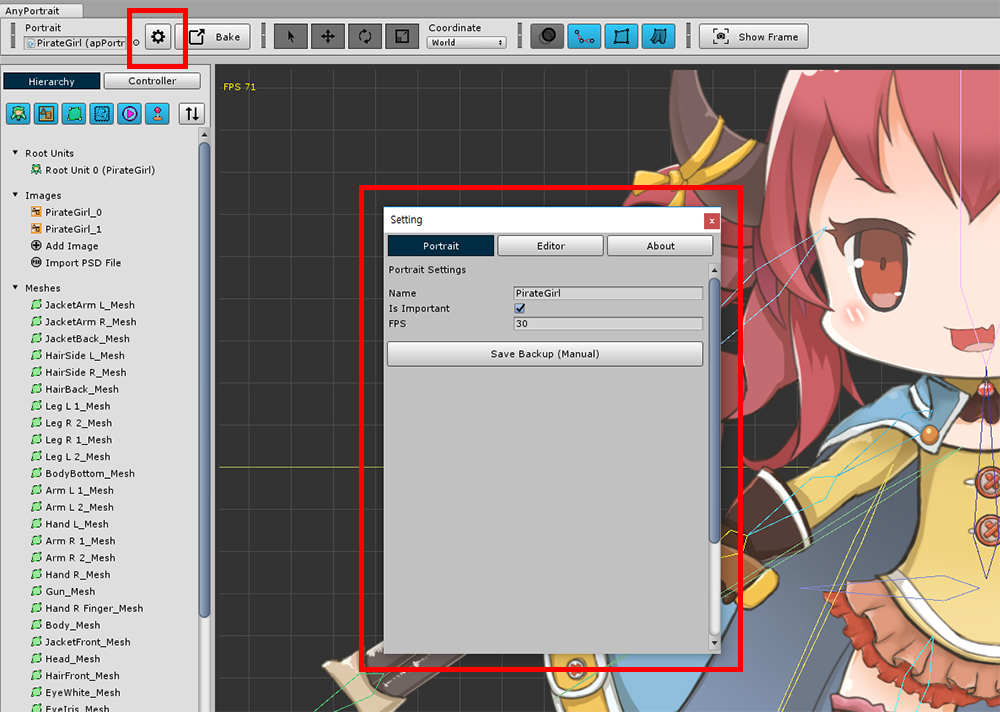
Click the gear icon at the top of the editor to open the "Settings dialog".
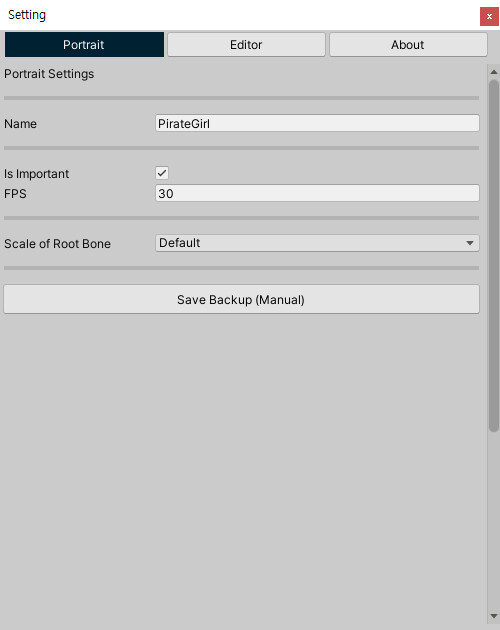
When you select the Portrait tab, the default setting for Portrait appears.
Settings related to bake can be changed in "Bake dialog" (related page).
1. Name : Name of Portrait.
2. Is Important, FPS
: Important option.
When this option is turned on, it will be updated every frame, and when the option is turned off, it will update to the frequency of FPS.
For more information, please visit the related page.
3. Scale of Root Bone : This is the calculation method for the scale of bones.
For more information, please visit the related page.
4. Save Backup (Manual) : Creates a backup file.

In the Editor tab, you can change the settings related to AnyPortrait.
You can change the language of the editor, the information displayed, the automatic backup, and the color options.
Details can be found below.
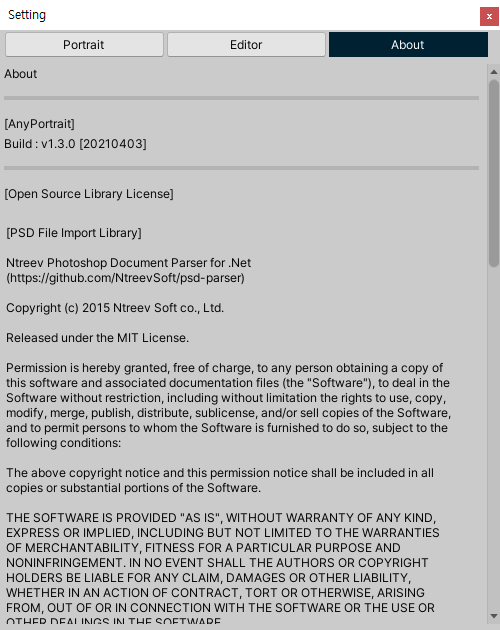
The build version of AnyPortrait and open source licenses are listed on the About tab.
AnyPortrait follows Unity's "Asset Store Terms of Service and EULA" and is not specified here.
(Terms of Service page)
Settings on the Editor tab
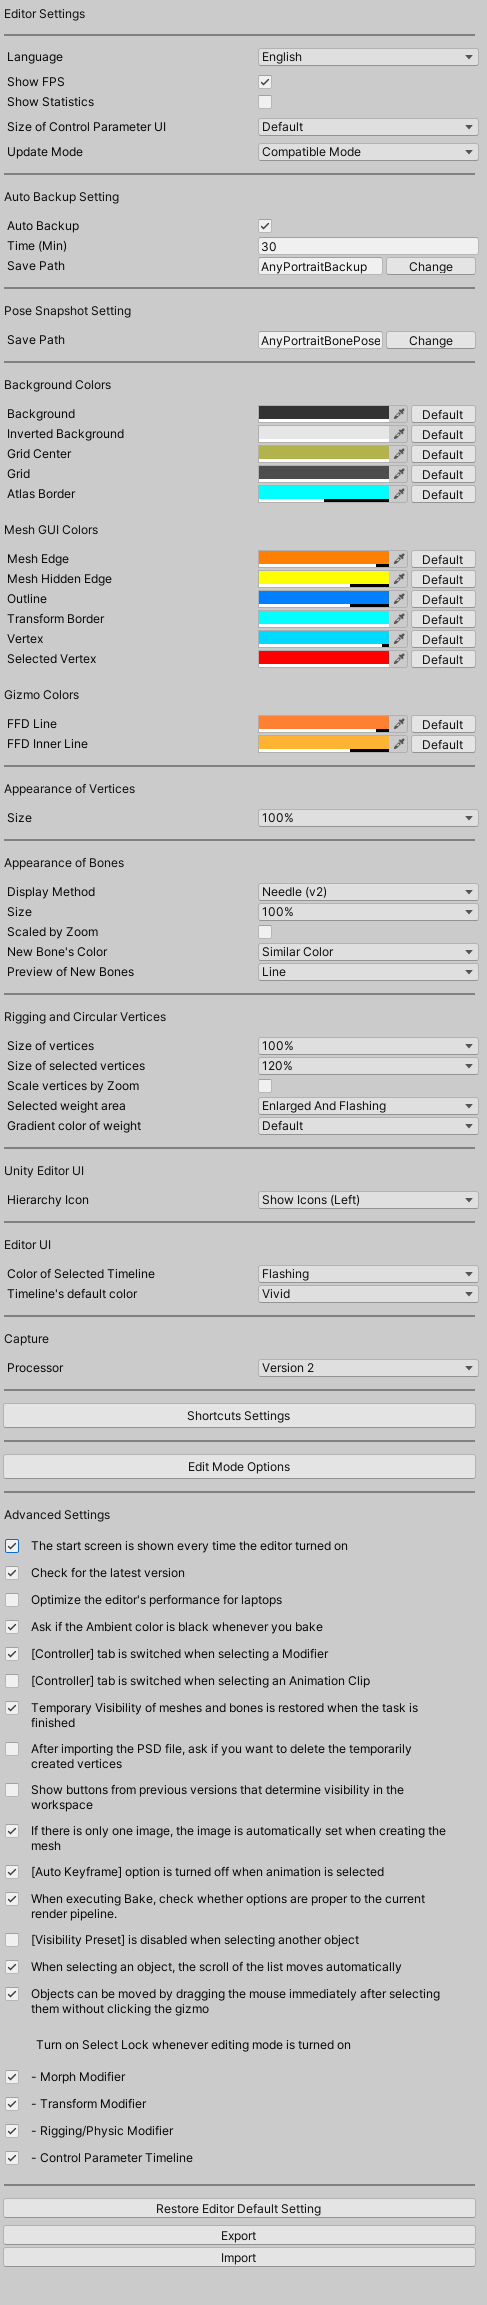
1. Language : You can change the language of the editor. (English, Korean, French, German, Spanish, Italian, Danish, Japanese, Chinese, Polish)
2. Show FPS : The editor's FPS (Frames Per Second) is displayed in the workspace.
3. Show Statistics : Information such as "the number of vertices" and "the number of meshes" of the object to be rendered is output to the workspace.
4. Size of Control Paramter UI : You can change the height of the control parameter UI on the left side of the screen. (v1.4.0)
5. Update Mode
: Determines the update method of the editor itself. The existing Compatible Mode is selected, and you can also change to Accelerated Mode, which operates by installing an external plug-in to improve performance. (v1.3.2)
6. Auto Backup, Time, Save Path
: These are automatic backup settings. You can set the number of minutes to save and the path to save.
7. Pose Snapshot Setting
: When you create an animation that contains bones, you can save and open the pose. The path set in this option will be used.
8. Background Colors
: The background color of the workspace and the color of the grid and the outline of the Atlas.
9. Mesh GUI Colors
: The color of the mesh, vertex, and outline.
10. Gizmo Colors
: The color of FFD tool.
11. Appearance of Vertices
: Settings for how vertices and pins will look in the workspace. (v1.4.2)
12. Appearance of Bones
: Settings for how the bones will look in the workspace.
13. Rigging and Circular Vertices
: Setting how vertices are displayed during rigging
14. Unity Editor UI
: Options of UI related to AnyPortrait within Unity Editor.
15. Editor UI
: Options related to the UI that can be changed by the user in the editor. (v1.4.6)
16. Capture
: Options for the behavior of the screen capture tool (v1.4.6)
17. Shortcuts Settings
: Customizing shortcuts in the editor (v1.3.0)
18. Edit Mode Options
: Options for how the modifier works in edit mode, information displayed in the workspace, etc. (v1.3.0)
19. Advanced Settings
: You can set the actions of the editor.
The options are as follows.
- Whether the start screen is displayed when starting the editor
- Whether to check for the latest version
- Whether or not the feature prevents the laptop from overheating.
- Whether or not the ability to adjust the scene's Ambient color on bake is enabled
- Whether to switch to the "Controller tab" when selecting a modifier or animation clip
- Whether the temporary visibility of meshes will be restored automatically at the end of the task
- Whether the color of the newly added bone is set to be similar to the color of the parent bone
- When meshes are generated from a PSD file, whether to show a dialog asking whether to initialize the vertices of the mesh (v1.2.4)
- Whether to keep showing the button to change the view option in the workspace (from v1.3.0 the button moves to the view menu)
- If there is 1 image, whether that image will be set automatically when creating the new mesh (v1.3.0)
- Whether the animation's Auto-Keyframe function is automatically disabled at the start of work (v1.3.0)
- Depending on the situation, whether "Selection Lock" is turned on when editing mode is executed
- Whether to show a message to automatically change the Render Pipeline option when executing Bake if it does not match the project settings. (v1.3.5 / From Unity 2020)
- Whether the Visibility Preset is automatically disabled when selecting another object (v1.4.0)
- Whether the list automatically scrolls when selecting an object (v1.4.1)
- Whether the object can be moved immediately without clicking the gizmo when dragging after clicking the object (v1.4.2)
- When adding a modifier key to a control parameter, whether the value blended from existing keys will be set as the initial value. (v1.5.0)
20. Restore Button
: All settings are restored to their default values.
21. Export/Import Buttons
: You can export editor settings to a file, or import editor settings from a file. (v1.4.2)
Setting to prevent the laptop from overheating
1.1.6
Many users are using Unity with their laptops.
AnyPortrait basically takes full advantage of Unity's performance,
so we have received feedback from users that their laptop is getting hot and inconvenient to use.
On some devices, the degree of overheating is so severe that it can be difficult for users to work.
If you turn on the option added in v1.1.6, you can selectively limit the performance of the editor and prevent your laptop from overheating.
Select the Editor tab in the Settings dialog and turn on the "Optimize the editor's performance for laptops" option.
When the optimization option is turned on, the performance of the editor will be significantly reduced unless it is updated in real time.
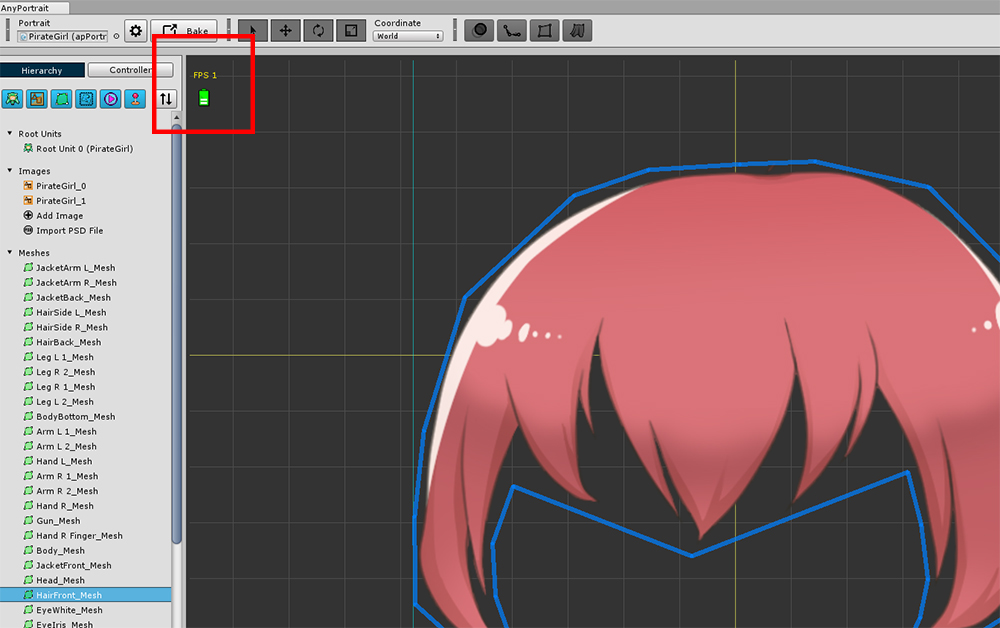
In situations where performance is limited, a green battery icon appears in the upper left corner of the workspace.
This option has the following characteristics:
- In all situations where an animation is played, the editor will behave the same as before.
- If you select a root unit, performance will be limited except when playing an animation or capturing a screen.
- When image, mesh, or control parameters are selected, performance is limited in all situations except editing Pivot.
- If you select a mesh group, performance is limited except when you select the Physics modifier or use the Blur tool.
- If you are editing an animation, performance is limited except when you are playing an animation or using the Blur tool.
- Physical effects and IK may behave somewhat unnaturally when performance is limited.
Bone and Rigging settings in the workspace
1.2.3
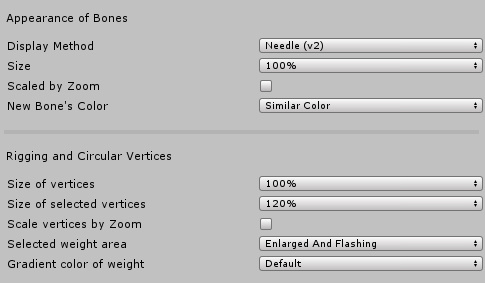
1. Appearance of Bones : These are options regarding the appearance of the bone.
- Display Method : Select "Arrowhead" or "Needle" to change the appearance of bones.
- Size : The size of the bone. As the value increases, the width increases.
- Scaled by Zoom : Determines whether the size of bones changes depending on the zoom of the workspace.
- New Bone's Color : When adding a bone, you can choose whether to have a color similar to that of the parent bone or have a completely different color.
- Preview of New Bones : When creating a bone, changes the preview of the bone that will be created with the mouse cursor position. (v1.4.2)
2. Rigging and Circular Vertices : These are options for the circular rigging weight vertices of the Rigging Modifier.
- Size of vertices : The size of the basic circular vertices.
- Size of selected vertices : The size of selected circular vertices.
- Scale vertices by Zoom : Determines whether the size of the circular vertices changes depending on the zoom of the workspace.
- Selected weight area : You can affect the area for the rigging weight of the selected bone. Selecting "Enlarged" will enlarge the size of the target area. Selecting "Flashing" make the target area flash.
- Gradient color of Weight : When displaying as the gradient color by weight value, not the color of bones, you can determine the color of the gradient. If you select "Default", the color combination used in the previous version will be displayed. If you select "Vivid" added in v1.2.3, a gradation of bright and easy to distinguish color combinations will appear.
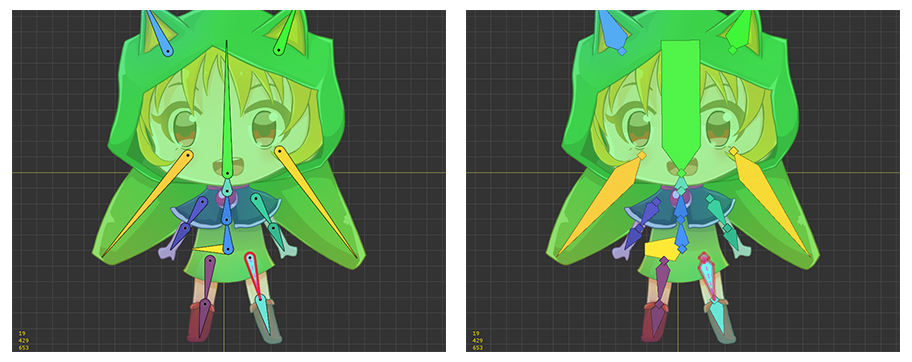
The above images are the appearance of the bone output in the form of a Needle and Arrowhead.
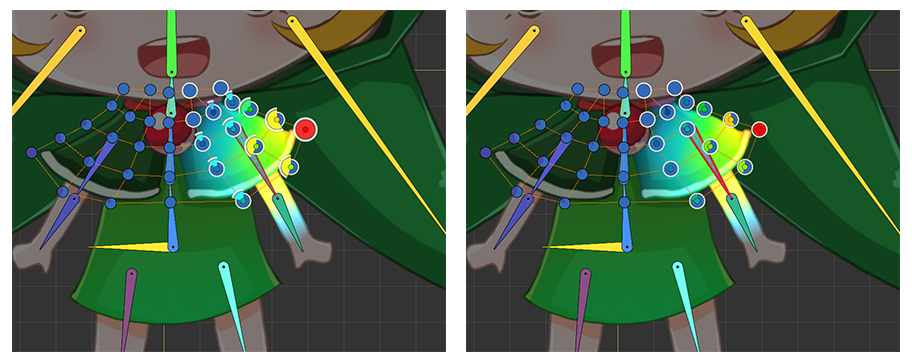
The above images show the effect added to the weighted area of the selected bone.
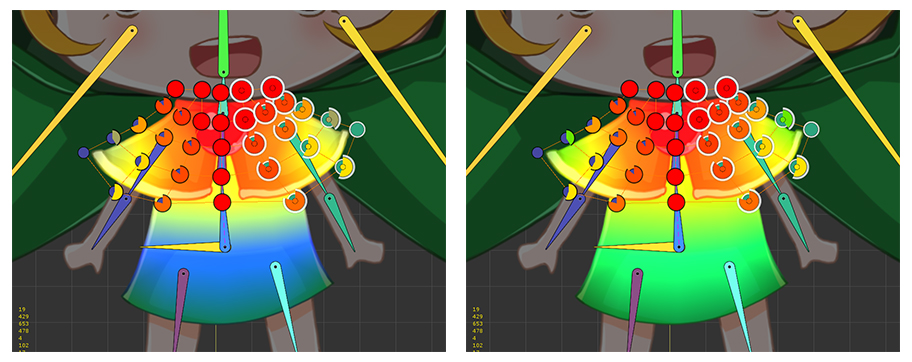
Gradient color for rigging weights. Default option is applied on the left and Vivid option is applied on the right.
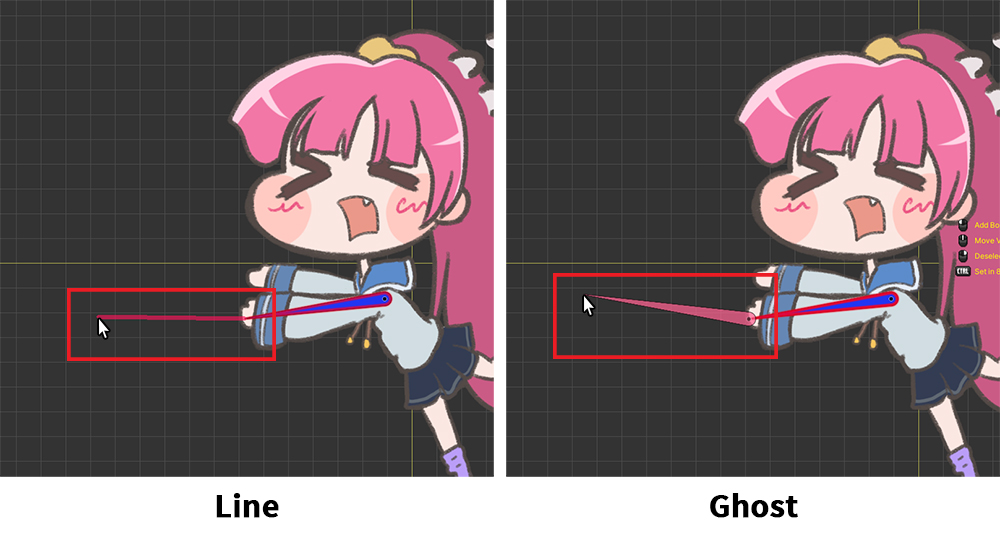
Among the preview appearances when creating bones, in the Line method, "Thick line" shows the position where the bone will be created, and in the Ghost method, "Translucent bone" appears instead.
Show icons in Hierarchy in Unity
1.3.4
A new option has been added to easily distinguish characters created with AnyPortrait in the Unity editor.
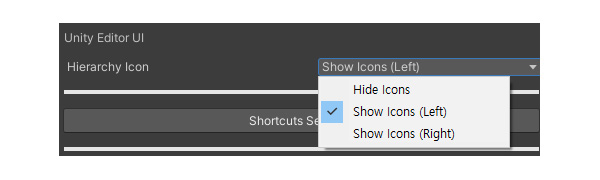
If you set the Hierarchy Icon option in the Editor tab, an icon is added to the Hierarchy tab of the Unity Editor.
- Hide Icons : Icons do not appear in the editor.
- Show Icons (Left) : Icons appear to the left of the object's name.
- Show Icons (Right) : Icons appear to the right of the object's name.
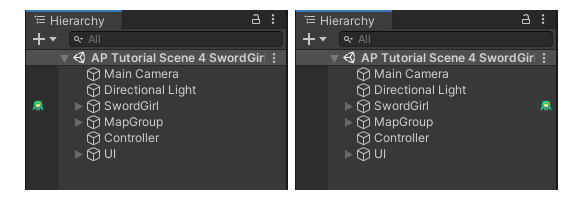
Setting the options makes it easy to find AnyPortrait characters in the Unity Editor's Hierarchy.
Resize the Control Parameter UI
1.4.0
When you try to edit using the control parameter UI located on the left side of the AnyPortrait editor, you may feel that the UI of the Vector type Control Parameter is small.
The new option for this case has been added in v1.4.0.
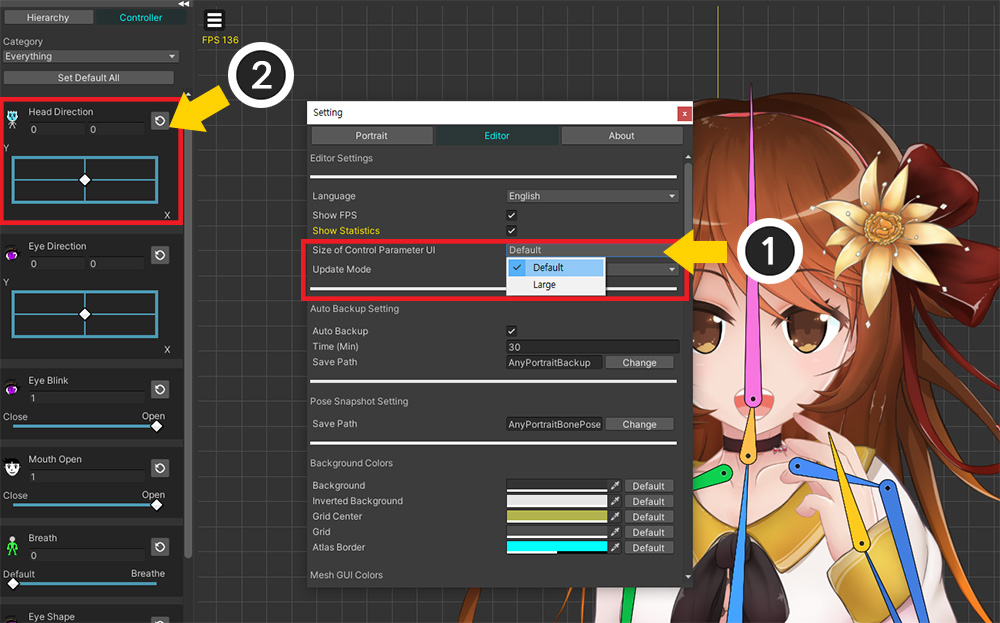
(1) The value of the Size of Control Parameter UI option is set to Default.
(2) As shown above, the Vector type Control Parameter UI is displayed rather narrow.
The UI above is convenient to view multiple Control Parameters at once, but is quite inconvenient to manipulate.
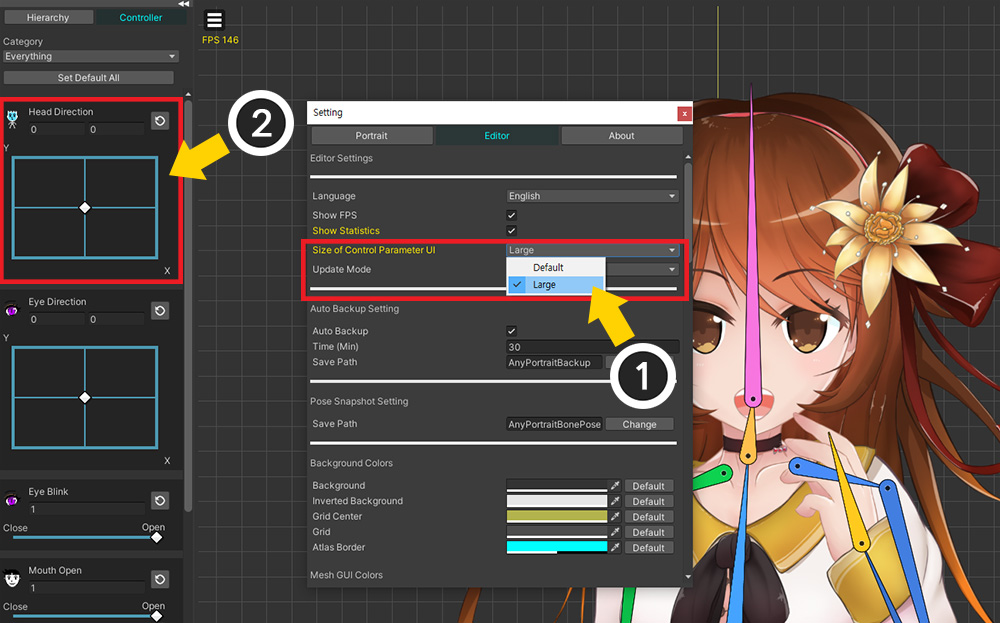
(1) Let's change the Size of Control Parameter UI option to Large.
(2) You can see that the height of the Vector type Control Parameter UI has grown considerably.
Now the UI will be convenient to use.
Size of vertices and pins
1.4.2

(1) By changing the Size option in Appearance of Vertices
(2) You can change the size of vertices or pins shown in the workspace.
This feature can solve the problem of vertices or pins looking too small at resolutions higher than AnyPortrait's native resolution of FHD (1080p).
Not only does the click range increase as the size increases, but if you're working on a high-resolution screen, the click range automatically expands a little further, regardless of the option.
Export editor settings to/import from file
1.4.2
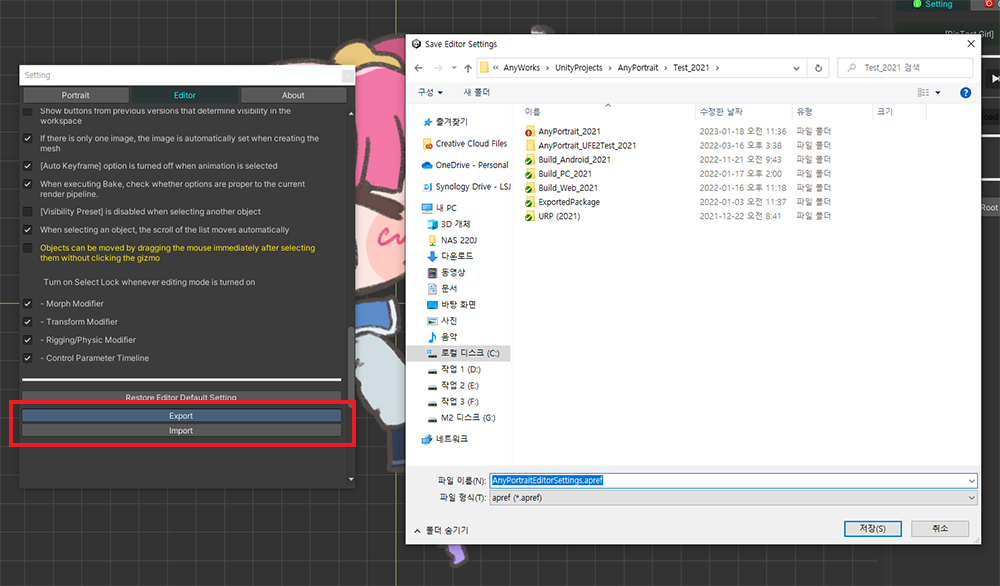
You may want to export the editor's settings to a file to copy to other development environments.
The export to file feature also includes hotkey settings.
There are Export and Import buttons at the bottom of the Editor tab.
- Export: Exports the current editor settings to a file.
- Import: Imports editor settings from a file.