AnyPortrait > Manual > Bone and Physics Components
Bone and Physics Components
1.6.2
Applying Unity's 2D physics system to characters would make games appear much more dynamic.
In particular, by adding Rigidbody components to character bones, you could achieve movement based on physics collisions.
Unfortunately, however, the compatibility between AnyPortrait's system and Unity's physics components is not very good.
Therefore, to apply physics component movement to AnyPortrait's skeletal structure, a workaround is necessary.
This page introduces the idea behind this workaround and then uses it to create a "script that detaches the arms of a robot character."
You can also apply the concepts presented on this page to create a "Ragdoll."
After reading the explanation on this page, check out how to implement ragdolls on Next page!
Note
The content on this page is based on Unity 6.2.
Implementation methods for scripts and components may vary depending on the version.
Create a character and compose a scene
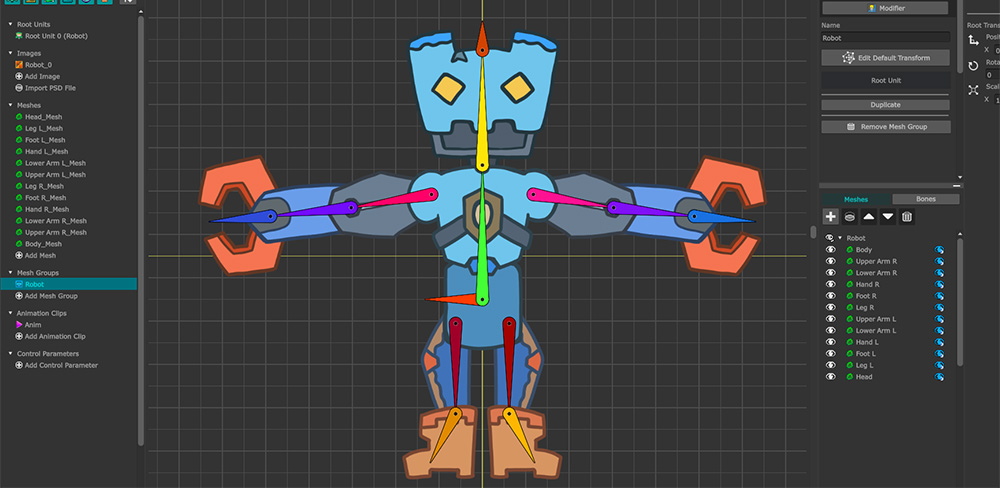
We created a robot character to be used on this page.
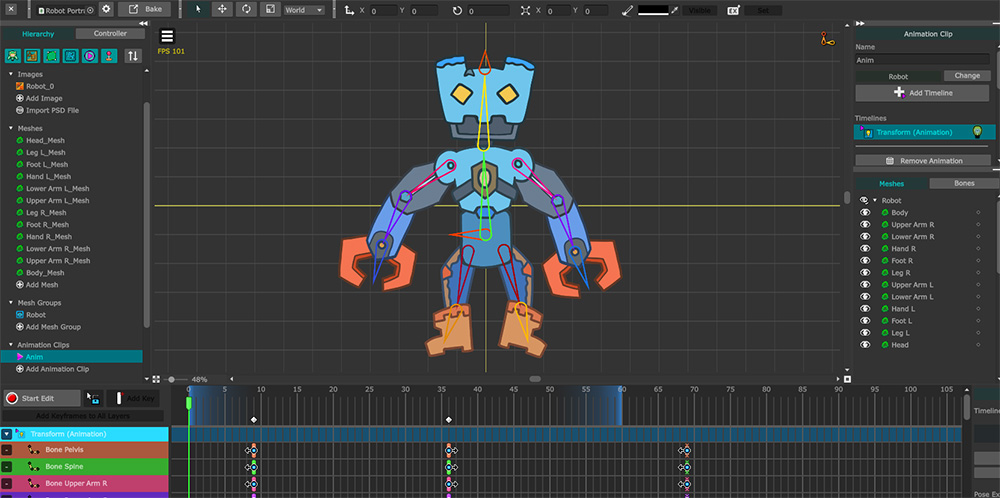
We created a simple looping animation called "Anim" using the Transform modifier.
And we set this animation to play automatically at game start on the root unit screen.
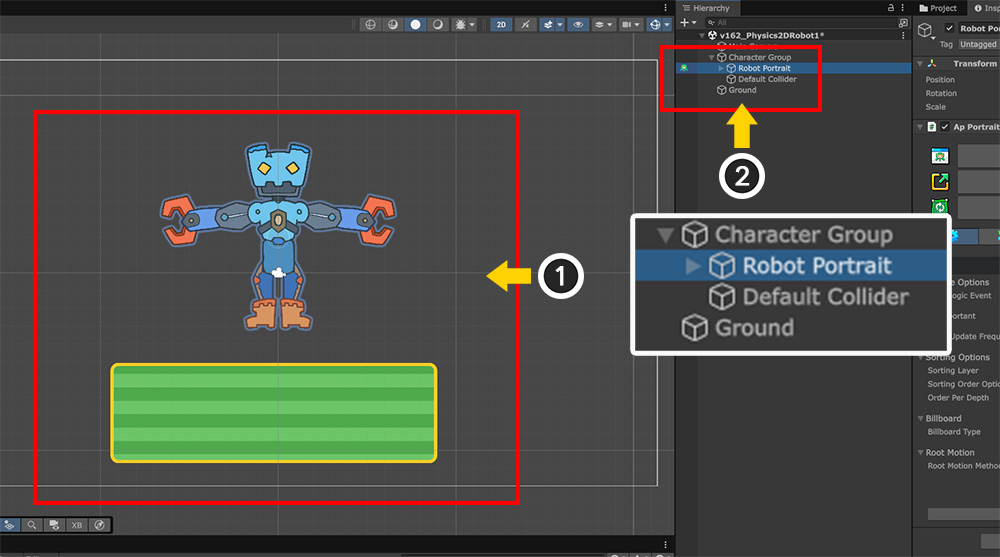
(1) Run Bake to place the character in the Unity scene and add a square sprite for physics collision testing.
(2) To implement basic physics effects on the character, add GameObjects as shown above and establish a parent-child relationship.
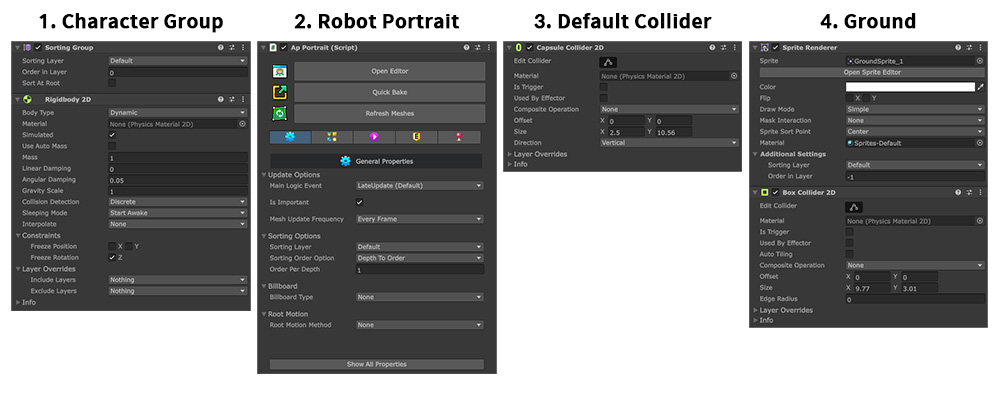
Add components according to the roles of the objects placed in the scene.
1. Character Group
This is the character's root object.
For characters, it's effective to separate objects based on their roles, separate from the character created with AnyPortrait.
Therefore, it's convenient to create a new GameObject as the parent of the AnyPortrait character and control it.
Add the "Sorting Group" and "Rigidbody 2D" components to allow the child objects to physically move.
2. Robot Portrait
This is a robot character created with AnyPortrait.
3. Default Collider
This object has a Collider component that corresponds to the collision area of the entire character.
The Collider component type can be chosen based on the character's shape.
Here, we used "Capsule Collider 2D."
If you add the Collider component to the "Character Group," this object is not needed.
4. Ground
A rectangle sprite located beneath the character.
It has a "Box Collider 2D" added so that falling characters can land on it.
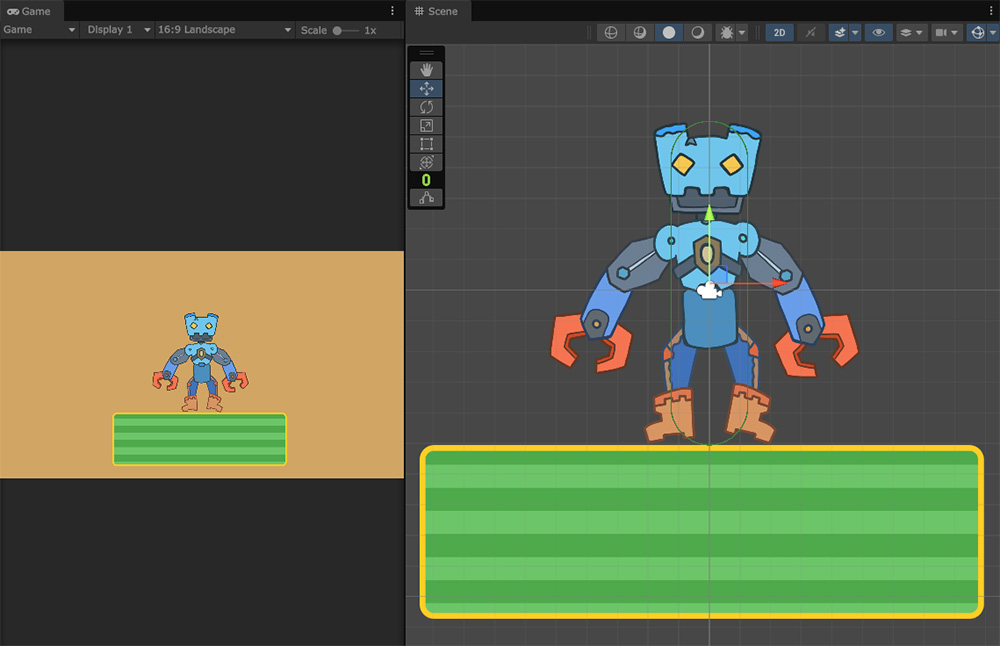
When you run the game, you'll see the character fall and land, as shown above.
Using Rigidbody and Collider, you can implement physical movement that matches the character's overall size.
Now we're ready to implement physical movement into the individual bones of our character.
Implementation idea
Before we actually write the script, let's take a moment to think about how we're going to implement it.
To apply physics effects to Unity's basic skeletal animation system, you can simply add a component to the corresponding GameObject bone.
However, this method doesn't work for characters created with AnyPortrait.
Therefore, you'll need to write a script to integrate with the physics component.
Writing a script to move a bone in AnyPortrait to a specific location isn't difficult. (Related page)
You need to write a script that calculates movement using physics components and passes the results to the character.
To do this, you need to address the following issues:
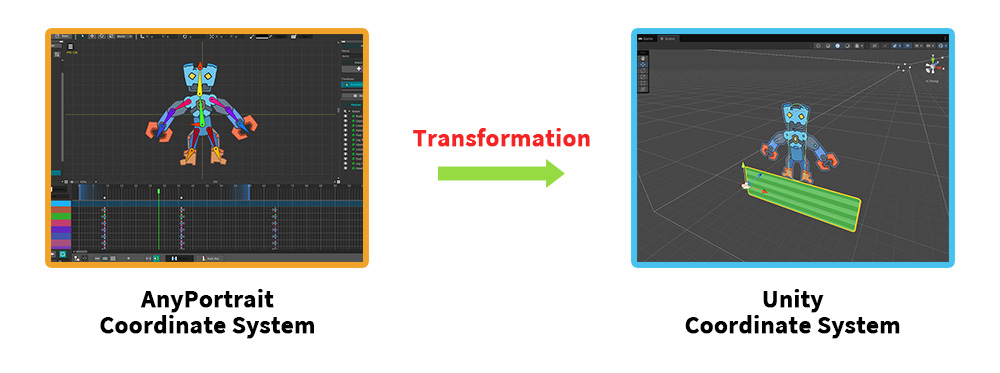
The biggest challenge is the difference between AnyPortrait and Unity's coordinate systems.
AnyPortrait has its own coordinate system, and rendering in Unity requires transformations.
This difference not only means different position values, but also means that AnyPortrait bone animations don't utilize Unity GameObjects.
This means that attaching physics components to the GameObjects corresponding to the bones within an AnyPortrait character won't work at all due to system-specific and coordinate-system issues.
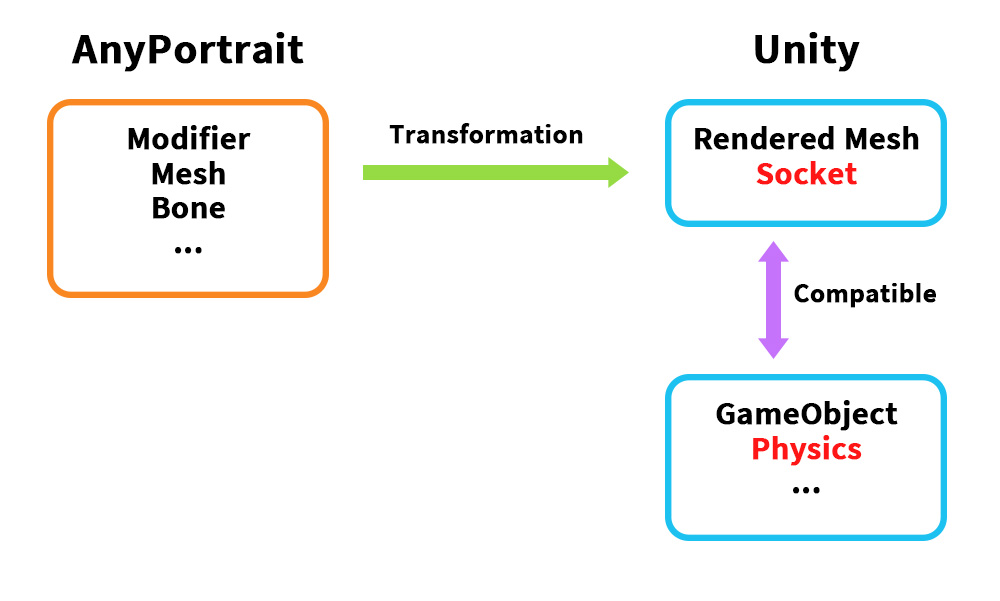
However, if we take a closer look at the coordinate system transformation process, integration is not completely impossible.
In particular, implementation is possible using the "Socket" (Related page).
Sockets are a feature originally designed to attach Unity objects to bones or meshes.
Because they are provided in the form of "Transforms," they are also ideal for integration with other Unity components, despite their original purpose.
However, simply attaching a physics component to a socket isn't enough to implement physical movement.
Sockets simply reflect the results of AnyPortrait animations, not the reverse.
Sockets, even if moved by a Rigidbody, won't be reflected in the character's animation.
Even if you want to apply the socket's position transformation to the character via script, it's difficult to implement stable physical movement due to issues with the script execution order.
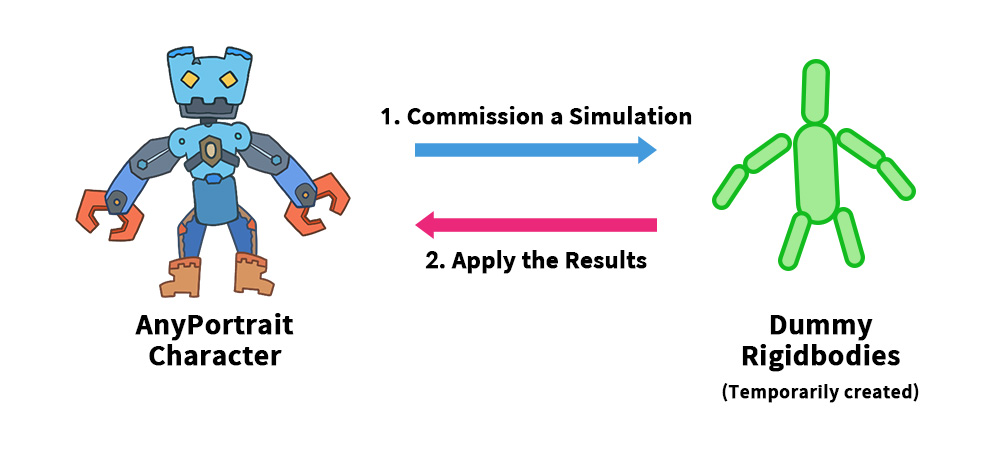
So, the solution we devised was to temporarily create a "Dummy object" that would perform the physical movements on behalf of the character.
We attached a physics component to the dummy object and delegated the physical movements to it.
We then wrote a script that would apply the dummy object's position and rotation to the character's bone every frame.
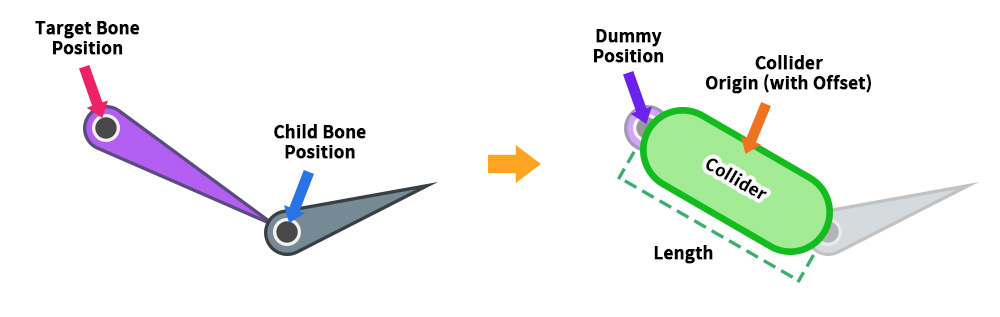
The first step in implementing this method is to create a dummy object with physics components that match the shape of the character's bone.
First, get the positions of the target bone and its child bones.
At this point, you can use Socket to find the bone's location.
Then, using the two locations, create a GameObject with a Collider and Rigidbody that connect the two locations.
The origin of the GameObject should be the same as the target bone's position, and the Collider's "Offset" and "Length" should be set appropriately.
This object will be a dummy object that simulates the target bone's physics movement.
Once the dummy object is created, its physical movement will be automatically handled by the physics component.
The next step is to apply the "dummy object's position or rotation" back to the AnyPortrait bone.
This can be done by calling apPortrait's "SetBonePosition" or "SetBoneRotation" functions in the Update function.
As shown above, you can integrate physics components using dummies.
Let's implement this idea in practice.
On this page, we'll create an example where a robot arm detaches and physically moves.
Make a detachable robotic arm
Let's make the robot's arm detach and physically move during the animation.
Before writing the script, let's edit the character.
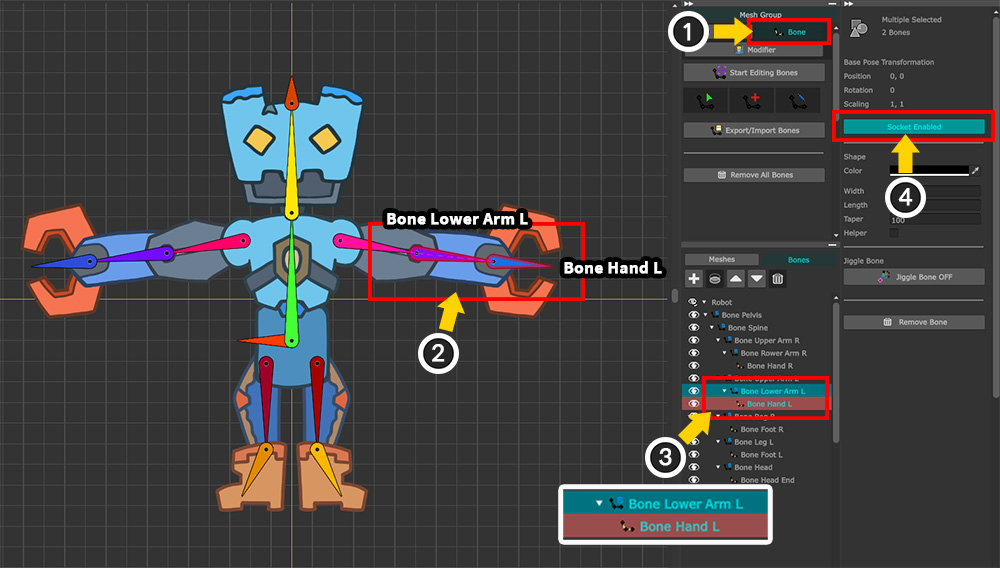
(1) Select the Bone tab.
(2) The bone corresponding to the arm to be separated is named "Bone Lower Arm L." Its child, "Bone Hand L," must also be referenced to calculate Collider lengths, etc.
(3) In the Hierarchy UI on the right, press Ctrl to select the target bone and all its children.
(4) Activate the Socket option.
Why child bone is used
In the AnyPortrait workspace, bones appear as long needles.
However, this is for convenience; in reality, bone end points are not treated as valid data.
Therefore, to reference bone's end points in the Unity scene, we have to use "a child bone."
If the target bone has two or more child bones, select the bone corresponding to the end point of the bone.
Conversely, if there are no child bones, be sure to add at least one child bone.
Once the above steps are complete, run Bake.
Then, write the script as follows:
using UnityEngine;
using AnyPortrait;
public class v162_DetachBoneScript : MonoBehaviour
{
// Target Portrait
public apPortrait portrait;
// Generated dummy object for the physics simulation
private Transform _detachedDummy = null;
void Start() { }
void Update()
{
// Pressing the A key will detach the bone and apply physics simulation.
if (Input.GetKeyDown(KeyCode.A))
{
MakeDetachedBone();
}
// Pressing the S key will revert it back to normal.
if (Input.GetKeyDown(KeyCode.S))
{
// Replay the animation after removing the dummy object.
if (_detachedDummy != null)
{
Destroy(_detachedDummy.gameObject);
_detachedDummy = null;
}
portrait.Play("Anim");
}
// If a dummy object exists, the position and rotation of the physics-simulated dummy object are applied to the bone.
if (_detachedDummy != null)
{
Vector3 upVectorW = _detachedDummy.TransformDirection(Vector3.up);
float angleZ_W = Vector3.SignedAngle(Vector3.up, upVectorW, Vector3.forward);
angleZ_W += 90.0f;
portrait.SetBonePosition("Bone Lower Arm L", _detachedDummy.position, Space.World);
portrait.SetBoneRotation("Bone Lower Arm L", angleZ_W, Space.World);
}
}
// Create a dummy object with a Rigidbody2D and a Collider2D added to it to make it look like the bone is detached.
private void MakeDetachedBone()
{
// Prevent duplicate creation if a dummy object already exists.
if (_detachedDummy != null)
{
return;
}
// Create a dummy object using the positions of the "Bone Lower Arm L" and "Bone Hand L" bones.
Transform boneSocket = portrait.GetBoneSocket("Bone Lower Arm L");
Transform childBoneSocket = portrait.GetBoneSocket("Bone Hand L");
Vector3 worldPos = boneSocket.position;
float angleZ = Vector3.SignedAngle(Vector3.up, childBoneSocket.position - boneSocket.position, Vector3.forward);
// Create a dummy object and set its initial position and rotation.
GameObject dummyGameObject = new GameObject("Detached Dummy");
_detachedDummy = dummyGameObject.transform;
_detachedDummy.parent = null;
_detachedDummy.position = worldPos;
_detachedDummy.localRotation = Quaternion.Euler(0.0f, 0.0f, angleZ);
_detachedDummy.localScale = Vector3.one;
Rigidbody2D detachedRigidbody = dummyGameObject.AddComponent<Rigidbody2D>();
detachedRigidbody.mass = 1.0f;
// Set the size of the capsule collider using the distance between the bones.
float hingeHeight = Vector3.Distance(boneSocket.position, childBoneSocket.position);
float hingeWidth = hingeHeight * 0.5f;
CapsuleCollider2D capsuleCollider = dummyGameObject.AddComponent<CapsuleCollider2D>();
capsuleCollider.direction = CapsuleDirection2D.Vertical;
capsuleCollider.size = new Vector2(hingeWidth, hingeHeight);
capsuleCollider.offset = new Vector2(0.0f, hingeHeight * 0.5f);
// Apply initial forces to the dummy object to make it appear as if physics simulation is applied.
detachedRigidbody.AddForce(new Vector2(3.0f, 2.0f), ForceMode2D.Impulse);
}
}
Let's take a look at the main codes in the above script.
...
// If a dummy object exists, the position and rotation of the physics-simulated dummy object are applied to the bone.
if (_detachedDummy != null)
{
Vector3 upVectorW = _detachedDummy.TransformDirection(Vector3.up);
float angleZ_W = Vector3.SignedAngle(Vector3.up, upVectorW, Vector3.forward);
angleZ_W += 90.0f;
portrait.SetBonePosition("Bone Lower Arm L", _detachedDummy.position, Space.World);
portrait.SetBoneRotation("Bone Lower Arm L", angleZ_W, Space.World);
}
...
This code executes every frame in the Update function when a dummy object exists.
As the dummy object moves with the physics components, the physics simulation of the "detached arm" is performed and the results are passed to the AnyPortrait character's bone ("Bone Lower Arm L").
The bone's position is set by passing "_detachedDummy.position" to the bone using the "SetBonePosition" function.
The bone's rotation angle cannot be directly entered due to different coordinate systems.
Therefore, the angle must be calculated as shown in the code above and then applied using the "SetBoneRotation" function.
apPortrait's SetBonePosition and SetBoneRotation functions should be called within the Update function, not within LateUpdate.
This is because the bone doesn't move immediately when these functions are called; instead, the values requested by the AnyPortrait animation calculation for that frame are applied.
Therefore, they must be called before the AnyPortrait character is updated.
...
// Create a dummy object using the positions of the "Bone Lower Arm L" and "Bone Hand L" bones.
Transform boneSocket = portrait.GetBoneSocket("Bone Lower Arm L");
Transform childBoneSocket = portrait.GetBoneSocket("Bone Hand L");
Vector3 worldPos = boneSocket.position;
float angleZ = Vector3.SignedAngle(Vector3.up, childBoneSocket.position - boneSocket.position, Vector3.forward);
...
Above is the code for calculating the position and rotation angle of the target bone ("Bone Lower Arm L") when creating a dummy object.
First, use the "Socket" to retrieve the "Transform" corresponding to each bone.
For the position, you can directly reference the "Transform" position of the target bone, but the rotation angle must be converted as described above.
Apply the position and rotation angle calculated in the following GameObject creation code.
...
// Set the size of the capsule collider using the distance between the bones.
float hingeHeight = Vector3.Distance(boneSocket.position, childBoneSocket.position);
float hingeWidth = hingeHeight * 0.5f;
CapsuleCollider2D capsuleCollider = dummyGameObject.AddComponent<CapsuleCollider2D>();
capsuleCollider.direction = CapsuleDirection2D.Vertical;
capsuleCollider.size = new Vector2(hingeWidth, hingeHeight);
capsuleCollider.offset = new Vector2(0.0f, hingeHeight * 0.5f);
...
Here's the code for adding "Rigidbody2D" and "CapsuleCollider2D" to the dummy object.
To calculate the collider's size, we use the positions of the two bone sockets previously calculated.
However, since there's no way to accurately determine the collider's width, we've arbitrarily calculated it based on its height.
Please also note that the Y value of the collider's "Offset" is half its height.
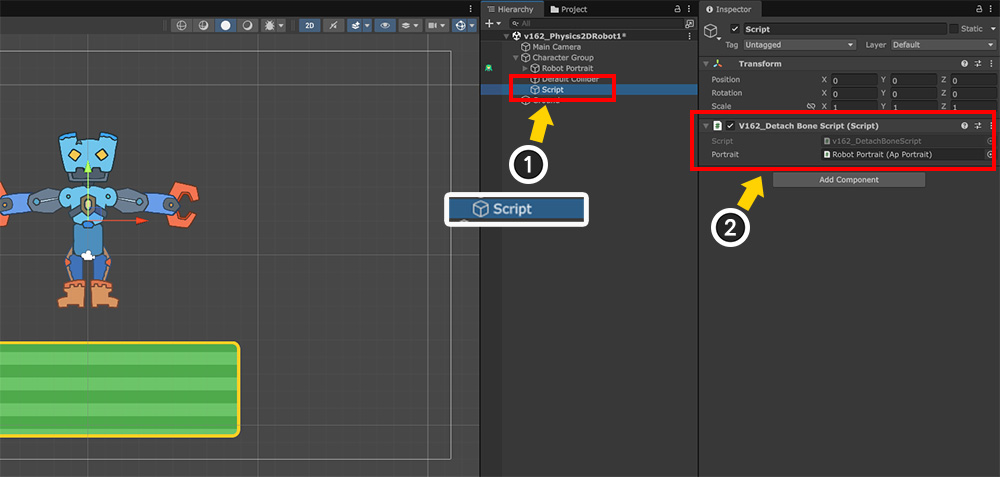
Once you've written all the scripts, return to the Unity scene.
(1) Create a GameObject to which you want to apply the script.
(2) After adding the script to the GameObject, assign the robot character to a member variable.
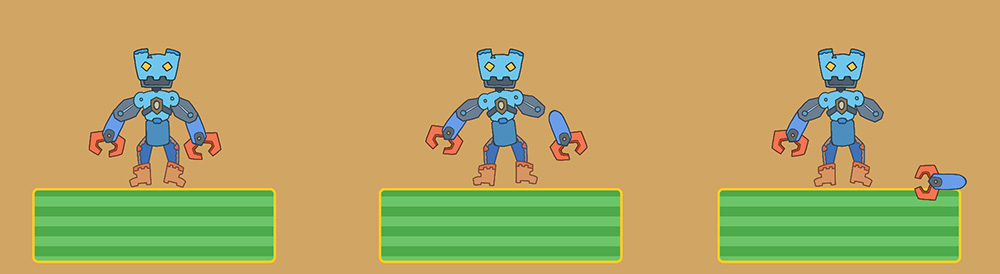
If you run the game and press A according to the script, you will see the arm detach and fall, as shown above.
You will also see the detached arm collide with the floor.
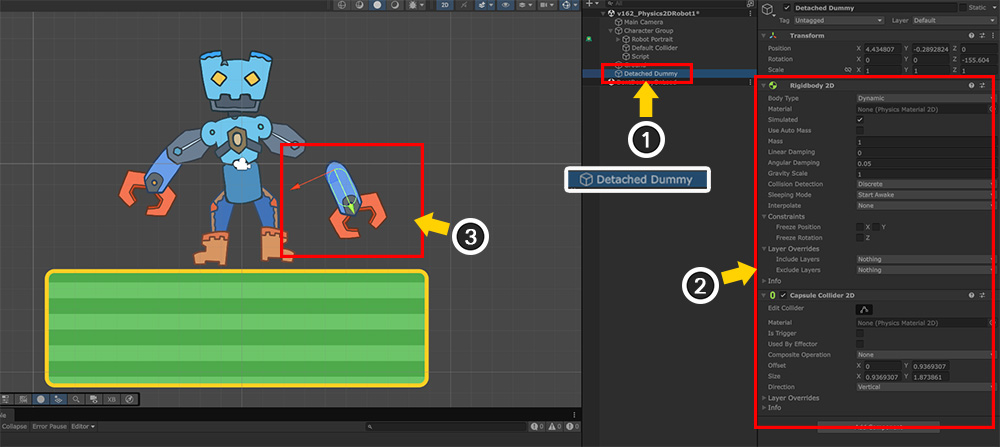
Let's examine what changes have occurred in the scene in this state.
(1) When the arm is detached, a "Dummy object" is created by the script.
(2) Rigidbody 2D and Capsule Collider 2D components are added to the dummy object.
(3) In the scene view, you can see the dummy object and the arm moving in sync.
Using the methods introduced on this page, you can apply physical movement to individual bones of a character.
Depending on how you create and configure the dummy objects, you can achieve a variety of effects.
Try out different techniques!