AnyPortrait > Manual > Implementing Ragdoll
Implementing Ragdoll
1.6.2
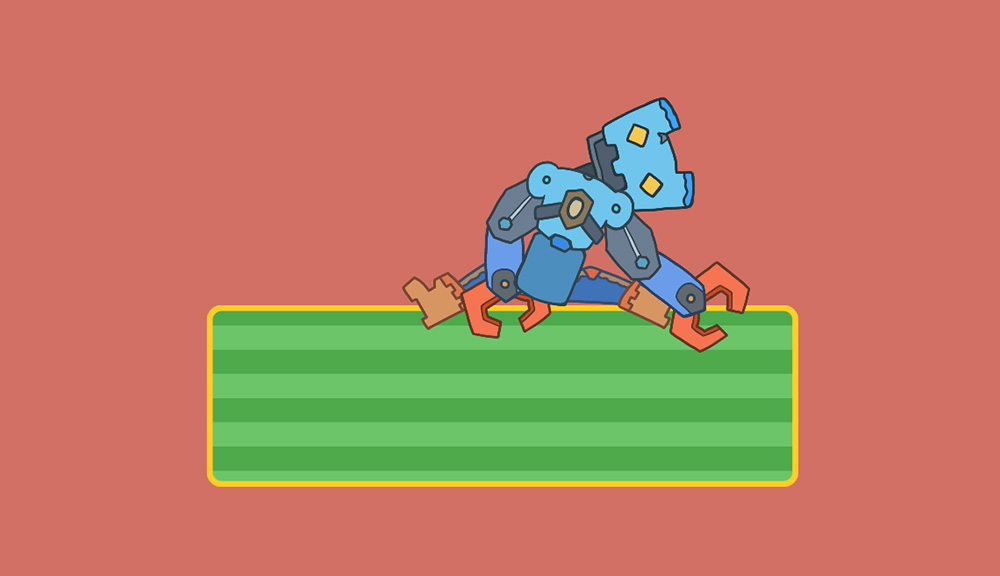
"Ragdoll" is a technique that makes a character move limply, like a stuffed doll.
The core of this technique is to add physics functions to each bone of the character, so that the character moves only by the physics engine.
To implement a ragdoll in Unity, you need to use physics components of the Joint type.
This page explains how to implement a ragdoll by connecting "Hinge Joint 2D" and other 2D physics components to bones.
First, we will explain how to apply the ragdoll effect to a single bone.
Then, we will explain how to apply a script developed by our team to implement the ragdoll effect on multiple bones.
Note
AnyPortrait requires special implementation details to link bones with physics components like Rigidbody.
Before reading the instructions on this page, we recommend reading the "Bone and Physics Components" (Link) manual.
Example 1. Linking a Hinge Joint 2D to a single bone
In our first example, let's apply a ragdoll effect to one of our robot's arms.
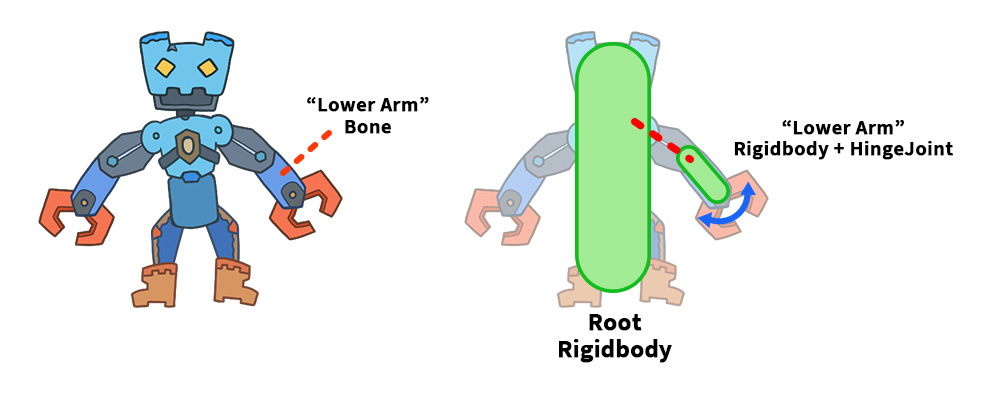
The best way to implement a ragdoll is to create a "dummy object" and add a "Hinge Joint 2D" component to it.
The added "Hinge Joint 2D" should be connected to the "Rigidbody 2D" component of the parent bone.
For this example, which doesn't have a parent bone, simply connect it to the "root GameObject."
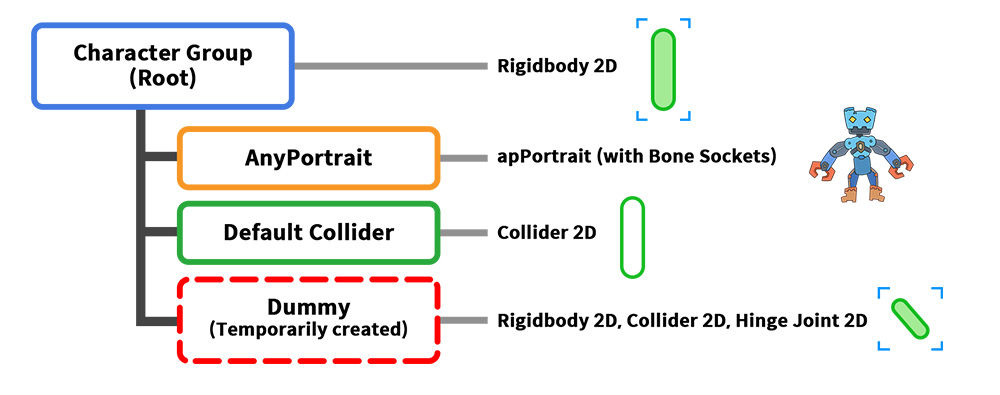
The character is structured as shown above.
1. Character Group: This is the root object for the entire character. It has a "Rigidbody 2D" component.
2. AnyPortrait: This character was created with AnyPortrait.
3. Default Collider: This is a collider object set to the size of the entire character.
4. Dummy: This is a dummy object temporarily created when the ragdoll effect begins. It corresponds to a robotic arm and has physics components, including a "Hinge Joint 2D."
Note that unlike the previous manual, the robot arm is dependent on the character's movement, so the "Dummy object" is included within the character group.
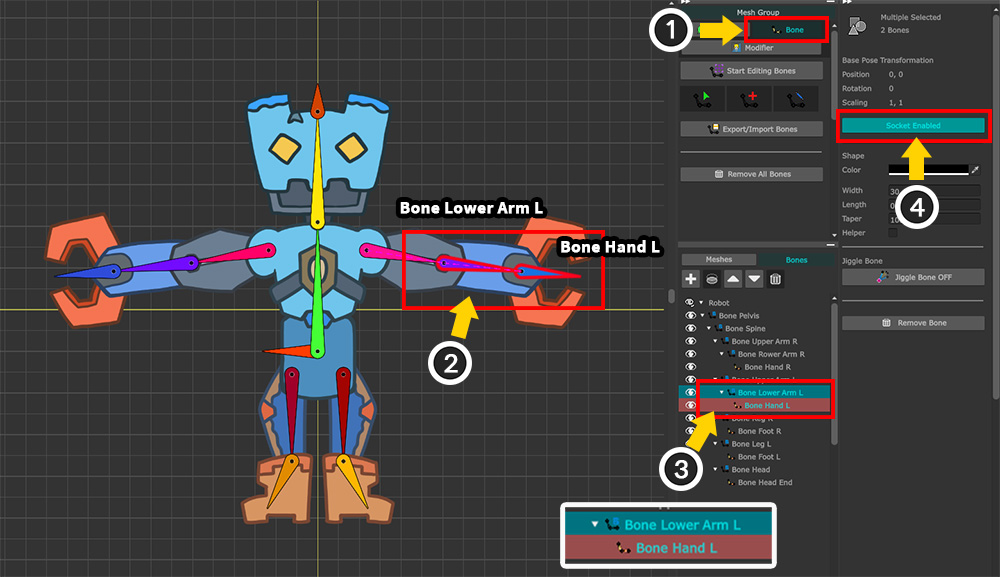
Before writing the script, activate the "Socket" function.
(1) Select the Bone tab.
(2) The target bone is "Bone Lower Arm L." To calculate the length of the bone, its child, "Bone Hand L," must also be referenced.
(3) Press the Ctrl key to select both bones.
(4) Click the "Socket" button to activate the socket.
Now run Bake and write the following script:
using UnityEngine;
using AnyPortrait;
public class v162_HingeJointScript : MonoBehaviour
{
// Parent objects of apPortrait with Rigidbody2D
public Transform characterTransform;
public Rigidbody2D rootRigidbody;
// AnyPortrait Character
public apPortrait portrait;
// A flag indicating the physics simulation status and a Rigidbody2D for the dummy object used in the simulation.
private bool _isSimulating = false;
private Rigidbody2D _dummyHingeRigidbody = null;
// Variable to store the initial position
private Vector3 _initPosition;
void Start()
{
// Save the initial position.
_initPosition = characterTransform.position;
}
void Update()
{
// Pressing the A key creates a dummy hinge, making it appear as if physics simulation is applied.
if (Input.GetKeyDown(KeyCode.A))
{
// Make a dummy hinge and start ragdoll simulation
MakeDummyHinge();
// Pause the animation
portrait.PauseAll();
// Release the constraints on the Rigidbody2D to allow the character to physically rotate.
rootRigidbody.constraints = RigidbodyConstraints2D.None;
}
// Pressing the S key will remove the dummy hinge and return it to its original state.
if (Input.GetKeyDown(KeyCode.S))
{
// Remove the dummy hinge.
RemoveDummyHinge();
// Reset the constraints of the Rigidbody2D to prevent the character from rotating.
rootRigidbody.constraints = RigidbodyConstraints2D.FreezeRotation;
// Reset the character's position and rotation to their initial state and plays the animation.
characterTransform.position = _initPosition;
characterTransform.localRotation = Quaternion.identity;
portrait.Play("Anim");
}
// Update the rotation of the "Bone Lower Arm L" bone using the position and rotation of the dummy hinge with physics simulation applied.
if (_isSimulating)
{
Vector3 upVectorW = _dummyHingeRigidbody.transform.TransformDirection(Vector3.up);
float angleZ_W = Vector3.SignedAngle(Vector3.up, upVectorW, Vector3.forward);
angleZ_W += 90.0f;
portrait.SetBoneRotation("Bone Lower Arm L", angleZ_W, Space.World);
}
}
void FixedUpdate()
{
// Correct the position of the dummy hinge with physics simulation applied.
if (_isSimulating)
{
Vector3 bonePosW = portrait.GetBoneSocket("Bone Lower Arm L").position;
Vector3 hingePosW = _dummyHingeRigidbody.position;
// If the distance between the bone and the dummy hinge is greater than a certain value, correct the position of the dummy.
if (Vector3.Distance(bonePosW, hingePosW) > 0.1f)
{
_dummyHingeRigidbody.MovePosition(bonePosW);
}
}
}
// Start the physics simulation by creating a dummy hinge.
private void MakeDummyHinge()
{
if (_dummyHingeRigidbody != null)
{
Destroy(_dummyHingeRigidbody.gameObject);
}
_dummyHingeRigidbody = null;
// Calculate the positions of the "Bone Lower Arm L" bone and the "Bone Hand L" bone.
Transform targetSocket = portrait.GetBoneSocket("Bone Lower Arm L");
Transform childSocket = portrait.GetBoneSocket("Bone Hand L");
Vector3 posL_Target = characterTransform.InverseTransformPoint(targetSocket.position);
Vector3 posL_Child = characterTransform.InverseTransformPoint(childSocket.position);
// Calculate the initial rotation value.
float angleZ = Vector3.SignedAngle(Vector3.up, posL_Child - posL_Target, Vector3.forward);
// Create a dummy hinge object and set it as a child of the character object, then set its initial position and rotation.
GameObject dummyHingeObj = new GameObject("DummyHinge");
Transform dummyHingeTransform = dummyHingeObj.transform;
dummyHingeTransform.parent = characterTransform;
dummyHingeTransform.localPosition = posL_Target;
dummyHingeTransform.localRotation = Quaternion.Euler(0f, 0f, angleZ);
dummyHingeTransform.localScale = Vector3.one;
// Add a Rigidbody2D and a CapsuleCollider2D to the dummy hinge.
_dummyHingeRigidbody = dummyHingeObj.AddComponent<Rigidbody2D>();
_dummyHingeRigidbody.mass = 1.0f;
// Set the size of the capsule collider using the distance between the bones.
float hingeLength = Vector3.Distance(posL_Target, posL_Child);
float hingeWidth = hingeLength * 0.3f;
CapsuleCollider2D hingeCollider = dummyHingeObj.AddComponent<CapsuleCollider2D>();
hingeCollider.direction = CapsuleDirection2D.Vertical;
hingeCollider.size = new Vector2(hingeWidth, hingeLength);
hingeCollider.offset = new Vector2(0f, hingeLength * 0.5f);
// Add a HingeJoint2D to the dummy hinge and connect it to the character's Rigidbody2D.
HingeJoint2D hingeJoint = dummyHingeObj.AddComponent<HingeJoint2D>();
hingeJoint.connectedBody = rootRigidbody;
hingeJoint.autoConfigureConnectedAnchor = false;
hingeJoint.anchor = Vector2.zero;
hingeJoint.connectedAnchor = posL_Target;
// Limit the rotation angle so that the dummy hinge only rotates within a certain range.
Physics2D.SyncTransforms();
JointAngleLimits2D angleLimits = new JointAngleLimits2D();
angleLimits.min = -30.0f + hingeJoint.jointAngle;
angleLimits.max = 30.0f + hingeJoint.jointAngle;
hingeJoint.limits = angleLimits;
hingeJoint.useLimits = true;
_isSimulating = true;
}
// Stop the physics simulation by removing the dummy hinge.
private void RemoveDummyHinge()
{
if (_dummyHingeRigidbody != null)
{
Destroy(_dummyHingeRigidbody.gameObject);
_dummyHingeRigidbody = null;
}
_isSimulating = false;
}
}
Most of the code is almost identical to the script introduced in the previous manual.
Let's examine the code related to the ragdoll implementation.
...
// Make a dummy hinge and start ragdoll simulation
MakeDummyHinge();
// Pause the animation
portrait.PauseAll();
// Release the constraints on the Rigidbody2D to allow the character to physically rotate.
rootRigidbody.constraints = RigidbodyConstraints2D.None;
...
This code requests the ragdoll simulation to begin.
It calls the "MakeDummyHinge" function, described later, and releases all constraints on the root object's Rigidbody 2D.
This allows us to create the movement of the character losing balance and falling.
It's important to note that we pause the character's animation by calling the "PauseAll" function.
Continuing the character's animation will cause the physics simulation to become very unstable, so please be sure to pause the animation.
...
// Update the rotation of the "Bone Lower Arm L" bone using the position and rotation of the dummy hinge with physics simulation applied.
if (_isSimulating)
{
Vector3 upVectorW = _dummyHingeRigidbody.transform.TransformDirection(Vector3.up);
float angleZ_W = Vector3.SignedAngle(Vector3.up, upVectorW, Vector3.forward);
angleZ_W += 90.0f;
portrait.SetBoneRotation("Bone Lower Arm L", angleZ_W, Space.World);
}
...
This code applies the movement of a dummy hinge object to the character's bones every frame.
For Hinge Joint 2D, only SetBoneRotation is called, as it is dependent on its parent and does not move independently.
void FixedUpdate()
{
// Correct the position of the dummy hinge with physics simulation applied.
if (_isSimulating)
{
Vector3 bonePosW = portrait.GetBoneSocket("Bone Lower Arm L").position;
Vector3 hingePosW = _dummyHingeRigidbody.position;
// If the distance between the bone and the dummy hinge is greater than a certain value, correct the position of the dummy.
if (Vector3.Distance(bonePosW, hingePosW) > 0.1f)
{
_dummyHingeRigidbody.MovePosition(bonePosW);
}
}
}
This is the code that differs most significantly from the previous manual.
In the "FixedUpdate" section, where physics calculations are performed, the dummy object's position must be adjusted to match the character's bones.
Normal, the AnyPortrait bones and dummy objects share the commonality of being dependent on their parent, so position adjustments are unnecessary.
However, even if the Hinge Joint 2D is set to be strongly connected to the parent, if too much force is applied or a collision error occurs, the dummy object will separate from its parent (in this case, the Character Group).
Therefore, if an error occurs while continuously comparing the position of the dummy object with the position of the bone, it's necessary to force compensation of the dummy object.
We've set the position difference detection to "0.1f".
If this value is set too small, the "MovePosition" function may be called too frequently.
Excessive "MovePosition" calls will affect the speed of the dummy object, resulting in unnatural movement.
Therefore, you should test and set an appropriate value.
...
// Create a dummy hinge object and set it as a child of the character object, then set its initial position and rotation.
GameObject dummyHingeObj = new GameObject("DummyHinge");
Transform dummyHingeTransform = dummyHingeObj.transform;
dummyHingeTransform.parent = characterTransform;
...
When creating a dummy object, unlike the previous manual, set it to be a child of "characterTransform", which corresponds to the root of the character.
...
// Add a HingeJoint2D to the dummy hinge and connect it to the character's Rigidbody2D.
HingeJoint2D hingeJoint = dummyHingeObj.AddComponent<HingeJoint2D>();
hingeJoint.connectedBody = rootRigidbody;
hingeJoint.autoConfigureConnectedAnchor = false;
hingeJoint.anchor = Vector2.zero;
hingeJoint.connectedAnchor = posL_Target;
// Limit the rotation angle so that the dummy hinge only rotates within a certain range.
Physics2D.SyncTransforms();
JointAngleLimits2D angleLimits = new JointAngleLimits2D();
angleLimits.min = -30.0f + hingeJoint.jointAngle;
angleLimits.max = 30.0f + hingeJoint.jointAngle;
hingeJoint.limits = angleLimits;
hingeJoint.useLimits = true;
...
Here's the code for adding a "Hinge Joint 2D" component to the dummy object.
Since there's no parent bone here, we'll attach it to the character's root object, "rootRigidbody."
If the ragdoll has a parent bone, we'll need to attach a Rigidbody corresponding to that parent bone.
Additionally, if you need to limit the dummy object's rotation angle, you can do so by writing the code as shown above.
Note that you must call "Physics2D.SyncTransforms()" before applying "JointAngleLimits2D."
Let's apply the script we've written to the scene.
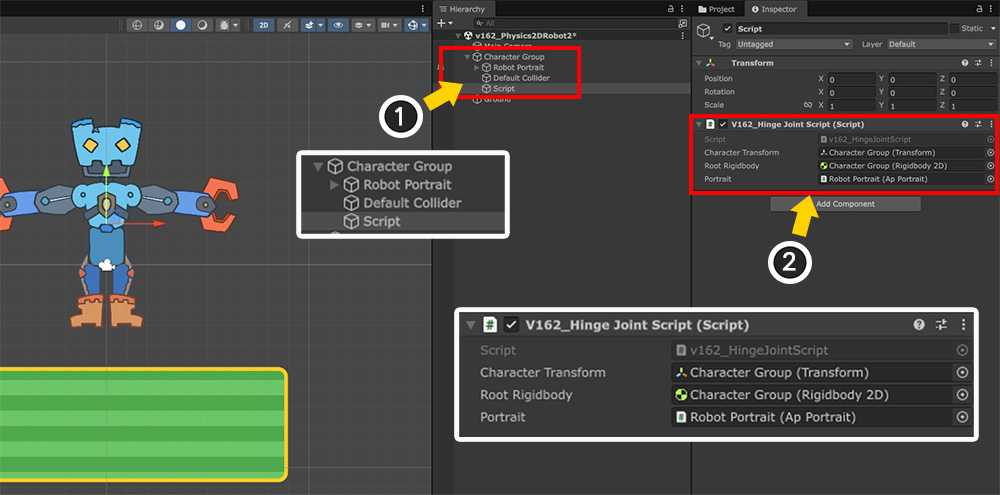
(1) Create a new GameObject.
(2) Add the script to the created GameObject and assign the appropriate objects to the member variables.
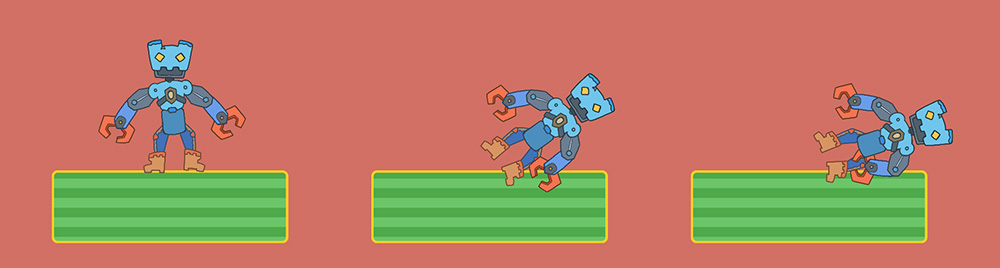
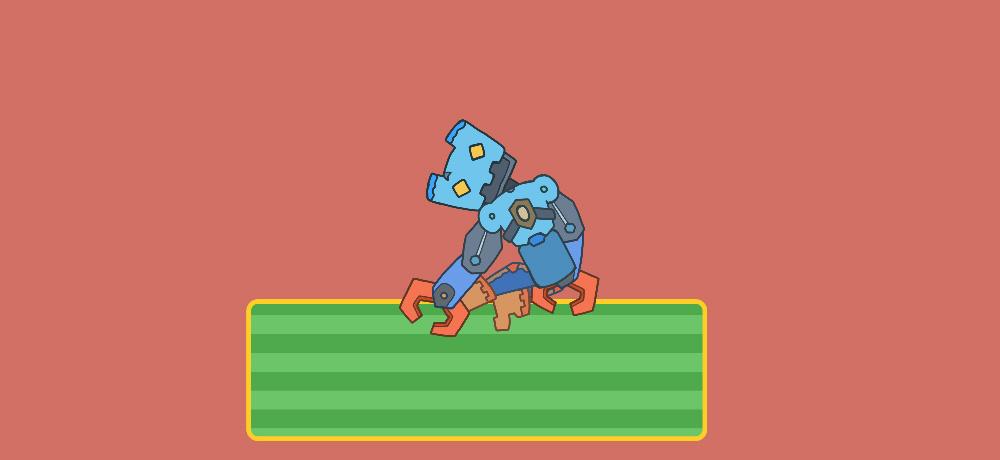
Let's run the game and press A as per the script.
You'll see the robot character stop its animation and fall to the side, as shown above.
You'll also see the robot's arm naturally bend as it falls.
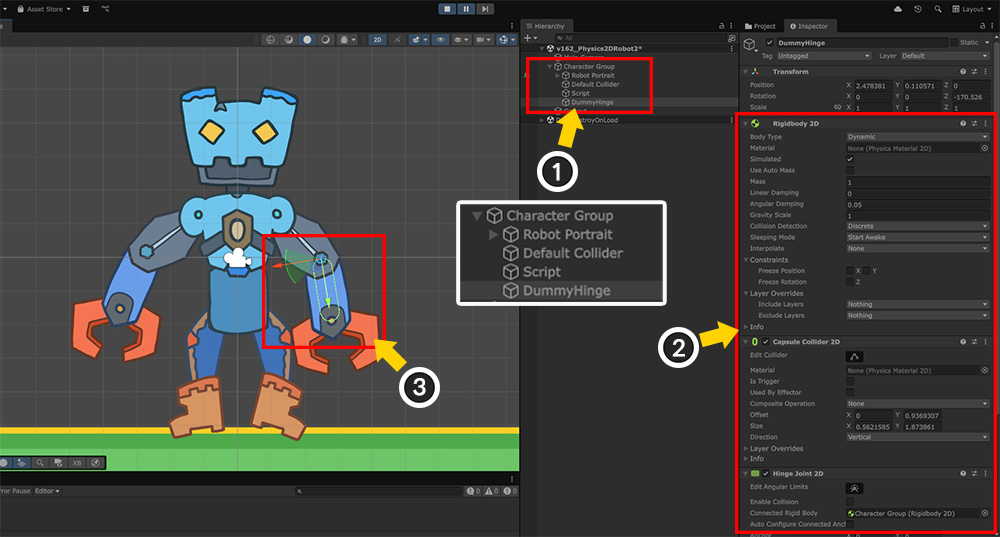
Let's pause the game at this point and see what happens.
(1) When ragdoll is activated, a dummy object named "DummyHinge" is created within the character group.
(2) This dummy object has the following components: "Rigidbody 2D," "Capsule Collider 2D," and "Hinge Joint 2D."
(3) You can see that the dummy object and physics components are created according to the target bone, and the bone moves in sync with the dummy object.
Example 2. Implementing a Ragdoll
By applying the method of linking a single bone with "Hinge Joint 2D" to other bones in a character, you can create a ragdoll.
You can modify the above script to create dummy objects for multiple bones and perform physics simulations.
However, the modified script is too large to be presented on this page, so we've provided a pre-written script.
- Download the Ragdoll Simulator Script
After downloading the Unitypackage file and importing it into your Unity project, a script will be added.
Let's use this script to create a ragdoll.
Note
The provided script is based on AnyPortrait v1.6.2 and Unity 6.2.
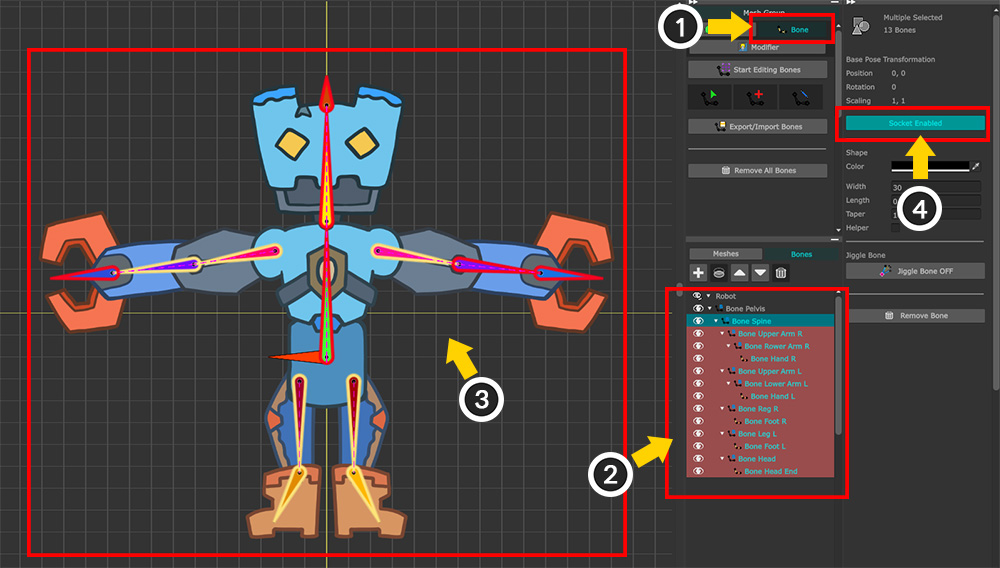
You need to prepare to create dummy objects for most of the bones of the robot character.
(1) Select the Bone tab.
(2) Press Shift or Ctrl to select most of the bones. Also, select the child bones of the target bones.
(3) Almost all of the bones should be selected.
(4) Activate the "Socket" option for all selected bones.
Note
In this example, we excluded the root bone, "Bone Pelvis," from selection.
This is because the root bone and mesh are not connected, and the root object ("Character Group") takes over that role.
Since each artist's character structure will vary, you should configure and implement it appropriately for your character's structure.
After performing Bake, return to the Unity scene.
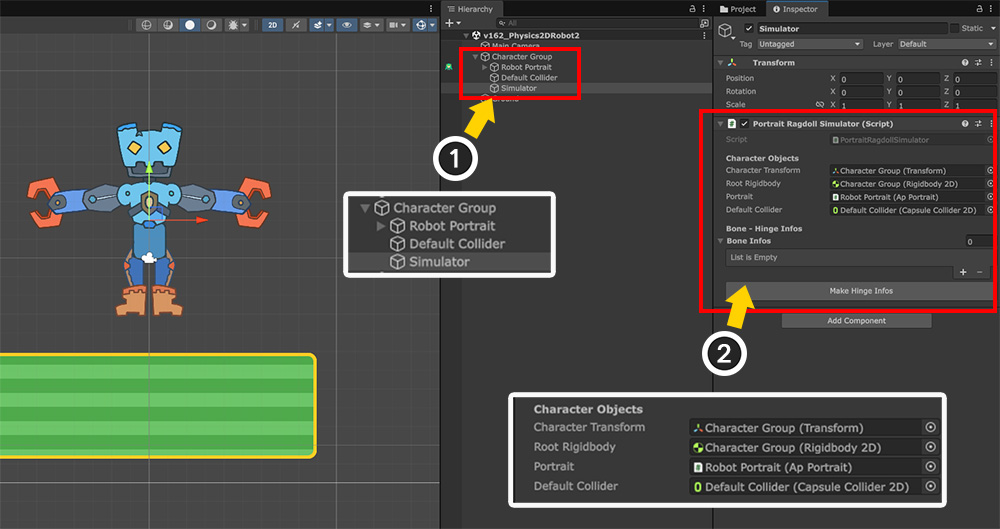
(1) Create a new GameObject.
(2) Add the downloaded "Portrait Ragdoll Simulator" script to the created GameObject.
(3) Assign the appropriate objects to the member variables of the "Character Objects" section.
This script creates a dummy object based on the bone information entered in the "Bone Infos" field.
You could memorize the names of all the bones in your character and enter them one by one, but that would be too cumbersome.
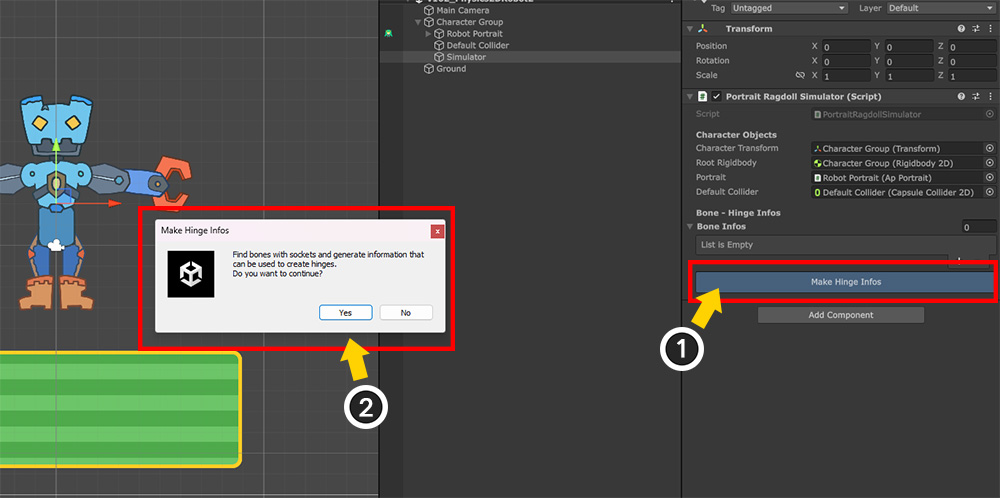
Therefore, we implemented a function that automatically finds all bones with the socket option enabled and enters their information.
(1) Click the "Make Hinge Infos" button.
(2) A dialog box will appears. Click the Yes button.
Information will be automatically filled in for bones with the socket option enabled.
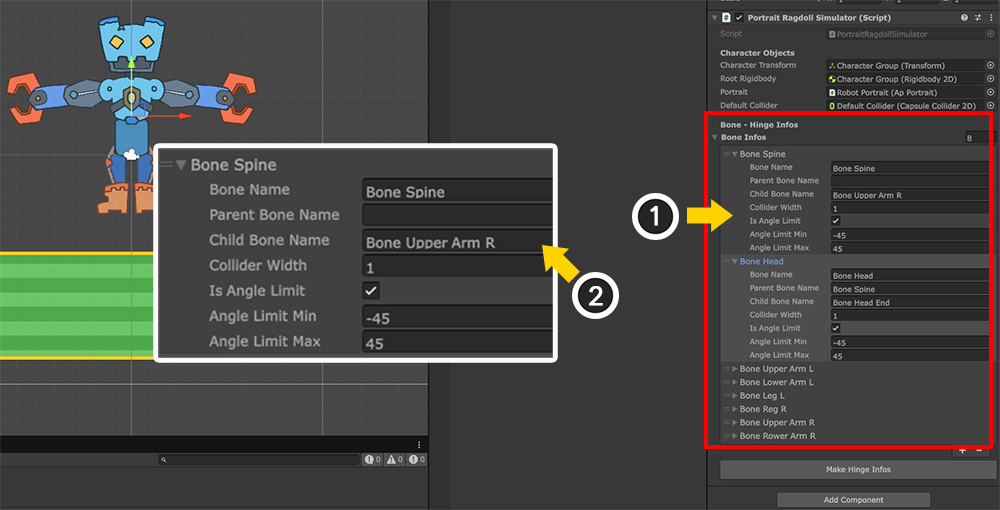
However, due to the structure of the bones, some information may be entered incorrectly, so please check each bone individually.
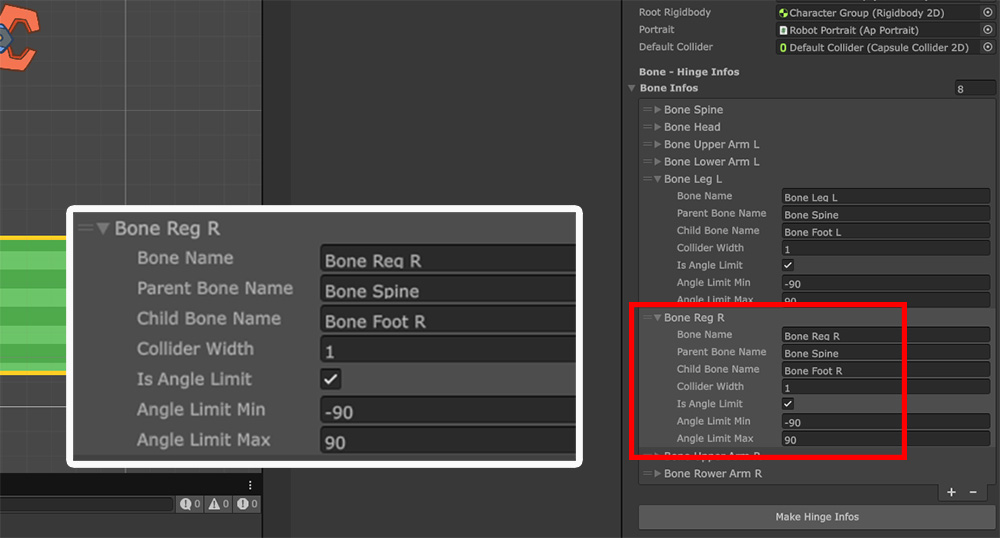
(1) For example, in this character, some items in the "Bone Spine" field are entered incorrectly.
(2) The "Child Bone Name" field contains "Bone Upper Arm R." If this is entered, the dummy object corresponding to the torso will be created tilted toward the right shoulder.
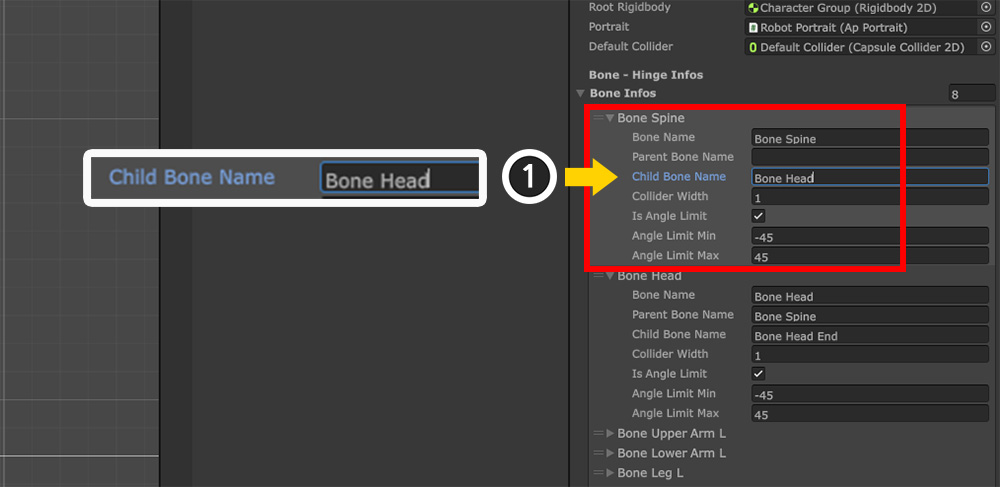
(1) Please enter the name of your own “Bone Head” corresponding to the end point of “Bone Spine” directly in "Child Bone Name".
The "Bone Info" options contain the following:
1. Bone Name: The name of the target bone from which the dummy bone will be created.
2. Parent Bone Name: The name of the parent bone to be connected as the parent of the "Hinge Joint 2D." If no parent bone is specified, it will be connected to the character's root object.
3. Child Bone Name: The name of the child bone referenced to calculate the position of the target bone's end point. This cannot be empty; the child bone closest to the target bone's end point must be entered for the collider to be created properly.
4. Collider Width: Specifies the width of the collider, i.e., the X value of the Size.
4. Is Angle Limit: You can limit the rotation range of the dummy object.
5. Angle Limit Min/Max: The rotation range of the dummy object. The range is specified based on the angle at the time of ragdoll creation.
Check other creation information and adjust the properties as appropriate.
Changing the rotation range as shown above will create a more natural ragdoll.
The simulator script doesn't work on its own.
Let's write a separate script to run the simulation.
using UnityEngine;
using AnyPortrait;
public class v162_RagdollScript : MonoBehaviour
{
// Parent object of apPortrait with Rigidbody2D
public Transform characterTransform;
// AnyPortrait Character and Ragdoll Simulator
public apPortrait portrait;
public PortraitRagdollSimulator ragdollSimulator;
// Variable to return to initial position
private Vector3 _initialPosition;
void Start()
{
// Initialize the physics simulator and AnyPortrait character.
portrait.Initialize();
ragdollSimulator.Initialize();
// Save the initial position.
_initialPosition = characterTransform.position;
}
void Update()
{
// Pressing the A key will start the ragdoll simulation.
if (Input.GetKeyDown(KeyCode.A))
{
// Pause the animation.
portrait.PauseAll();
// Start the ragdoll simulator.
ragdollSimulator.StartSimulate();
}
// Pressing the S key will stop the simulation and revert the character.
if (Input.GetKeyDown(KeyCode.S))
{
// Replay the animation.
portrait.Play("Anim");
// Stop the ragdoll simulator.
ragdollSimulator.StopSimulate();
// Resets the character's position and rotation to their initial state.
characterTransform.position = _initialPosition;
characterTransform.rotation = Quaternion.identity;
}
}
}
Before calling "ragdollSimulator.Initialize()", you have to first call "portrait.Initialize()" to properly initialize the simulator.
Afterwards, use the "ragdollSimulator.StartSimulate()" and "ragdollSimulator.StopSimulate()" functions to start or stop the simulator.
When running the ragdoll simulator, please pause the animation.
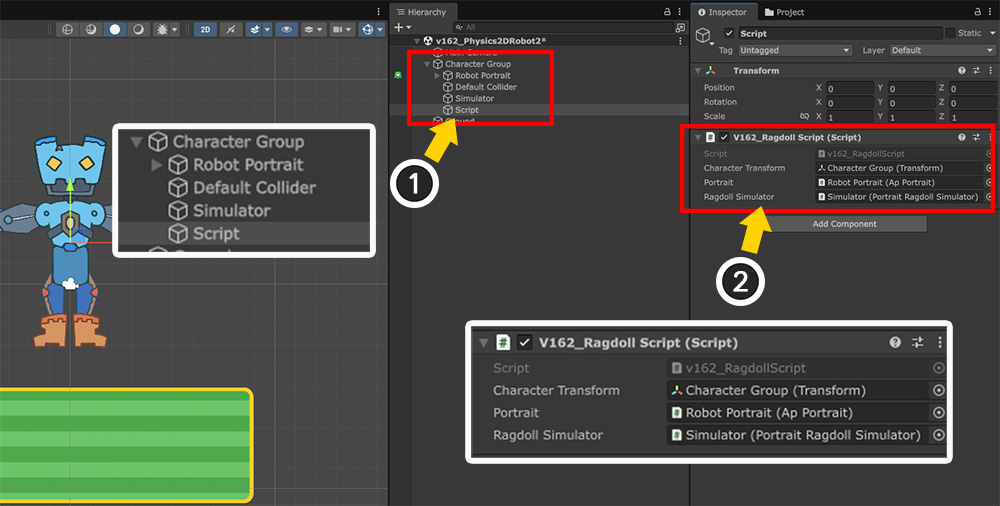
Now that we've written a script to run the ragdoll simulator, let's apply it to the scene.
(1) Create a new GameObject.
(2) Add the script we wrote and assign the appropriate targets to its member variables.
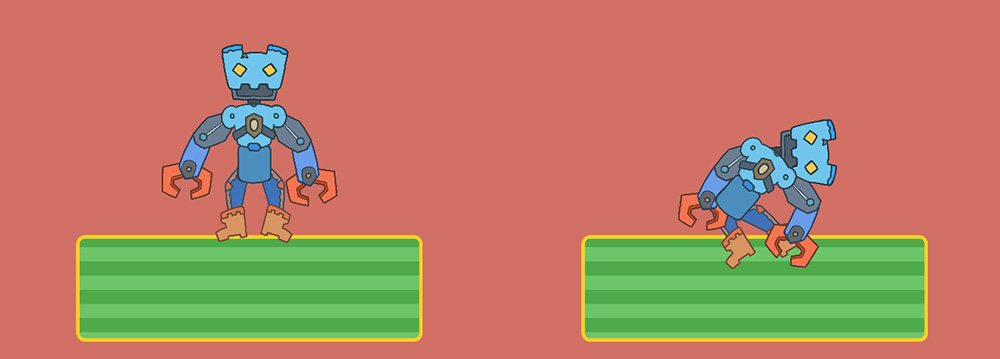
Now let's run the game.
Press A to activate the ragdoll, and you'll see the character fall helplessly to the ground.
Let's make a few more adjustments here.
It seems like the currently generated dummy objects are colliding with each other, causing the joints to rotate less.
Sometimes, depending on your intent, you may want to prevent a character's joints from colliding with each other.
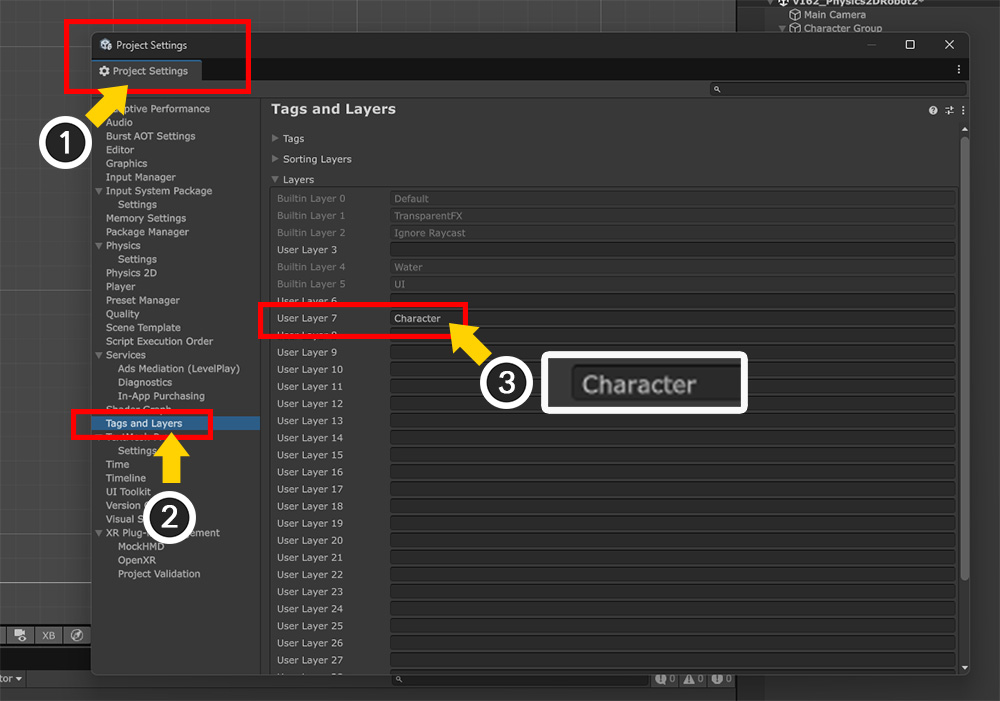
(1) Open Project Settings.
(2) Select Tags and Layers.
(3) Add a new layer specifically for the character to Layers. Here, we named it "Character."
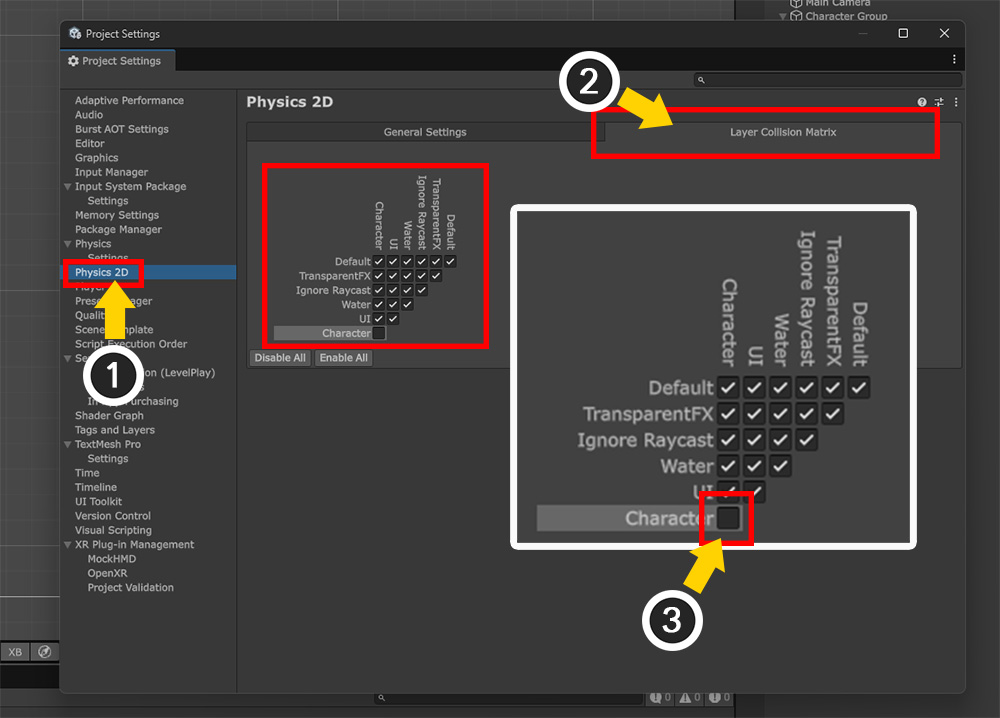
(1) Select Physics 2D in Project Settings.
(2) Select the Layer Collision Matrix tab.
(3) Uncheck "Character - Character" for collision between layers.
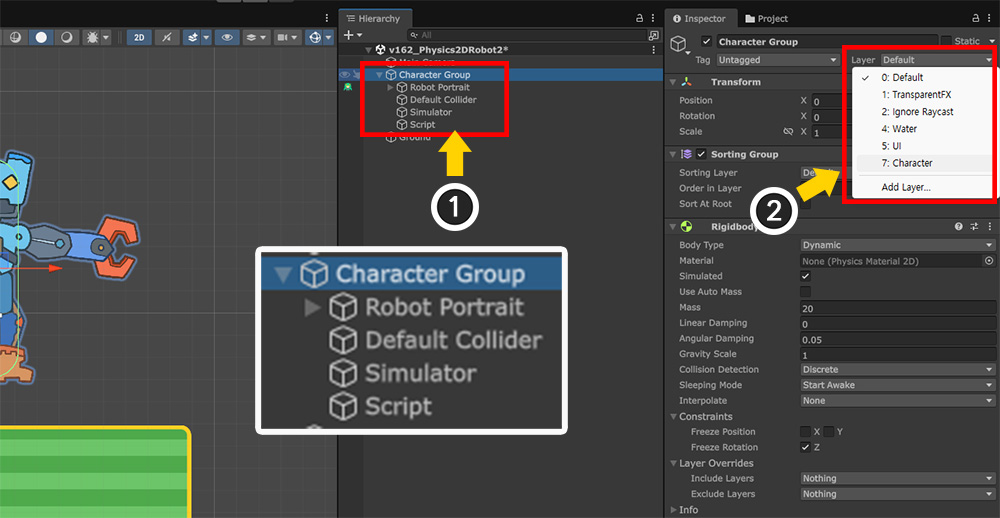
(1) Select the character's root object.
(2) Change the Layer to the "Character" you just added and apply it.
The ragdoll simulator script contains the following code, which causes the generated dummy objects to have the same layer value as the root object.
...
GameObject hingeGO = new GameObject(info.boneName + "_Hinge");
...
hingeGO.layer = characterTransform.gameObject.layer;
...
Now, let's run the game and turn on the ragdoll again.
You'll see that the character's joints bend more, as they no longer collide with each other.
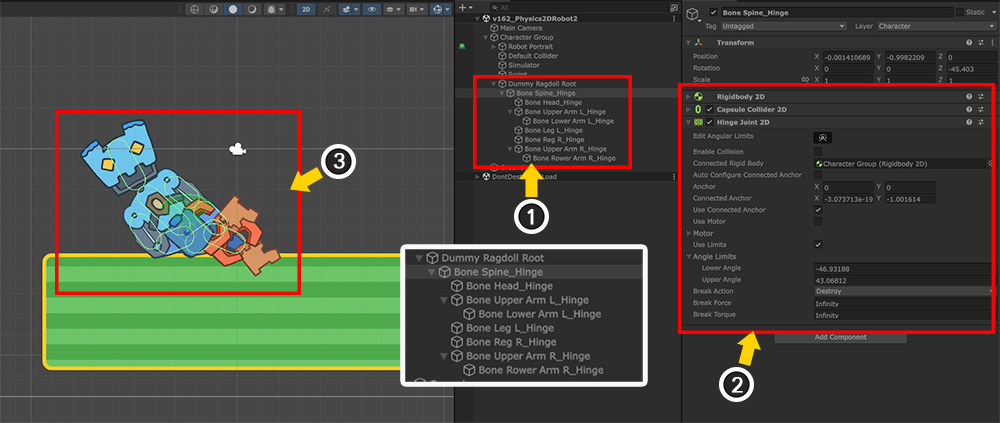
Finally, let's examine what happens in the scene when the ragdoll simulator is running.
(1) When the ragdoll simulator is turned on, dummy objects are created with a structure similar to the bone structure.
(2) Except for the "Ragdoll Root," each dummy object has Rigidbody 2D, Capsule Collider 2D, and Hinge Joint 2D components added.
(3) You can see that the character and dummy objects move in sync.
The provided script only provides basic functionality and doesn't fully support cases such as multiple root units.
We've provided detailed comments within the script, so you can modify it to suit your project.
Please provide feedback on this manual so we can improve its functionality for greater convenience.